Scanning Using the Shortcut Key
This registers the scan settings and the computer where scanned data will be saved to a shortcut key so that you can quickly perform a scan from [Home] screen on the control panel.
Required Preparations |
Make preparations such as installing the scanner driver (ScanGear MF) and application (Scan Utility) to the computer used as the save location. Preparing to Save Scanned Data to a Computer If the ScanGear MF screen appears on the computer used as the save location, close the screen. |
Registering the Scan Settings and a Computer as the Save Location in the Shortcut Key
Use the control panel to configure the settings. You cannot configure the settings using Remote UI from a computer.
1
On the control panel, select [Menu] in the [Home] screen, and press  . [Home] Screen
. [Home] Screen2
Press [Function Settings]  [Send] [Scan and Send Settings] .
[Send] [Scan and Send Settings] .3
Press [Shortcut Key Settings] [Register] .
[Register] .4
Press the shortcut key .
.5
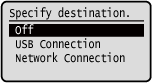
Select the method for connecting to the computer to be used as the save location, and press .
.
6
Select the computer to be used as the save location, and press .
.If you select [USB Connection] in step 5, proceed to step 7.
7
Select the scan type, and press .
.The scanned data format, the save location on the computer, and other settings are specified for each set of scan settings. The original is scanned according to the selected scan settings.
You can check and change the scan settings by using the Scan Utility on the computer used as the save location. Starting Scan Utility
For macOS, see the relevant driver and software manuals at the online manual site.
Checking Registered Save Locations and Scan SettingsPress [Shortcut Key Settings] [Confirm Destination] Shortcut key in step 3.Deleting Registered Save Locations and Scan SettingsPress [Off] in step 5. |

Using the Shortcut Key
1
Place the original. Placing Originals
2
 PC] in the [Home] screen , and press
 Scanning of the original starts.
When scanning is completed, the destination folder is displayed on the screen of the selected computer.
* By default, a subfolder with the scanning date is created in the [Documents] folder (Windows) or the [Pictures] folder (macOS), and the scanned data is saved to that folder.
* By default, a subfolder with the scanning date is created in the [Documents] folder (Windows) or the [Pictures] folder (macOS), and the scanned data is saved to that folder.
 When [*Scan Next:Press Start] appears
When an original is placed on the platen glass and is scanned, the screen for scanning additional originals is displayed.
To continue scanning originals, place them on the platen glass, and press .
.
Press [<Finish Scanning>] to save the scanned data.
To continue scanning originals, place them on the platen glass, and press
.Press [<Finish Scanning>]
to save the scanned data.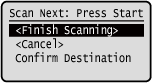
* If the size of the original is different, part of the image may be missing, or the image may be scanned smaller.