
A Message Appears
If a message appears on the control panel, select the message from the list below, and check how to troubleshoot the problem.
|
If the problem persists even after trying the troubleshooting methods, contact your dealer or service representative. If the Problem Persists |
Cannot analyze the authentication server certificate.
The certificate of the authentication server may not be correct, or it may be a format unsupported by the machine.
Check the Certificate of the Authentication Server, and Change the Setting, as Needed.
Cannot find any access point.
An error occurred, preventing the machine from detecting the Wi-Fi router (access point).
Is Connection Type Configured Correctly?
Select the connection type (WPS) according to the method supported by the Wi-Fi router. Connecting to a Wi-Fi by Using the Router Button (Push Button Mode)
Did You Connect Within the Fixed Time?
When connecting by pressing a button on the Wi-Fi router, set the connection type on the control panel of the machine, and then press the button on the Wi-Fi router within one or two minutes. Connecting to a Wi-Fi by Using the Router Button (Push Button Mode)
Are the SSID and Network Key Configured Correctly?
When entering the Wi-Fi router information manually, check the SSID and network key of the Wi-Fi router, and configure the settings correctly on the machine. Connecting to a Wi-Fi by Setting the Details (Manual Setup Method)
Are the Machine and Wi-Fi Router Located Appropriately?
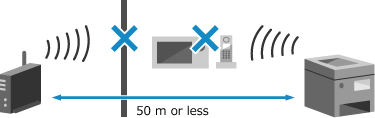
The machine and Wi-Fi router should be installed in a location without walls or other obstructions between the devices and within range of 50 m.
Do not install near a microwave oven, digital cordless telephone, or other device that generates radio waves.
Check the Security Settings of the Wi-Fi Router.
For details, see the manual of the Wi-Fi router or contact the manufacturer.
Cannot print. A non-Canon or counterfeit cartridge may be in use. *Close: Press OK
Printing cannot be performed due to the use of a toner cartridge whose print quality cannot be guaranteed.
Replace with a New Toner Cartridge.
For optimum print quality, using Canon genuine toner cartridges is recommended. List of Consumables
Cannot print RX data.
Received data cannot be printed for some reason.
Do the Cause and Solution Appear on the control panel?
If so, follow the instructions on the screen.
Is the Front Cover, Rear Cover, or Feeder Cover Open on the Machine?
Close the covers if they are open.
Is Paper Loaded?
Load paper if not loaded. Loading Paper
Is Paper Jammed?
If so, remove any jammed paper. Paper Jams
Have the Toner Cartridge Reached the End of Their Lifetime?
Check the remaining amount of toner in the toner cartridge, and replace any toner cartridge, as needed.
Checking the Remaining Amount of Consumables
Replacing the Toner Cartridge
Checking the Remaining Amount of Consumables
Replacing the Toner Cartridge
Cart. Comm. Error A counterfeit or non-Canon cartridge may be in use. *Close: Press OK
The toner cartridge is not installed correctly, the toner cartridge has malfunctioned, or the toner cartridge whose print quality cannot be guaranteed may be in use.
Reinstall the Toner Cartridge.
For optimum print quality, using Canon genuine toner cartridges is recommended. List of Consumables
If the message still appears after repeatedly reinstalling the toner cartridge, contact your dealer or service representative. If the Problem Persists
Cart. end of lifetime. Rplcmt. recommended.
The toner cartridge has reached the end of their lifetime.
It Is Recommended to Replace with New Toner Cartridge.
Cartridge Comm. Error Problems caused by non-Canon cart. not covered by warranty. *Close: Press OK
Printing cannot be performed due to incorrect installation of the toner cartridge, a damaged toner cartridge, or the use of a non-Canon toner cartridge, resulting in a communication error.
Reinstall the Toner Cartridge.
For optimum print quality, using Canon genuine toner cartridges is recommended. List of Consumables
If the message still appears after repeatedly reinstalling the toner cartridge, contact your dealer or service representative. If the Problem Persists
Change the authentication password.
The password has expired.
Set a new password.
Set a new password.
Check the authentication settings.
The authentication method set on the machine does not match that set on the RADIUS server.
Check the Authentication Method Set on the RADIUS Server, and Set This Correctly.
Cooling down... Wait a moment.
The machine is cooling down because the temperature inside the machine has risen. Wait a moment.
Could not connect.
An error occurred, preventing the machine from establishing a direct connection.
Wait a Moment, and Try Connecting Again.
If you still cannot establish a connection, restart the machine.
Set the IP Address for Connection to Something Other Than "192.168.22.xx".
The machine must be restarted to apply the settings.
Log in to Remote UI in Administrator Mode  [Settings/Registration] [Network Settings] [Direct Connection Settings] [Edit] in [IP Address for Direct Connection], enter the IP address [OK] restart the machine [Settings/Registration] [Network Settings] [Direct Connection Settings] [Edit] in [IP Address for Direct Connection], enter the IP address [OK] restart the machine |
On the control panel, select [Menu] in the [Home] screen, and then select [Preferences] to configure the setting. [Direct Connection Settings]
Is the Subnet Mask Configured Correctly?
Check the IPv4 subnet mask settings. Change the settings if they have not been configured correctly. For details, contact the network administrator.
Viewing the IP address set to the machine
Setting IPv4 Addresses
Viewing the IP address set to the machine
Setting IPv4 Addresses
Could not connect. Check the encryption key settings.
The network key (encryption key) of the Wi-Fi router (access point) is not configured correctly, preventing connection.
Reset the Network Key.
Check the network key of the Wi-Fi router, and configure the settings correctly on the machine. Connecting to a Wi-Fi
Could not connect. Device will restart.
An error occurred, preventing the machine from connecting in Access Point Mode. Alternatively, an error occurred when starting cableless setup mode.
Restart the Machine, and Start Cableless Setup Mode Again.
Administrator privileges are required.
[Home] on the control panel [Menu]  [Preferences] [Network] [Easy Connection via PC] start the settings on the computer [Preferences] [Network] [Easy Connection via PC] start the settings on the computer |
Could not connect. Max connections to access point reached
The maximum number of devices that can be connected to the Wi-Fi router (access point) has been reached, preventing connection.
Reduce the Number of Devices (Clients) Connected to the Wi-Fi Router.
For the maximum number of connections, see the manual of the Wi-Fi router or contact the manufacturer.
Could not connect using Wi-Fi.
An error occurred, preventing the machine from connecting to the Wi-Fi.
Restart the Machine, and Configure the Wi-Fi Connection Again.
Are the Machine and Wi-Fi Router (Access Point) Located Appropriately?
The machine and Wi-Fi router should be installed in a location without walls or other obstructions between the devices and within range of 50 m.
Do not install near a microwave oven, digital cordless telephone, or other device that generates radio waves.
Check the Security Settings of the Wi-Fi Router.
For details, see the manual of the Wi-Fi router or contact the manufacturer.
Could not connect using WPS.
An error occurred, preventing the machine from establishing a WPS connection.
Wait a Moment, and Configure the Settings Again.
If you still cannot establish a WPS connection, check whether the Wi-Fi router (access point) supports WPS.
If It Supports WPS
Check that the machine and Wi-Fi router are located appropriately.
The machine and Wi-Fi router should be installed in a location without walls or other obstructions between the devices and within range of 50 m.
Do not install near a microwave oven, digital cordless telephone, or other device that generates radio waves.
If It Does Not Support WPS
Connect using a different connection type. Connecting to a Wi-Fi
Could not detect any connections from wireless devices.
An error occurred, preventing the machine from detecting mobile devices.
Did You Connect Within the Fixed Time?
Connect the mobile device to the machine within five minutes of the SSID and network key being displayed.
Could not perform cleaning.
Cleaning could not be performed due to jammed paper, loading of incorrect paper, or another problem.
Is Paper Loaded?
Load paper in the paper drawer if not loaded. Loading Paper in the Paper Drawer
Is Paper Jammed?
If so, remove any jammed paper. Paper Jams
Direct Connection terminated.
The connection with a mobile device was terminated.
Directly Connect Again.
Easy Conn. via PC ended due to timeout Device will restart.
30 minutes have elapsed since the start of the cableless setup mode without connecting to the computer.
Restart the Machine, and Start Cableless Setup Mode Again.
Administrator privileges are required.
[Home] on the control panel [Menu] [Preferences] [Network] [Easy Connection via PC] start the settings on the computer |
End of Cart. Lifetime
The toner cartridge has reached the end of their lifetime.
It Is Recommended to Replace with New Toner Cartridge.
Replace the toner cartridge. Replacing the Toner Cartridge
IEEE 802.1X error. Cannot analyze auth. server certificate.
The certificate of the authentication server may not be correct, or it may be a format unsupported by the machine.Check the certificate of the authentication server, and change the setting, as needed.
Check the Certificate of the RADIUS Server, and Change the Setting, as Needed.
IEEE 802.1X error. Change the auth. password.
The password has expired.
Set a New Password.
IEEE 802.1X error. Check the auth. settings.
The authentication method set on the machine does not match that set on the RADIUS server.
Check the Authentication Method Set on the RADIUS Server, and Set This Correctly.
IEEE 802.1X error. Configure correct authentication info.
The authentication method or authentication information of IEEE 802.1X is not set correctly.
Set the Authentication Method and Authentication Information (Keys and Certificates, Password, CA Certificate) Correctly.
IEEE 802.1X error. Configure the info. required for auth.
The authentication method or authentication information of IEEE 802.1X is not set correctly.
Set the Authentication Method and Authentication Information (Keys and Certificates, Password, CA Certificate) Correctly.
IEEE 802.1X error. No reply from the destination.
The network connection may have a problem.
Check the Network Status and Settings.
Check the Ethernet cable and switch status.
Check the network key of the Wi-Fi router, and configure the settings correctly on the machine.
IEEE 802.1X error. The auth. server cert. has expired.
The server certificate sent from the RADIUS server has expired.
Check the Expiry Date of the RADIUS Server.
IEEE 802.1X error. The auth. server cert. is incorrect.
A CA certificate that supports the certificate of the authentication server is not registered to the machine.
Check the Certificate Information of the Authentication Server, and Register a Supported CA Certificate.
Setting IEEE 802.1X
Registering a Key and Certificate or CA Certificate Obtained from an Issuing Authority
Registering a Key and Certificate or CA Certificate Obtained from an Issuing Authority
IEEE 802.1X error. An unknown error occurred.
An error occurred, preventing the machine from establishing the IEEE 802.1X authentication connection.
Check the Ethernet Cable and Switch Status.
Set the Authentication Method and Authentication Information (Keys and Certificates, Password, CA Certificate) Correctly.
Check the Authentication Method Set on the RADIUS Server, and Set This Correctly.
Check the Expiry Date of the RADIUS Server.
Insert the toner cartridge.
The toner cartridge is not installed correctly.
Reinstall the Toner Cartridge.
If the message still appears after repeatedly reinstalling the toner cartridge, contact your dealer or service representative. If the Problem Persists
Low Cartridge Level
It is nearing the time to replace the toner cartridge.
Prepare New Toner Cartridge, and Replace the Old Ones, as Needed.
When printing large printing jobs, it is recommended to replace the toner cartridge. Replacing the Toner Cartridge
To Continue Printing, Press [Continue Printing]
|
You can manually specify when this message appears (when toner is low). [Displ. Timing for Cartridge Prep. Notif.] |
Mem. full. Check error w/Status Monitor key.
The memory is full with data that has not been printed due to an error.
Cancel Printing of the Data with an Error, or Press [<Skip Error>] on the [Status Monitor] Screen.
No Paper
There is no paper loaded, or the paper loaded cannot be used to print reports or lists.
Load the Paper.
Load the paper for printing reports, lists, and set the paper size and type. Loading Paper
No reply from the destination.
The Ethernet cable may not be connected or there may be a problem with the switch.
Check the Ethernet cable and switch status.
Check the Ethernet cable and switch status.
No response from host.
The machine is not connected correctly to the network.
Check the Settings of the Machine and Network, and Connect Again.
When Connected via Wi-Fi
Configure the settings correctly according to your usage environment. Connecting to a Wi-Fi
When Connected via Wired LAN
Check that the Ethernet cable is properly connected. Connecting to a Wired LAN
Paper jammed.
Paper jammed in the machine during printing.
Remove the Jammed Paper, and If Printing Does Not Resume Automatically, Try Printing Again.
Prepare a cartridge.
It is nearing the time to replace the toner cartridge.
Prepare New Toner Cartridge, and Replace the Old Ones, as Needed.
When printing large jobs, it is recommended to replace the toner cartridge. Replacing the Toner Cartridge
To Continue Printing, Press [Continue Printing]
|
You can manually specify when this message appears (when toner is low). [Displ. Timing for Cartridge Prep. Notif.] |
Problems caused by non-Canon cart. not covered by warranty. *Close: Press OK
An error occurred due to the use of a toner cartridge whose print quality cannot be guaranteed.
Replace with a New Toner Cartridge.
For optimum print quality, using Canon genuine toner cartridges is recommended. List of Consumables
Set the correct authentication information.
The authentication method or authentication information of IEEE 802.1X is not set correctly.
Set the Authentication Method and Authentication Information (Keys and Certificates, Password, CA Certificate) Correctly.
Set the information necessary for authentication.
The authentication method or authentication information of IEEE 802.1X is not set correctly.
Set the Authentication Method and Authentication Information (Keys and Certificates, Password, CA Certificate) Correctly.
Size/Settings Mismatch
The size of the paper loaded in the machine does not match that set on the control panel or printer driver.
Match the Size of the Loaded Paper with the Paper Size Setting.
When Using the Loaded Paper
Change the paper size setting on the control panel to match the size of the loaded paper.
Setting the Paper Size and Type for the Paper Drawer
Setting the Paper Size and Type for the Paper Drawer
When printing from a computer, change the paper size setting on the printer driver to match the size of the loaded paper. Printing from a Computer
When Reloading Paper
Load paper of the size set on the control panel or printer driver. Loading Paper
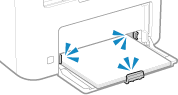
Check That the Paper Guides Are Aligned with the Markings and Are Not Too Loose or Too Tight.
The authentication server certificate has expired.
The server certificate sent from the RADIUS server has expired.
Check the Expiry Date of the RADIUS Server.
The authentication server certificate is incorrect.
A CA certificate that supports the certificate of the authentication server is not registered to the machine.
Check the certificate information of the authentication server, and register a supported CA certificate.
Setting IEEE 802.1X
Registering a Key and Certificate or CA Certificate Obtained from an Issuing Authority
Registering a Key and Certificate or CA Certificate Obtained from an Issuing Authority
The memory is full. Scanning will be canceled. Print?
Reading of the original cannot be performed due to insufficient available memory. Alternatively, all the pages could not be read when sorting and copying.
Divide the Original Before Copying.
Print up to the pages that were read or cancel the job, and then divide the original before copying.
Try Configuring the Setting as Follows.
[Home] screen on the control panel [Copy] [Original Type] [Text/Photo (High Speed)]. |
Memory is full. [Memory is full.] Is Displayed on the Control Panel, and the Operation Cannot Be Performed.
Printing cannot be performed due to insufficient available memory. If there is data waiting to be printed, wait until the processing is completed.
Reduce the File Size or Divide the File.
Optimize the file to make it smaller, or divide the file and then print it.
Incorrect number of characters/invalid characters entered.
The network key of the Wi-Fi router (access point) is not configured correctly on the machine.
Reset the Network Key.
Check the network key of the Wi-Fi router, and configure the settings correctly on the machine. Connecting to a Wi-Fi
Turn the main power OFF and ON. If the device does not recover, contact your dealer or service representative. *Next: Press OK
An error occurred in the machine.
Restart the Machine.
Turn OFF the power switch, wait at least 10 seconds, and then turn ON the power switch again.
Universal Print Cannot communicate w/server.
An error occurred, preventing communication with the Universal Print server.
The Machine Is Not Connected to the Network Correctly.
Check the machine and network settings, and try connecting again.
Could Not Communicate Because a Server Error Occurred.
Check whether the server is operating normally.
Communication with the Server Is Blocked Due to Firewall Settings.
Configure the firewall settings to allow communication.
Universal Print Internal error.
The printer stopped operating normally due to an unknown problem.
Restart the machine. If the message still appears after restarting the machine, make a note of the message and contact your dealer or service representative.
Restart the machine. If the message still appears after restarting the machine, make a note of the message and contact your dealer or service representative.
Universal Print Server authentication error.
An error has occurred during server authentication.
Restart the machine. If the message still appears after restarting the machine, make a note of the message and contact your dealer or service representative.
Restart the machine. If the message still appears after restarting the machine, make a note of the message and contact your dealer or service representative.
Universal Print The certificate has expired.
The expiration date of the certificate has expired.
Delete this machine from Microsoft Entra ID and the computer, re-register the machine, and then update the certificate.
Delete this machine from Microsoft Entra ID and the computer, re-register the machine, and then update the certificate.
Universal Print The printer is not registered.
This machine was deleted from Microsoft Entra ID and could not be communicated with.
Re-register this machine in Microsoft Entra ID.
Re-register this machine in Microsoft Entra ID.
Use Remote UI to set info. necessary for authentication.
The authentication method or authentication information of IEEE 802.1X is not set correctly.
Check the IEEE 802.1X Setting, and Set This Correctly.
Check the following, and change the setting, as needed. Setting IEEE 802.1X
The login name is specified correctly.
At least one of the following checkboxes is selected: [Use TLS], [Use TTLS], and [Use PEAP].
When using TLS, a key and certificate are registered.
When using TTLS or PEAP, the user name and password are set correctly.