85CR-009
How to Get the Most Accurate Colors Possible for Your Printouts
Use the following procedures to adjust colors if a spot color in a logo is not exactly reproduced, or if the colors on your printouts are not acceptable, for example.
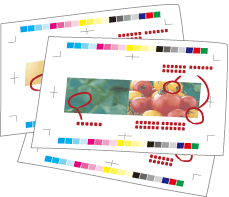
Eliminating the Basic Causes
Find the answers to your questions about how to solve your problems.
Do You Calibrate the Colors Periodically?
The density and tone of colors may change gradually as you print large volumes of pages, which means you cannot reproduce accurate colors. You need to calibrate the colors to solve the problem.
Remedy
See the following references to calibrate the colors periodically.
Are You Using an Appropriate Source Profile?
Select a source profile suitable for your printing purpose. If you use some other simulation profile, colors may change.
Remedy
Double-click the job in Command WorkStation, and click [COLOR] → [Color input]. The simulation profile currently set is displayed. Specify the appropriate simulation profile, if necessary.
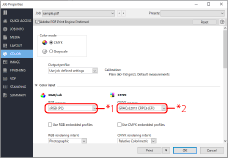
*1 Simulation profile for RGB/LAB
*2 Simulation profile for CMYK/Grayscale
Changing Print Settings for a Job with the imagePRESS Server
If you still have the same problem after you follow the procedures in "Eliminating the Basic Causes", change the print settings in Command WorkStation on the imagePRESS Server as follows. However, the adjustments described in this section change overall colors. If you want to change the colors of photos only, see "How to Print Clear Photos."
Printing a Spot Color Accurately
Try this procedure if you cannot reproduce a specified spot color. Registering spot colors in Command WorkStation on the imagePRESS Server ensures consistency and accuracy in color reproduction.
1
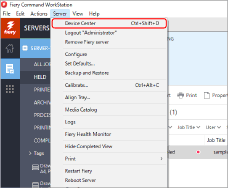
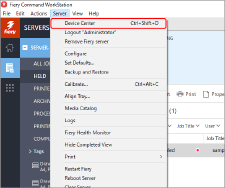
Click [Server] → [Device Center] in Command WorkStation.
The device center screen is displayed.
2
Click [Spot Colors] or [Spot Pro].
Depending on the activated option software, [Spot Colors] or [Spot Pro] is displayed.
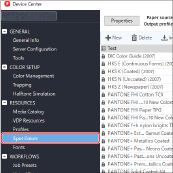
When you click [Spot Pro], further click [Launch Spot Pro] to display the [Spot Pro] window.
3
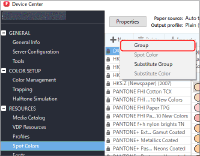
Click [New] → [Group] to register a new color group.
4
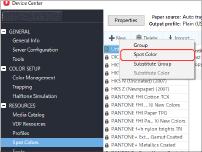
Select a new color group and click [New] → [Spot Color].
5
Register a spot color.
For detailed instructions for registration, see the following help.
Command WorkStation > [Help] > [Managing color] > [Spot colors] > [Create, rename, or delete a spot color or color group]
6
Double-click the job in Command WorkStation.
[Job Properties] is displayed.
7
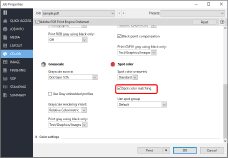
Select the [COLOR] tab, and then select the check box for [Spot color matching].
8
Click [OK].
Print a test sheet to check the finished result. If you are satisfied with the result, you can print the job.
Changing the Colors of an Entire Page
If you think that the colors are somewhat dark overall, and you want to change the colors so they are just a little bit lighter, try the following procedure to adjust the entire palette of colors on the page.
1
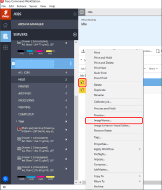
Right-click the processed job marked with  in Command WorkStation → click [ImageViewer].
 in Command WorkStation → click [ImageViewer].
NOTE
You can only edit processed jobs.
If you cancel rasterization after editing a job, the edits are canceled.
Depending on the imagePRESS Server you are using, the optional product which enables ImageViewer may be necessary.
2
Select the [Color Wheel] tab on the [Color Adjust] panel, and then move the slider to change all the colors on the page so they appear the way you want.
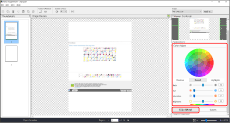
For detailed instructions about adjusting colors, see the help files for ImageViewer.
3
To confirm if the colors are acceptable, click [File] →[Print] and do a test print.
If you are satisfied with the result, save the adjusted settings by clicking [File] → [Save As], then print the job that you just saved with the adjusted settings.
Using a Custom Profile to Improve the Accuracy of Color Reproduction

If the color on printouts is not the same as you get when you print using preset profiles, you can create a custom profile and use it to print a job. This column explains how to create a new custom profile by making fine adjustments to the CMYK tone curves in an existing profile.
NOTE
If you use profile creation software instead of Command WorkStation to create custom profiles, see the following reference and output the chart for color measurement from the imagePRESS Server.
1
Click [Server] → [Device Center] in Command WorkStation.
2
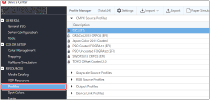
Click the [Profiles] in the device center screen.
3
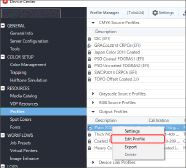
Right-click the profile you want to use as a base to create a custom profile → click [Edit Profile].
4
Adjust the CMYK tone curves, and then click [Save].
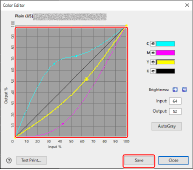
For detailed instructions on adjustments, see the help files on the [Color Editor] screen.
5
Enter an easy to understand description in <Description> so that you can easily tell the difference between profiles, and then click [Save].
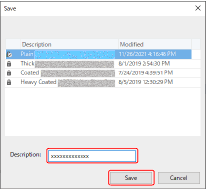
6
Click [Close] to close the [Color Editor] screen.
The created custom profile is added to the list.
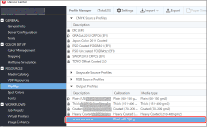
7
Double-click the job in Command WorkStation on the imagePRESS Server.
[Job Properties] is displayed.
8
Select the [COLOR] tab, select the custom profile you created for [Output Profile], and then click [OK].
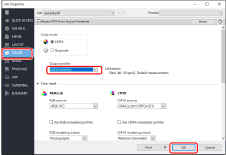
9
Print a test sheet using the custom profile you created to check the result. If you are satisfied with the result, you can print the job.
See "Setting Output Profiles to a Job" for information about how to Setting Output Profiles to a Job.