Registering an Advanced Space of imageRUNNER ADVANCE
An Advanced Space of imageRUNNER ADVANCE is a storage location for sharing information. An Advanced Space can also be browsed by network computers. You can enlarge the availability of document management and e-documents by linking an Advanced Space with Desktop.
An Advanced Space can be registered as a Personal Library or Network Library.
|
Note
|
|
If you externally publish an Advanced Space as a WebDAV server, you cannot register an Advanced Space in a Personal Library or Network Library of Desktop. In order to register an Advanced Space as a Personal Library or Network Library in Desktop, be sure to externally publish it as an SMB server.
|
To register a folder in an Advanced Space as a Personal Library, it must be set as a network drive.
When using network drive mapping
Using [Map Network Drive], register a folder in Advanced Space as a network drive.
When using the wizard:
Using the wizard, register a folder in Advanced Space as a network drive.
|
Note
|
|
For Windows 7/Windows 8/Windows 8.1, use [Map Network Drive] to register the folder.
This operation is not required if it is already set as a network drive. Register the library.
|
When using network drive mapping
1.
Start Windows Explorer, right-click [Computer] and select [Map Network Drive].
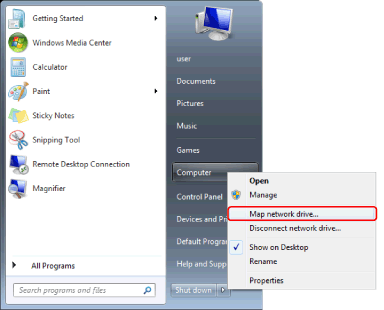
The [Map Network Drive] dialog box is displayed.
|
Note
|
|
For Windows 8/Windows 8.1, right-click [Computer] ([PC] for Windows 8.1) on the [Desktop] screen, then select [Map Network Drive].
|
2.
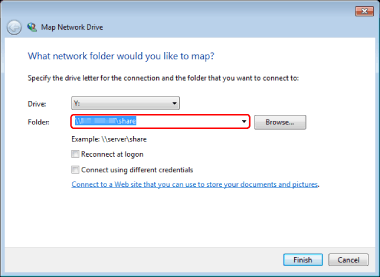
Specify the folder of an Advanced Space in [Folder].
|
Note
|
|
You can also click [Browse] to specify the folder of an Advanced Space.
For an Advanced Space, specify the folder for which you have the access permission.
|
3.
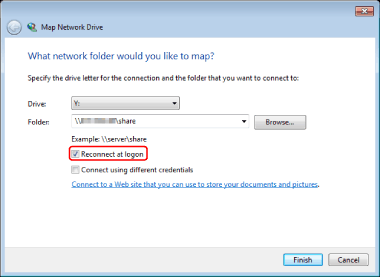
Select the [Reconnect at logon] check box.
4.
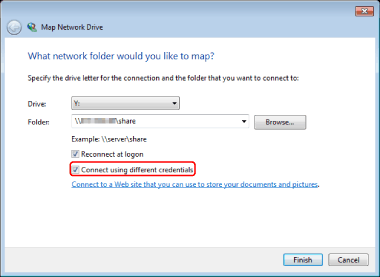
If you are connecting as a different user, click [Connect using different credentials].
5.
Click [Finish].
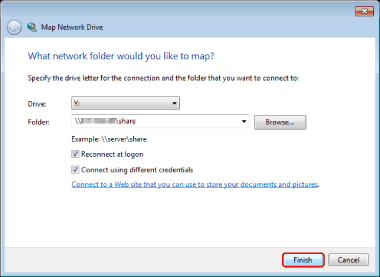
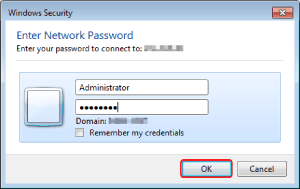
The [Windows Security] dialog box is displayed.
6.
Enter the user name and password of the user who accesses the Advanced Space and click [OK].
|
Note
|
|
If you do not know your user name and password, consult the system administrator.
You can save your user name and password by selecting the [Remember my credentials] check box.
|
When using the wizard
For Windows XP:
1.
Select [My Network] from the [Start] menu, and then click [Network Tasks] > [Add a network place] in the displayed screen.
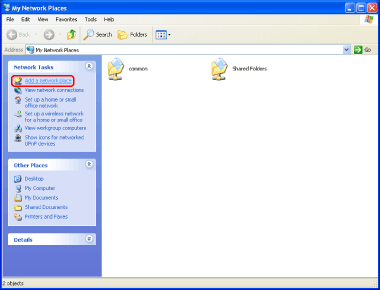
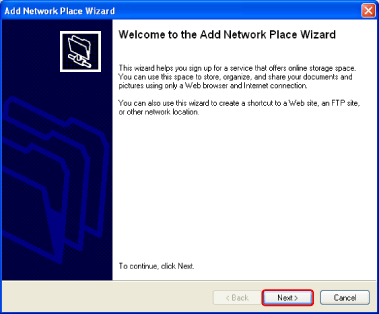
[Add Network Place Wizard] is displayed.
2.
Click [Next].
3.
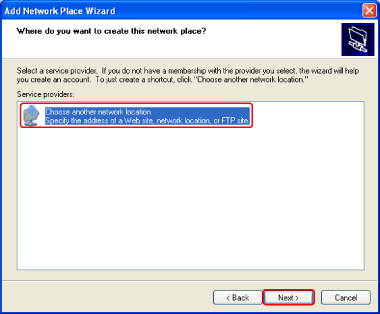
Select [Choose another network location] and then click [Next].
4.
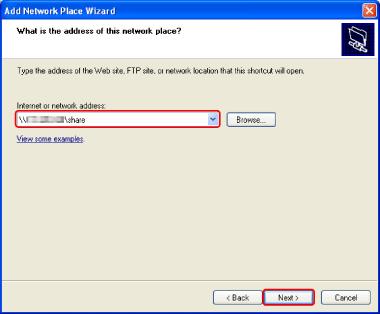
Specify a folder in Advanced Space in [Internet or network address] and then click [Next].
|
Note
|
|
You can also click [Browse] to specify the folder of an Advanced Space.
For an Advanced Space, specify the folder for which you have the access permission.
|
5.
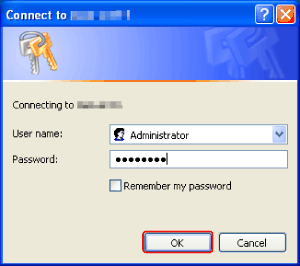
Enter the user name and password of the user who accesses the Advanced Space and click [OK].
|
Note
|
|
If you do not know your user name and password, consult the system administrator.
You can save your user name and password by selecting the [Remember my password] check box.
|
6.
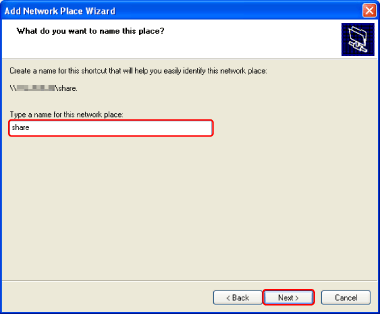
Enter the name of folder to be referenced for connecting in [Type a name for this network place], and then click [Next].
7.
Click [Finish].
For Windows Vista:
1.
For Windows Vista, right-click [Computer] in Windows Explorer and then select [Add a network location].
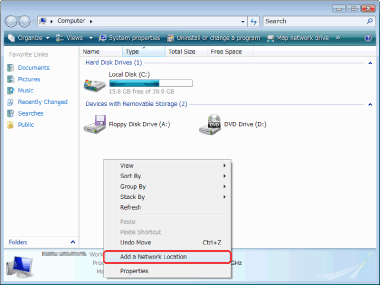
[Add Network Location] is displayed.
2.
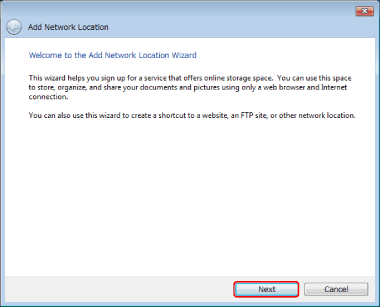
Click [Next].
3.
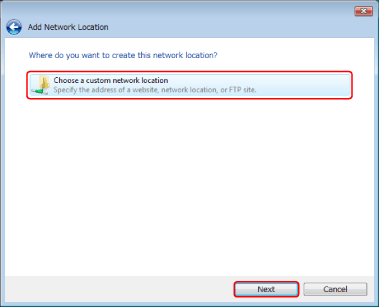
Select [Choose a custom network location] and then click [Next].
4.
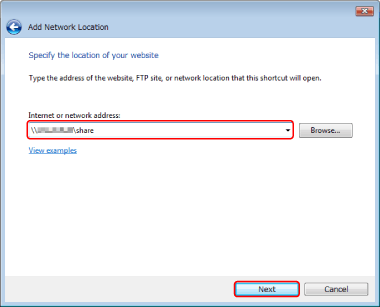
Specify a folder in Advanced Space in [Internet or network address] and then click [Next].
|
Note
|
|
You can also click [Browse] to specify the folder of an Advanced Space.
For an Advanced Space, specify the folder for which you have the access permission.
|
5.
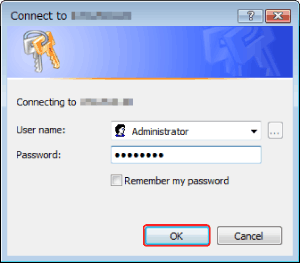
Enter the user name and password of the user who accesses the Advanced Space and click [OK].
|
Note
|
|
If you do not know your user name and password, consult the system administrator.
You can save your user name and password by selecting the [Remember my password] check box.
|
6.
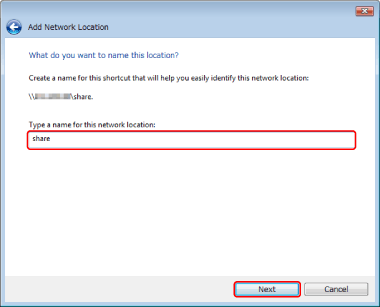
Enter the name of folder to be referenced for connecting in [Type a name for this network location], and then click [Next].
7.
Click [Finish].
This section describes how to register a folder in an Advanced Space as a library. The following example is a description of how to register a folder as a Personal Library.
|
Note
|
|
For details on how to register a folder as a Network Library, see the following.
|
1.
Select the [Settings] menu > [Library Management].
Or, right-click on the Navigation Pane and select [Library Management].
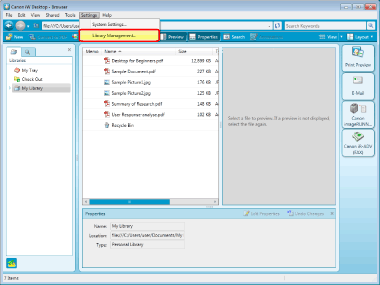
The [Library Management] dialog box is displayed.
2.
Click [Register Library].
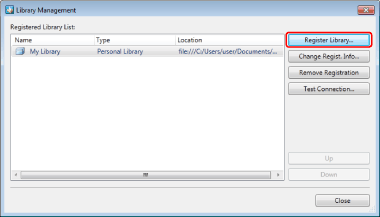
The [Select Library to Register] dialog box is displayed.
3.
Select [Personal Library] and then click [OK].
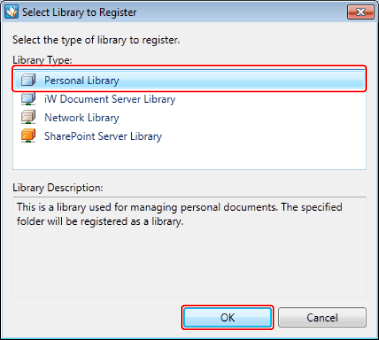
The [Register Library] dialog box is displayed.
4.
Click [Browse].
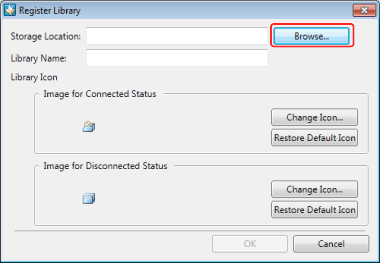
The [Browse For Folder] dialog box is displayed.
5.
Select a folder to use for a Personal Library and click [OK].
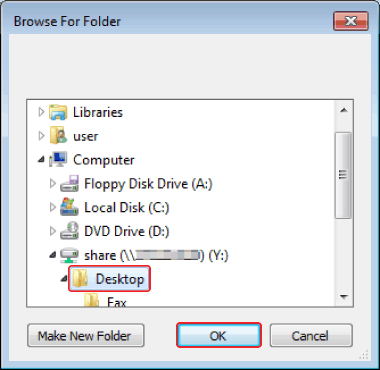
The selected folder is displayed in [Storage Location].
The name of the selected folder is displayed in [Library Name].
|
Note
|
|
You can also specify the folder that has been used for a Personal Library registered in a previous version of Desktop.
If you register a folder that is located in an upper or lower directory to the folder that has already been registered as a Network Library, the operations you perform to the registered will be treated as operations to a Personal Library.
|
6.
If necessary, change the library settings and click [OK].
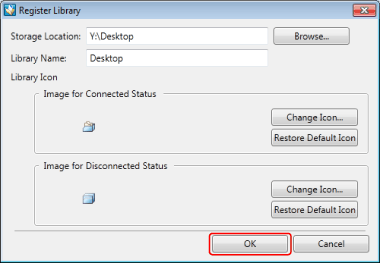
For information on how to change the name of the displayed library, see the following.
When setting the library icon, see the following.
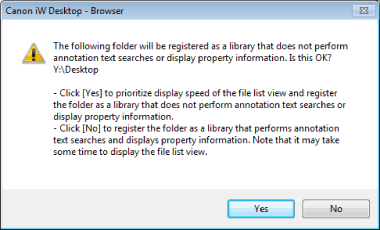
A confirmation screen for an annotated PDF document is displayed.
|
Note
|
|
To change the displayed library name, enter the registration name of a Personal Library using up to 255 characters in [Library Name].
The total number of documents and folders which can be stored and displayed on each folder hierarchy in Advanced Space is 1,000. Files or folders exceeding this value are not displayed. However, when you display the content of a folder in an Advanced Space that you have registered as a Personal Library by using Desktop, the maximum number of items to be displayed may be smaller than 1,000 because there have been other files or folders in the box (hereafter referred to as "files/folders for Desktop"), which are used by Desktop for document management related operations and are hidden on the Desktop display.
The following types of files/folders for Desktop are generated or saved on the folder of Advanced Space. You can display or confirm these files from Windows Explorer.
Library management file (file extension: .iwu)
This file contains the library management information. It is generated and saved in the directory immediately under the library.
Library management file (file extension: .iwn)
This file contains the folder management information. It is generated and saved for each folder.
Library management file (file extension: .iwx)
This file contains the document property information. When the document saved into a library is in any one of the following situation, it is generated and saved.
Document properties have been modified (except for renaming)
The color of the folder is specified
$Recycler.DT:
This folder is a Recycle Bin for the library. It is generated in the directory immediately under the library.
When you are unable to connect to a folder in Advanced Space registered as a library, check the network connection to Advanced Space from the OS and password management of Advanced Space. If you cannot connect from the OS, you cannot connect to Advanced Space registered as libraries from Desktop Browser.
|
7.
Click [Yes] or [No] on the confirmation screen for an annotated PDF document.
The [Library Management] dialog box is displayed again.
|
Note
|
|
For a library on an Advanced Space, it may take a while to process the annotation information of the PDF document. If you click [Yes], the settings are changed so that searching or displaying of annotations will not be performed on the confirmation screen that is displayed when you register a library, and you can avoid this problem.
|
8.
Test the connection to the registered library. The connection will be tested. Or, the dialog box for authentication is displayed.
For more information on testing the connection to the library, see the following.
9.
Click [Close].