Basic Printing Procedure
This section describes the basic procedure for printing from an application, taking Adobe Reader as an example.
 |
The printing procedure may differ depending on the application you are using.
|
|
Before printing, see "Attention (Basic Printing)."
|
1
Load paper in the paper drawer.
2
Open the PDF file to be printed using Adobe Reader.
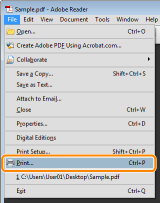
3
Select [Print] from the [File] menu.
4
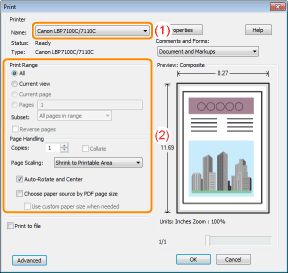
Configure the printing preferences.
|
(1)
|
Select this printer.
|
||
|
(2)
|
Configure the printing preferences.
|
 "
"
5
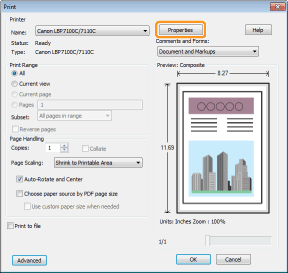
Click [Properties].
6
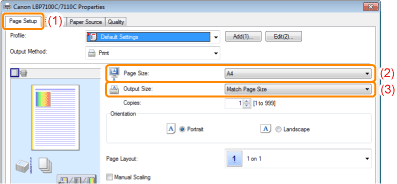
Specify the settings for [Page Size] and [Output Size].
|
(1)
|
Display the [Page Setup] sheet.
|
|
(2)
|
Select the page size of the document created by an application.
|
|
(3)
|
Select if the size of the paper to be printed is different from that of the data.
|
|
IMPORTANT
|
If the [Page Size] setting and [Output Size] setting are differentThe print is automatically reduced or enlarged to fit on the page.
|
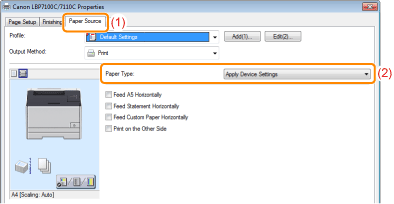
7
Specify the setting for [Paper Type].
|
(1)
|
Display the [Paper Source] sheet.
|
|
(2)
|
Select the type of the paper loaded in the paper source.*
|
|
*
|
Specify the setting according to the paper type as follows.
|
|
NOTE
|
||
About [Apply Device Settings]Selecting [Apply Device Settings] uses the [Paper Type] setting in the [Paper Source Settings] dialog box in the Printer Status Window.
(For details on the procedure for setting [Paper Type] in the [Paper Source Settings] dialog box, see "Registering the Paper Size and Type.")
|
8
Specify the other printing preferences as needed.
|
|
"Useful Printing Functions" describes the printing procedures that use the various printing functions. Make full use of the functions of this printer.
|
|
NOTE
|
For details on the settingsSee Help.
|
9
Confirm the settings, then click [OK].
|
→
|
The [Print] dialog box reappears.
|
10
Click [OK].
|
→
|
The printer starts printing.
|
