Basic Operations/Various Information for Windows

Displaying [Computer] or [My Computer]

 
From the [Start] menu, select [My Computer].
  
From the [Start] menu, select [Computer].

Setting the IP Address Using the ARP/PING Command

1
Make sure that the printer and computer are connected properly, and the printer is turned ON.
2
Turn the computer on, and then log on to Windows as a user with administrative rights.
3
Run Command Prompt.
From the [Start] menu, select [All Programs] → [Accessories] → [Command Prompt].
4
Enter "arp -s <IP address> <MAC address>", then press the [ENTER] key on your keyboard.
<IP address>
Enter the IP address to assign to the printer.
Specify the address with four numbers (from 0 to 255) separated with a period (.).
<MAC address>
Enter the MAC address of the printer.
Separate the number every two digits with a hyphen (-).
Input Example: "arp -s 192.168.0.215 00-1E-8F-05-70-31"
NOTE
Checking the MAC address
5
Enter "ping <IP address> -l 479", then press the [ENTER] key on your keyboard.
<IP address>
Enter the same IP address as the one entered in Step 4.
Enter a lowercase "L" for "-l".
Input Example: "ping 192.168.0.215 -l 479"
The IP address is set for the printer.
The subnet mask is set automatically according to the IP address.
The gateway address is set to [0.0.0.0].
6
Enter "exit", then press the [ENTER] key on your keyboard.
Command Prompt closes.

Displaying the CD-ROM Top Page

If the CD-ROM top page does not appear even after inserting the CD-ROM, perform the following procedure.
The CD-ROM drive name is indicated as "D:" in this manual. The CD-ROM drive name may differ depending on the computer you are using.
 
1.
From the [Start] menu, select [Run].
2.
Enter "D:\English\MInst.exe."
3.
Click [OK].
  
1.
Enter "D:\English\MInst.exe" in [Search programs and files] or [Start Search] under the [Start] menu.
2.
Press the [ENTER] key on the keyboard.

Checking the IP Address Using the PING Command

1
Run Command Prompt.
From the [Start] menu, select [All Programs] → [Accessories] → [Command Prompt].
2
Enter "ping <the IP address of the printer>", then press the [ENTER] key on your keyboard.
Input Example: "ping 192.168.0.215"
Correctly enter the IP address which is set for the printer. If the wrong IP address is entered, you cannot obtain an appropriate check result.
If you are not sure about the IP address of the printer, see "Checking the IP Address of the Printer."
3
Check the displayed result.
When "Packets: Sent = 4, Received = 4, Lost = 0 (0% loss)," is displayed
The IP address is set properly.
When "Packets: Sent = 4, Received = 0, Lost = 4 (100% loss)," is displayed
Ask your network administrator about the problem.
4
Enter "exit", and then press [ENTER] on the keyboard to exit Command Prompt.
NOTE
Checking and configuring the subnet
Enter "ipconfig" as a command in Command Prompt.
The network setting information of the computer appears. Confirm that the computer and printer are on the same subnet.
<Example>
Setting in a computer
Subnet mask: "255.255.255.0"
IP Address: "192.168.0.10"
The IP address of the printer needs to be "192.168.0.xxx". (xxx indicates an arbitrary number.)

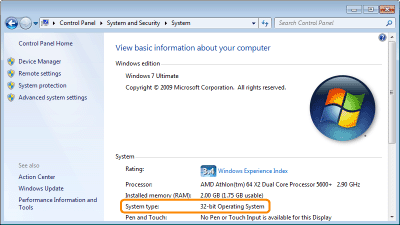
Checking the Processor Version of Windows Vista, 7, or Server 2008

If you are not sure whether you are using 32-bit Windows Vista/7/Server 2008 or 64-bit Windows Vista/7/Server 2008, you can check that using the following procedure.
1
From the [Start] menu, select [Control Panel].
2
Display [System].
  
Click [System and Security] or [System and Maintenance] → [System].

Double-click [System].
3
Check the processor version.
For a 32-bit operating system
[32-bit Operating System] is displayed.
For a 64-bit operating system
[64-bit Operating System] is displayed.

Printing a Test Page in Windows

You can check the operations of the printer driver by printing a test page in Windows.
1
Load A4 paper in the paper drawer.
2
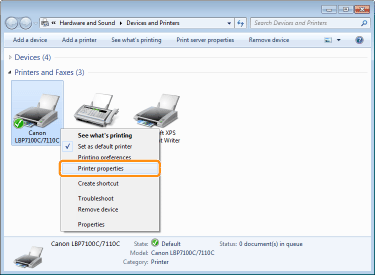
Open the printer folder.
3
Right-click the icon for this printer, and then select [Printer properties] or [Properties] from the pop-up menu.
4
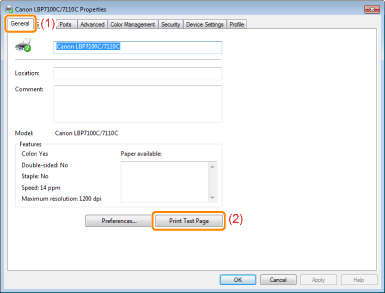
Print a test page.
(1)
Display the [General] sheet.
(2)
Click [Print Test Page] to print a test page.

Checking the Bi-directional Communication

1
Open the printer folder.
2
Right-click the icon for this printer, and then select [Printer properties] or [Properties] from the pop-up menu.
3
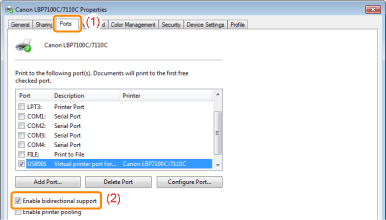
Check the bi-directional communication.
(1)
Display the [Ports] sheet.
(2)
Check the [Enable bidirectional support] check box is selected.
IMPORTANT
Do not clear the [Enable bidirectional support] check box.
If the check box is cleared, you cannot perform printing.

Installing with Plug and Play

If you are using Windows 7 or Server 2008 R2, install the printer driver in "Easy Installation."
(You may not be able to install the printer driver properly due to the Windows restriction even after detecting the printer with Plug and Play.)
1
Connect the USB cable.
2
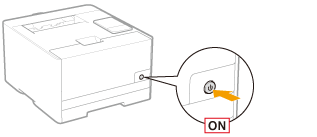
Turn the printer ON.
3
Turn the computer on, and then log on to Windows as a user with administrative rights.
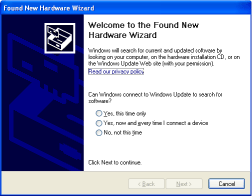
The automatic setup screen of Plug and Play appears.
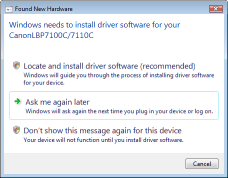
 If the printer driver is installed automatically
If you installed the printer driver for this printer previously, the driver is installed automatically.
If you want to update the printer driver (or want to install it manually), install the printer driver after uninstalling it once.
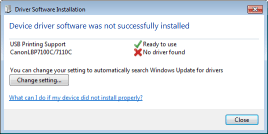
 If the following screen appears

You may not be able to install the printer driver properly due to the Windows restriction even after detecting the printer with Plug and Play.
Click [Close], and then reinstall the printer driver in "Easy Installation."
4
Follow the on-screen instructions to install the printer driver.
NOTE
When selecting the folder in which the printer driver is included.
Select one of the following folders.
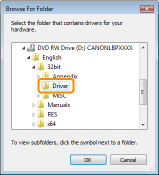
For a 32-bit operating system
Select the folders in the supplied CD-ROM: [English] - [32bit] - [Driver].
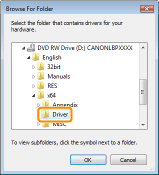
For a 64-bit operating system
Select the folders in the supplied CD-ROM: [English] - [x64] - [Driver].
If you are not sure whether you are using 32-bit Windows Vista/Server 2008 or 64-bit Windows Vista/Server 2008, see "Checking the Processor Version of Windows Vista, 7, or Server 2008."
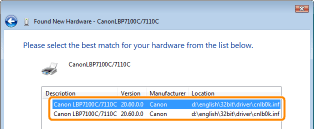
If the screen for selecting the printer driver appears
Even if which printer driver is selected, there is no problem with the installation because the same printer driver is installed.
When the installation is complete, an icon for this printer will be created.
"After Installation"

Displaying the Printer Folder

 
From the [Start] menu, select [Printers and Faxes].

From the [Start] menu, select [Control Panel], and then click [Printers and Other Hardware] → [Printers and Faxes].

From the [Start] menu, select [Control Panel], and then click [Printer].
 
From the [Start] menu, select [Devices and Printers].

From the [Start] menu, select [Control Panel], and then double-click [Printers].

Checking Printers in the Print Server

1
Display [Windows Explorer].
From the [Start] menu, select [All Programs] → [Accessories] → [Windows Explorer].
2
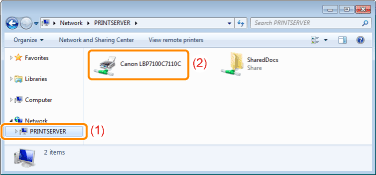
Check printers in the print server.
(1)
Select the print server from [Network] or [My Network Places].
(2)
Check the icon for this printer is displayed.

Checking the Port

1
Open the printer folder.
2
Right-click the icon for this printer, and then select [Printer properties] or [Properties] from the pop-up menu.
3
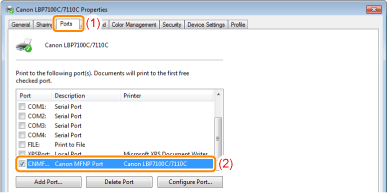
Check a port.
(1)
Display the [Ports] sheet.
(2)
Check the port that is being used.

Values for Setting a Port

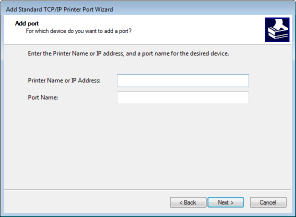
Depending on the method for setting the IP address of the printer, the value to be entered in [Printer Name or IP Address] on the following screen displayed in the process of port setting varies.
If you want to set the IP address to be assigned to the printer manually (If you know the IP address to use)
Enter the IP address in [Printer Name or IP Address].
"Checking the IP Address of the Printer"
If you want to set the IP address using the DNS server, specify the DNS settings for the printer. Then, enter the printer name (the DNS name registered on the DNS server) within up to 78 characters in [Printer Name or IP Address].
For example, enter the printer name as "AAA.BBB.com" if you specified the host name as "AAA" and the domain name as "BBB.com". However, enter "AAA.CCC.com" if you can obtain the domain name (CCC.com) simultaneously when you obtain the IP address from DHCP and so on.
If you want to set the IP address to be assigned to the printer using DHCP and so on
Specify the settings such as the DHCP settings so that the same IP address is always assigned to the printer when you start the printer. For more details, see "If you want to set the IP address to be assigned to the printer manually" above.
If a different IP address is assigned to the printer each time the printer starts, specify the DNS settings for the printer first. Then, enter the printer name (the DNS name registered on the DNS server) within up to 78 characters in [Printer Name or IP Address].
For example, enter the printer name as "AAA.BBB.com" if you specified the host name as "AAA" and the domain name as "BBB.com". However, enter "AAA.CCC.com" if you can obtain the domain name (CCC.com) simultaneously when you obtain the IP address from DHCP and so on.
NOTE
About the DNS settings

Setting for [Device Type] when Setting a Port

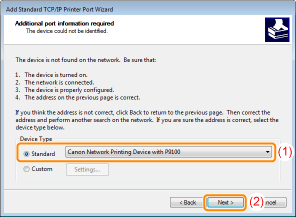
If the printer cannot be detected when setting a port, set [Device Type] as follows.
(1)
Select [Standard], and then select [Canon Network Printing Device with P9100].
(2)
Click [Next].
0F5J-0A3