Other Protocol Settings
 |
For details on the procedure before displaying the [TCP/IP Settings] page (the procedure before Step 1), see "Configuring the Protocol Settings."
|
|
|
For details on the SSL settings, see "Setting the SSL Encrypted Communication Function."
|
1
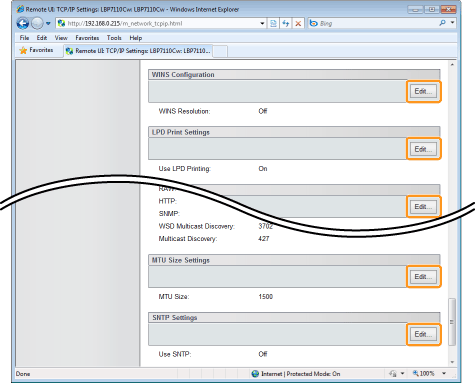
Click [Edit] for the option you want to specify.
2
Specify each setting.
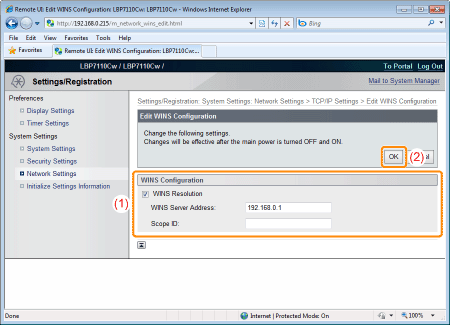
WINS Configuration
|
(1)
|
Specify the settings for WINS.
|
|
(2)
|
Click [OK].
|
|
[WINS Resolution]
|
To use WINS resolution, select the check box.
|
||||
|
[WINS Server Address]
|
Enter the IP address of the WINS server.
|
||||
|
[Scope ID]
|
Enter the scope ID. You can enter up to 63 single-byte alphanumeric characters.
|
|
|
To register the printer on a WINS server, you must specify the NetBIOS name and workgroup name settings of the printer.
|
|
Proceed to Step 3 if you do not specify the settings for the other options.
|
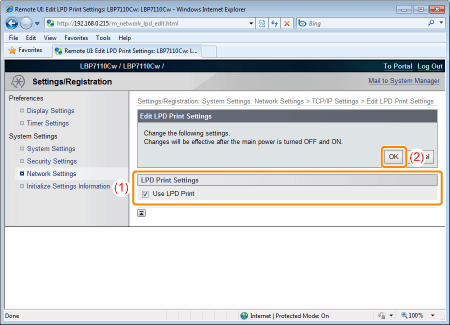
LPD Print Settings
|
(1)
|
Specify the settings for LPD printing.
|
|
(2)
|
Click [OK].
|
|
[Use LPD Print]
|
To use LPD printing, select the check box.
|
|
Proceed to Step 3 if you do not specify the settings for the other options.
|
NetBIOS Settings
|
(1)
|
Specify the settings for NetBIOS.
|
|
(2)
|
Click [OK].
|

|
[NetBIOS Name]
|
Enter the NetBIOS name of the printer.
|
|
[Workgroup Name]
|
Enter the workgroup to which the printer belongs.
|
|
Proceed to Step 3 if you do not specify the settings for the other options.
|
RAW Print Settings
|
|
Usually, it is not required to change the settings.
|
|
(1)
|
Specify the settings for RAW printing.
|
|
(2)
|
Click [OK].
|

|
[Use RAW Print]
|
To use RAW printing, select the check box.
|
|
Proceed to Step 3 if you do not specify the settings for the other options.
|
WSD Settings
|
|
To use the printer with a network connection, use MFNP Port or Standard TCP/IP Port to perform printing.
|
|
(1)
|
Specify the settings for WSD.
|
|
(2)
|
Click [OK].
|

|
[Use WSD Printing]
|
To use WSD printing, select the check box.
|
|
[Use WSD Browsing]
|
To use WSD to obtain the printer information, select the check box.
(If the [Use WSD Printing] check box is selected, the [Use WSD Browsing] check box is automatically selected and you cannot clear the check box.)
|
|
[Use Multicast Discovery]
|
To respond to search commands by multicast, select the check box.
|
|
Proceed to Step 3 if you do not specify the settings for the other options.
|
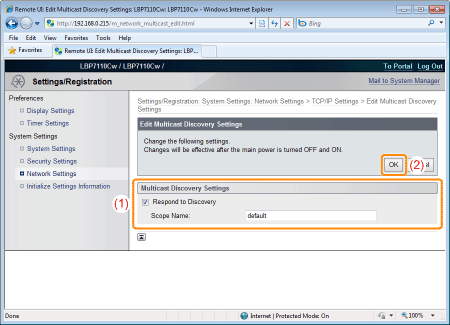
Multicast Discovery Settings
|
(1)
|
Specify the multicast discovery settings.
|
|
(2)
|
Click [OK].
|
|
[Respond to Discovery]
|
To allow a response to multicast discovery, select the check box.
|
|
[Scope Name]
|
Enter the scope name to be used when searching for certain devices from utility software by multicast. You can enter up to 32 single-byte alphanumeric characters.
|
|
Proceed to Step 3 if you do not specify the settings for the other options.
|
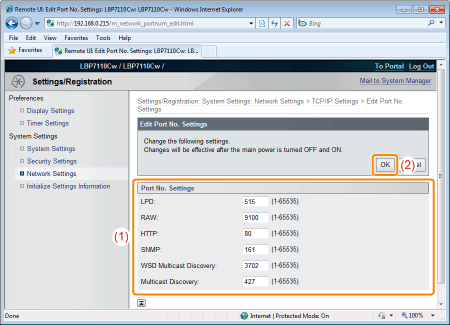
Port No. Settings
|
(1)
|
Specify the port number for each protocol.
|
|
(2)
|
Click [OK].
|
|
[LPD]
|
Enter the LPD port number.
|
|
[RAW]
|
Enter the RAW port number.
|
|
[HTTP]
|
Enter the HTTP port number.
|
|
[SNMP]
|
Enter the SNMP port number.
|
|
[WSD Multicast Discovery]
|
Enter the WSD multicast discovery port number.
|
|
[Multicast Discovery]
|
Enter the multicast discovery (SLP) port number.
|
|
Proceed to Step 3 if you do not specify the settings for the other options.
|
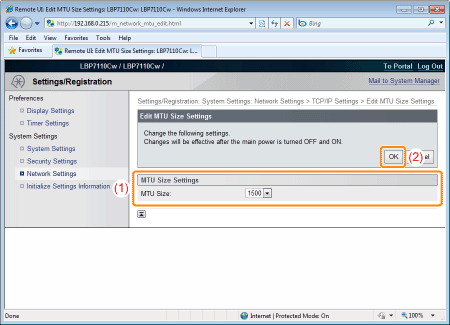
MTU Size Settings
|
(1)
|
Specify the MTU size.
|
|
(2)
|
Click [OK].
|
|
[MTU Size]
|
Select the MTU size.
|
|
Proceed to Step 3 if you do not specify the settings for the other options.
|
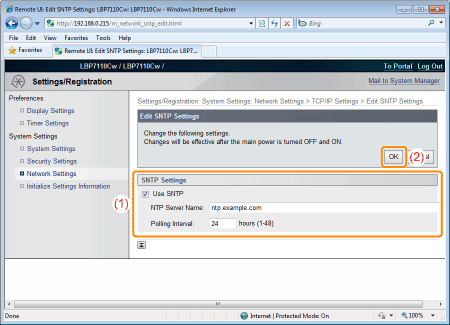
SNTP Settings
|
(1)
|
Specify the settings for SNTP.
|
|
(2)
|
Click [OK].
|
|
[Use SNTP]
|
If you use the SNTP client function to obtain the time information from the NTP server (public time information server on the Internet), select the check box.
|
||
|
[NTP Server Name]
|
If you have specified the DNS settings, enter the name of the NTP server.
If you have not specified the DNS settings, enter the IP address of the NTP server.
|
||
|
[Polling Interval]
|
Specify the interval at which to request the time information from the NTP server.
|
 If an NTP server is not available If an NTP server is not available
You can notify the printer of the time set on the computer using the following procedure.
|
|
NOTE
|
||||
Checking communication with the NTP serverYou can check communication with the NTP server by clicking [Check NTP Server Connection] on the [TCP/IP Settings] page.
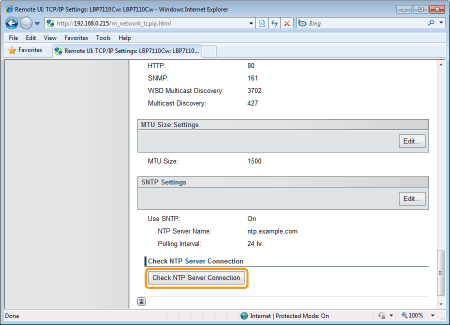 Clicking [Check NTP Server Connection] initiates communication with the NTP server specified in [NTP Server Name], and the communication result is shown in [NTP Server Connection Check Result] as follows.
|
|
Proceed to Step 3 if you do not specify the settings for the other options.
|
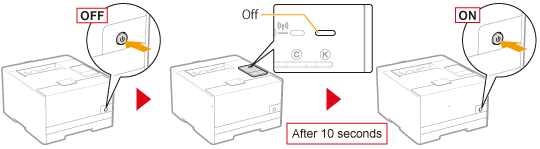
Restart the printer.
Turn the printer OFF, make sure that the Main Power indicator is off, wait for 10 seconds or longer, and then turn it ON again.
|
→
|
After the printer is restarted, the settings become effective.
|