Setting the File Format
You can set the file format to use when scanning originals.
1.
Press [Scan and Send] → specify the destination → press the file format button.
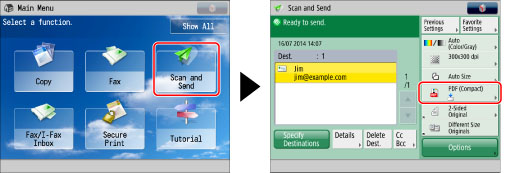
2.
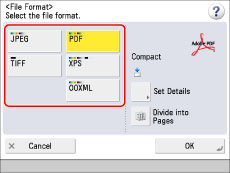
Select a file format for the image to send.
|
[JPEG]:
|
Sends the file in the JPEG format, if you select a colour mode other than Black-and-White.
|
|
[TIFF]:
|
Sends the file in the TIFF format, if you select Black-and-White for the colour mode.
|
|
[PDF]:
|
Sends the file in the PDF file format, regardless of the colour mode. You can also specify additional settings.
|
|
[XPS]:
|
Sends the file in the XPS file format, regardless of the colour mode. You can also specify additional settings.
|
|
[OOXML]:
|
Sends the file in the Office Open XML (pptx/docx) format only if you select the Full Color mode or the Grayscale mode for the colour mode.
|
|
IMPORTANT
|
|
If you send the file stored in the Memory RX Inbox, you cannot select OOXML as the file format.
|
If you select [JPEG]:
Press [OK].
If you select [JPEG], [Divide into Pages] is set to 'On'.
If you select [TIFF], [PDF], [XPS], or [OOXML]:
Specify whether or not to divide your files into separate pages → press [OK].
If you want to separate multiple images and send them as separate files, set [Divide into Pages] to 'On'. If you want to send the images as a single file, set the setting to 'Off'.
|
NOTE
|
|
You can select additional settings if you send in the PDF, XPS or OOXML format. Refer to the following for instructions on setting each type of PDF, XPS, or OOXML:
[Trace & Smooth]: Trace and Smooth
[Compact]: Compact PDF or XPS
[OCR (Text Searchable)]: Searchable PDF/OOXML
[Add Digital Signatures]: Adding a Digital Signature to a PDF or XPS
[Encrypt]: Encrypting PDF Files
[Apply Policy]: Applying a Policy
|