Parts and Their Functions
This section provides you with the names and functions of all the parts of the machine.
For information on optional products, parts, and their functions, see "Optional Products."
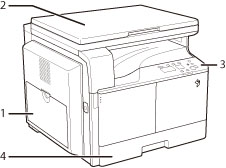
External View
|
1.
|
Multi-Purpose Tray
Use the multi-purpose tray to feed paper manually, and for loading nonstandard paper stock, such as envelopes. (See "Loading Paper In the Multi-Purpose Tray.")
|
|
2.
|
Platen Cover
The platen cover secures the originals placed on the platen glass.
|
|
3.
|
Control Panel
Includes the keys, display, and indicators required for operating the machine. (See "Control Panel Parts and Functions.")
|
|
4.
|
Drawer 1
Holds up to 250 sheets of paper (80 g/m2).
|
|
5.
|
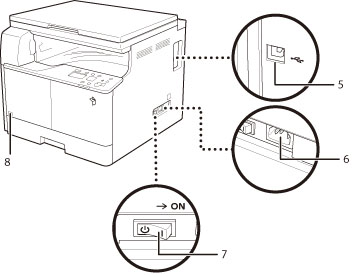
USB Port
Use the USB port to connect the machine to a computer using a USB cable.
|
|
6.
|
Power Socket
Connect the power cord.
|
|
7.
|
Main Power Switch
Press to the "I" side to turn the power ON.
|
|
8.
|
Toner Code
This code indicates the type of genuine toner that can be used with the machine. Use toner with a code that includes the same letters as the code on the front cover of the machine.
|
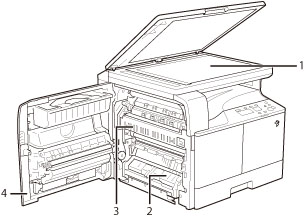
Internal View
|
1.
|
Platen Glass
Use the platen glass when scanning books, thick originals, thin originals, transparencies, etc.
|
|
2.
|
Drawer 1 Left Cover
Open this cover when clearing a paper jam in Drawer 1.
|
|
3.
|
Fixing Unit
If a paper jam occurs in the fixing unit, remove the jammed paper carefully.
|
|
4.
|
Left Cover
Open this cover to clear a paper jam inside the main unit.
|
|
5.
|
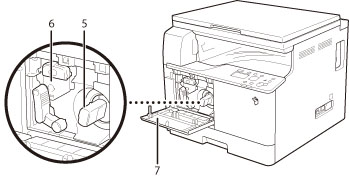
Toner Cartridge
When toner runs out, pull out the toner cartridge, and replace it with a new one.
|
|
6.
|
Drum Unit
The unit that applies toner to paper during printing. For more information on handling the drum unit, see "Replacing the Drum Unit."
|
|
7.
|
Front Cover
Open this cover to replace the toner cartridge or drum unit.
|
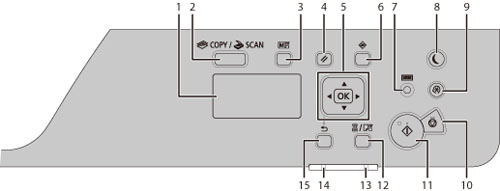
Control Panel Parts and Functions
|
1.
|
Display
|
During normal operation, displays messages and prompts. When adjusting the settings, displays your selections, text, and numbers.
|
|
2.
|
[COPY/SCAN] Key
|
Press to switch the mode to copy or scan.
|
|
3.
|
[ID Card Copy/Favorite Settings] Key
|
Press this to use ID Card Copy and Favorite settings.
|
|
4.
|
[Reset] Key
|
Press to reset the settings.
|
|
5.
|
[
 ] Key ] Key |
Press to scroll up or to increase the value.
|
|
[
 ] Key ] Key |
Press to scroll down or to decrease the value.
|
|
|
[
 ] Key ] Key |
Press to return to the previous screen, or move the cursor to the left.
|
|
|
[
 ] Key ] Key |
Press to proceed to the next screen, or move the cursor to the right.
|
|
|
[OK] Key
|
Press to confirm an action or setting.
|
|
|
6.
|
[Status Monitor] Key
|
Press to view the status of jobs or cancel jobs.
|
|
7.
|
[Counter Check] Key
|
Press this to display the total number of copies or prints (performed by the machine) on the display. You can also check the serial number of the machine (three letters and five numbers).
|
|
8.
|
[Energy Saver] Key
|
Press to manually set or cancel the Sleep mode. The Energy Saver indicator lights green while in the Sleep mode.
|
|
9.
|
[Settings/Registration] Key
|
Press to specify or register various settings.
|
|
10.
|
[Stop] Key
|
Press to cancel jobs.
|
|
11.
|
[Start] Key
|
Press to start a job.
|
|
12.
|
[Paper Selection/Settings] Key
|
Press to select a paper source, such as a drawer or multi-purpose tray, and register paper size and type.
|
|
13.
|
[Error] Indicator
|
Flashes when an error occurs.
|
|
14.
|
[Processing/Data] Indicator
|
Flashes when the device is in operation, is on when there is a job waiting to be processed.
|
|
15.
|
[Back] Key
|
Press to return to the previous screen.
|
|
NOTE
|
|
For more information on the optional products that can be attached to the machine, see "Optional Products."
|