Editing Address Details
You can change registered destination details as necessary. You can only edit destinations stored in the Local Address Book.
1.
Press  (Settings/Registration).
(Settings/Registration). 2.
Press [Set Destination] → [Register Destinations].
3.
Select the destination to edit → press [Details/Edit].
If you press [Search by Name], a screen for narrowing the search in the Address Book appears.
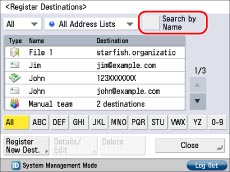
To return to the previous screen, press [Search by Name] again.
You can restrict the types of destinations displayed in the results list by selecting the desired type of destination from the drop-down list.
Use the Address Book drop-down list to display each address book (Address Lists 1 to 10). Address lists categorize the addresses stored in the Address Book.
If you select a destination that is stored with an access number, press [Access No.] → enter the access number using  -
-  (numeric keys). If you press [Addresses without Access Number], the destinations that are not managed with an access number are displayed.
- (numeric keys). If you press [Addresses without Access Number], the destinations that are not managed with an access number are displayed.|
NOTE
|
|
[Access No.] appears on the screen only if [Manage Address Book Access Numbers] is set to 'On' in [Set Destination] (Settings/Registration). (See "Managing the Address Book with Access Numbers.")
|
4.
Change the necessary settings → press [Next].
You cannot edit the address book for a group address, or the address book for an address registered in a group address.
|
NOTE
|
|
For more details on e-mail settings, see "Registering an E-Mail Address."
For more details on fax settings, see "Registering a Fax Number."
For instructions on registering an I-fax address, see "Registering an I-Fax Address."
For instructions on registering a file server address, see "Registering a File Server Address."
For instructions on registering a group address, see "Registering a Group Address."
|
5.
Change the necessary settings → press [OK] → [Close].
If you are performing Access Number Management for the Address Book, perform the following operation.
Press [Next] → [Access No.] → [Access No.].
Enter the access number using - (numeric keys) → press [Confirm].
- (numeric keys) → press [Confirm].Enter the access number again for confirmation → press [OK] → [OK].
You can enter up to seven digits for the access number. If you enter fewer than seven digits, the machine stores the access number with leading zeros.
Example: If <321> is entered, <0000321> is stored.
You cannot store an access number with only zeros as the number, such as <0000000>. If you enter a number that begins in zeros, such as <02> or <002>, the zeros are ignored and the number is registered as <0000002>, the same as if you had simply entered <2>.
|
NOTE
|
|
If you want to manage destinations in the Access Number Management mode, set [Manage Address Book Access Numbers] to 'On' in [Set Destination] (Settings/Registration). (See "Managing the Address Book with Access Numbers.")
If there is any required destination setting that has not yet been set after registering the access number, the screen for specifying the destination settings is displayed again.
|