Overview of This Function
If you press [Fax] on the Main Menu, the Fax Basic Features screen appears. The Fax function enables you to scan documents and send them to specified destinations via fax.
You can also send a fax from [Scan and Send]. To send a fax from [Scan and Send], set <Enable Fax in Scan and Send Function> in [Display Fax Function] to 'On'. (See "Display Fax Function.")
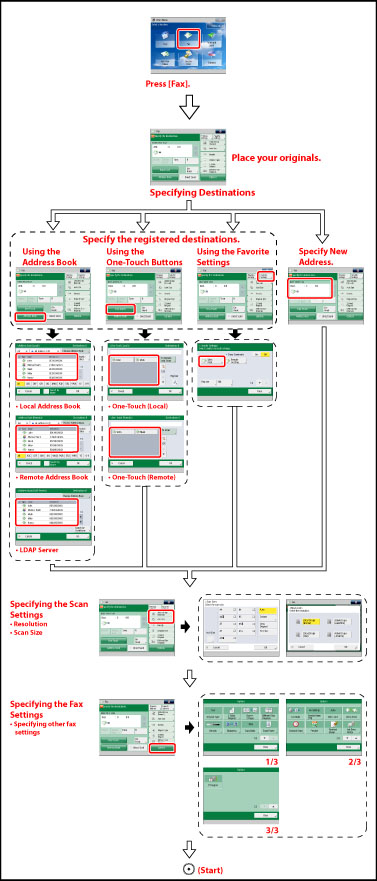
The flow of basic operations for sending a fax is as follows:
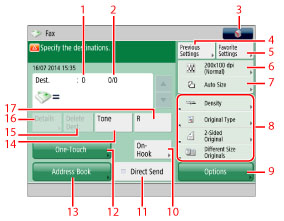
Fax Basic Features Screen
The screen below, which appears when you select [Fax] on the Main Menu screen, is called the Fax Basic Features screen.
|
1
|
Destinations
Displays the number of specified destinations.
|
|
2
|
Destination
Displays the destination entered using the numeric keys.
|
|
3
|
 You can specify the following settings:
Register Favorite Settings
Edit Favorite Settings
Register to Quick Menu (See "Quick Menu.")
Change Default Settings
Register Options Shortcuts
Register/Edit Info. for Each User
[Register/Edit Info. for Each User] appears only if you are managing users by login service, such as User Authentication. For more information, see "Authentication Method Settings for Sending Operations."
|
|
4
|
[Previous Settings]
Press to recall the last three send jobs, including the destinations, scan settings, and send settings.
|
|
5
|
[Favorite Settings]
Press to register the favorite settings. You can also recall the registered settings. (See "Favorite Settings.")
|
|
6
|
Resolution
Press to specify the resolution.
|
|
7
|
Scan Size
Press to specify the size for scanning.
|
|
8
|
Shortcuts to [Options]
Press to select an [Options] mode. (See "Assigning Shortcuts.")
|
|
9
|
[Options]
Press to specify other settings. You can set useful fax functions such as confirming the content of a scanned document before sending it or sending 2-sided originals.
|
|
10
|
[On-Hook]
Press to use tone dialing or to send a fax document manually. This button is not displayed when using the Remote Fax function. (See "Fax Information Services.")
|
|
11
|
[Direct Send]
Press to send documents directly to the recipient. If you do not select Direct Sending, Memory Sending is used instead. (See "Switching to Direct Sending.")
|
|
12
|
[One-Touch]
Press to specify destinations stored in one-touch buttons.
|
|
13
|
[Address Book]
Press to select a destination from the Address Book.
|
|
14
|
[Tone]
Press when you want to directly call an extension line that is connected to a PBX (Private Branch eXchange) which accepts only tone signals. If you press [Tone], the letter <T> appears. (See "Fax Information Services.")
|
|
15
|
[Delete Dest.]
Press to delete the selected destination.
|
|
16
|
[Details]
Press to check or change the selected destination.
|
|
17
|
[R]
Press to use the R-key. (See "Special Dialing.")
|
|
18
|
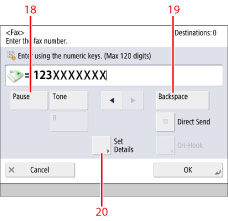
[Pause]
Press to insert a pause of several seconds in the fax number that you are dialing. If you press [Pause] between numbers, the letter <p> appears between the numbers. If you press [Pause] at the end of a number, the letter <P> appears at the end of the number. When dialing an overseas number, insert a pause after the country code, and at the end of the telephone number. (See "Pause Time.")
|
|
19
|
[Backspace]
Press when you enter an incorrect number to delete the number before the cursor.
|
|
20
|
[Subaddress]
Press to set an optional subaddress and password. Specify the settings as necessary.
[Set Details]
Displayed when multiple lines are set to be used. Press to set the subaddress and password, or to select the telephone line to use for transmission.
|
|
NOTE
|
|
If you set [Display Fax Function] to 'Off', [Fax] does not appear in the Main Menu. (See "Display Fax Function.")
If [Display Select Line Screen] is set to 'On' in [Default Screen] (Settings/Registration) and when you select [Fax] from the Main Menu screen, the screen for selecting a line is displayed. (See "Changing the Default Screen for Fax.")
You can use multiple lines in the following cases:
If the Super G3 2nd Line Fax Board is installed in addition to installing the Super G3 FAX Board.
If [No. of TX Lines] is set to two or more lines when using the Fax function with the Remote Fax Kit. (See "Remote Fax TX Settings.")
|
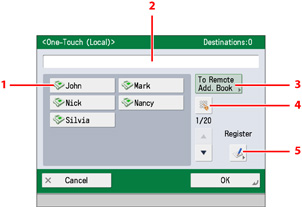
One-Touch Screen
You can register frequently used destinations to the one-touch screen. You can also access the one-touch buttons registered in other imageRUNNER ADVANCE series machines.
|
1
|
One-Touch Buttons
Press to specify destinations stored in one-touch buttons.
|
|
2
|
Settings
Displays the type and name of the destination registered in the one-touch button.
|
|
3
|
[To Remote Add. Book] /[To Local]
You can access the one-touch destinations of another imageRUNNER ADVANCE series machine to specify a destination. [To Local] is displayed when the one-touch buttons of the Remote Address Book are displayed.
|
|
4
|
One-Touch Button Number Entry Button
Press to specify the destination by entering the number for a one-touch button.
|
|
5
|
[Register]
Press to register destinations in one-touch buttons.
|
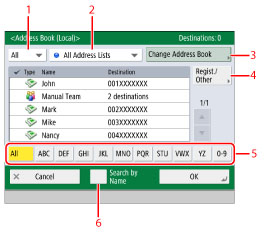
Address Book Screen
You can use various methods to search for destinations from the Address Book on the screen for selecting destinations. You can also search using a combination of these methods.
|
1
|
Specify Type of Destination drop-down list
If you press [All],
 (Fax) or (Fax) or  (Group), destinations for each type appear. (Group), destinations for each type appear. |
|
2
|
Address List drop-down list
Press the Address List drop-down list to display a list of Address Lists 1 to 10 or one-touch buttons. Address lists categorize the addresses stored in the Address Book.
|
|
3
|
Change Address Book
If you press [Change Address Book], you can switch the display to the [Local], [Remote], or [LDAP Server] address book.
|
|
4
|
[Regist./Other]
If you press [Regist./Other], you can register new destinations, edit destination information, and check the detailed information for registered destinations.
|
|
5
|
Search Initial Letter button
Press the alphanumeric keys (e.g., [ABC]) to display the individual keys for each letter or number. You can select a letter or number to restrict the displayed range of entries. Press [All] to return to the full address list.
|
|
6
|
[Search by Name]
If you press [Search by Name], a pop-up screen for refining the address book appears.
|
You can further refine the search by entering multiple consecutive characters, starting with the first character of the destination name. You can also refine the addresses displayed by entering multiple characters from the Keyboard screen.

|
1
|
[ABC] - [Sym]
Displays the characters you can enter. The range of letters or the symbols you can enter are displayed.
|
|
2
|
[Keyboard]
Displays the keyboard on the touch panel display.
|
|
3
|
[Clear]
Press to delete all of the text entered.
|
|
4
|
[Backspace]
Press to delete the last letter entered.
|
|
NOTE
|
|
[Search by Name] can be used with both the Local Address Book and Remote Address Book.
Press [Search by Name] to close the screen for refining the address book and return to the previous screen.
If you select [All], destinations registered in one-touch buttons also appear. However, you cannot delete destinations registered in one-touch buttons. For instructions on deleting one-touch buttons, see "Storing/Editing/Deleting One-Touch Buttons."
To cancel a selected destination, select the destination again.
[Access No.] appears only on the screen if [Manage Address Book Access Numbers] is set to 'On'. (See "Managing the Address Book with Access Numbers.")
|