Send and Fax Functions
This section describes the operation procedures for the Send and Fax functions you can access from the top screen of the Send and Fax functions.
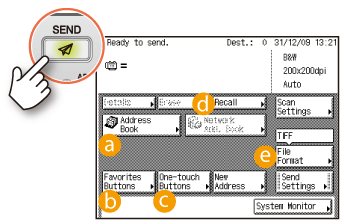
Specifying Destinations Easily and Quickly
[Address Book], [One-touch Buttons], and [Favorites Buttons] enable you to streamline and customize the procedures for specifying destinations. These functions enable you to register recipient destinations so that you can send documents by pressing only a few keys.
† The destinations you can specify may vary, depending on the settings of Authorized Send. See Customizing Settings.
Authenticating Users Before Sending Documents (Authorized Send)
Authenticating Users Before Sending Documents (Authorized Send)
 [Address Book]

Press [Address Book].
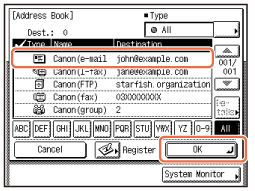
Select the desired destination → press [OK].
 [Favorites Buttons]

Press [Favorites Buttons].
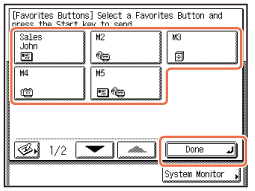
Select the desired favorites button → press [Done].
 [One-touch Buttons]

Press [One-touch Buttons].
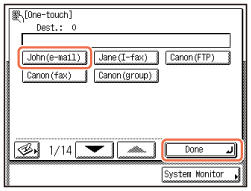
Select the desired one-touch button → press [Done].
Recalling the Most Recent Settings


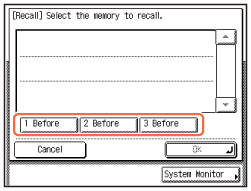
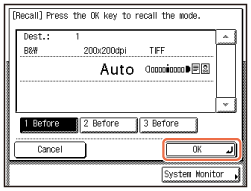
The Recall function enables you to send a document using any of the last three addresses, scan settings, and send settings that were used.
Job Recall
Job Recall
Press [Recall].
|
1
|
Select [1 Before], [2 Before], or [3 Before].
 |
|
2
|
Confirm the settings → press [OK].
 |
Specifying the File Format for Sending Documents


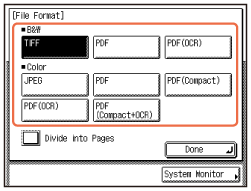
You can send documents in a variety of file formats, including TIFF, PDF, and JPEG. This gives you the freedom to send documents in a manner that is suited to the purpose of the document, as well as the recipient’s document handling environment. Scanned original images are converted to the specified file format and sent via e-mail or to a file server or USB memory media device.
Specifying the File Format
Specifying the File Format
Press [File Format].
|
1
|
Select the desired file format.
† You cannot select the file format when sending I-faxes or faxes.
 |
|
2
|
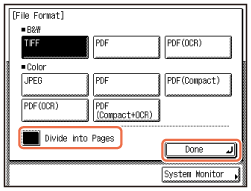
If you want to separate multiple images and send them as separate files, press [Divide into Pages] → [Done].
 |
|
File Formats
|
|
In addition to standard TIFF, PDF, and JPEG file formats, the machine also supports PDF (Compact) and PDF (OCR) files.
PDF (Compact) files are archived with a higher compression ratio than normal PDF. The resulting file data size is smaller than normal PDF, and therefore recommended for jobs that are to be sent over the network.
PDF (OCR) files perform OCR (Optical Character Recognition) on scanned documents to create a PDF with searchable text.
† PDF (OCR) is available only when the OCR function is activated with the optional Color Send Searchable PDF Kit-C1.
|
Additional Functions key
This section describes the operation procedures for specifying the useful Additional Functions settings related to the Send and Fax functions.
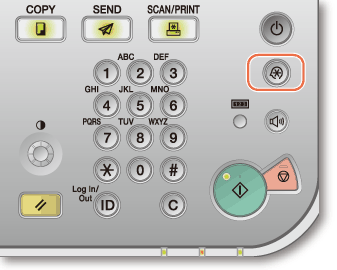
Setting the Send Screen to Suit Your Needs
You can specify the screen to display first when you press  (SEND). You can select Favorites Buttons screen, One-touch screen, or the top screen of the Send and Fax functions as the screen to display first.
Favorites Buttons
 (SEND). You can select Favorites Buttons screen, One-touch screen, or the top screen of the Send and Fax functions as the screen to display first.
Favorites Buttons
Press  (Additional Functions).
 (Additional Functions).
|
1
|
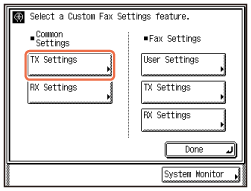
Press [Communication Settings] → [TX Settings] under <Common Settings>.
 |
|
2
|
Press [
 ] or [ ] or [ ] until [Default Screen for Send] appears → press [Default Screen for Send]. ] until [Default Screen for Send] appears → press [Default Screen for Send].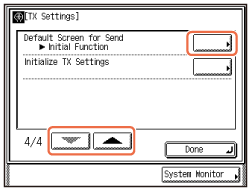 |
|
3
|
Select the desired setting item → press [OK]. To return to the top screen, press
 (Reset). (Reset).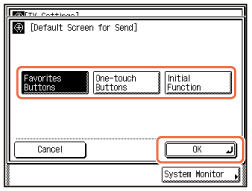 |
Printing the Sender Information When Sending I-Faxes/Faxes
You can add the sender information at the top of the documents that you send via I-fax/fax. Information such as your I-fax address, name and fax number is printed, enabling the recipient to know who sent the document.
Printing Sender Information on a Sent Document (TX Terminal ID)
Printing Sender Information on a Sent Document (TX Terminal ID)
Press  (Additional Functions).
 (Additional Functions).
|
1
|
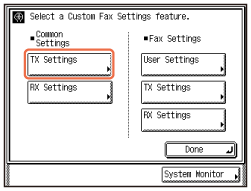
Press [Communication Settings] → [TX Settings] under <Common Settings>.
 |
|
2
|
Press [
 ] or [ ] or [ ] until [TX Terminal ID] appears → press [TX Terminal ID]. ] until [TX Terminal ID] appears → press [TX Terminal ID].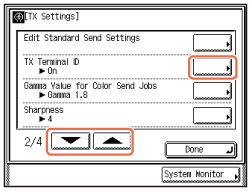 |
|
3
|
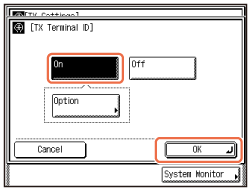
Press [On] → [OK]. To return to the top screen, press
 . . |
Automatically Forwarding Received Documents
You can set the machine to automatically forward the received I-fax/fax documents to any desired destination. If a received document matches the forwarding conditions you set, it is forwarded to the destination. You can also specify a forwarding destination for received documents that do not match the forwarding conditions.
Storing Forwarding Settings
Storing Forwarding Settings
Press  (Additional Functions).
 (Additional Functions).
|
1
|
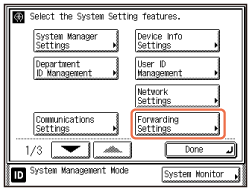
Press [System Settings]* → [Forwarding Settings].
* To make changes to the System Settings, log in to the machine as the System Manager.
 |
|
2
|
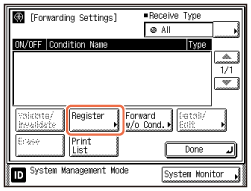
Press [Register] → register the forwarding conditions and destinations as indicated on the touch panel display.
 |
|
3
|
Select the desired forwarding setting → press [Validate/Invalidate] → [Done]. To return to the top screen, press
 (Reset). (Reset).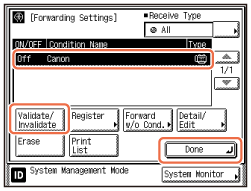 |
[Scan Settings] key
This section describes the operation procedures for the Send and Fax functions you can access from the [Scan Settings] key on the top screen of the Send and Fax functions.
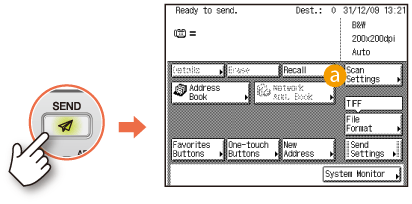
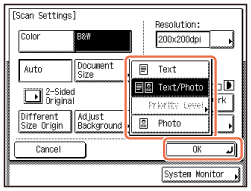
Scanning Documents Containing Photos Clearly


You can improve the image quality of scanned images by selecting the original type setting that best suits your originals. When originals containing photos are not scanned clearly, select [Photo] or [Text/Photo] from the original type drop-down list box to obtain better results.
Adjusting the Density and Image Quality
Adjusting the Density and Image Quality
Press [Scan Settings].
|
1
|
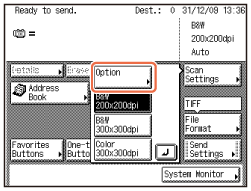
Press [Option].
 |
|
2
|
Press the original type drop-down list box → select [Photo] or [Text/Photo] → press [OK].
 |
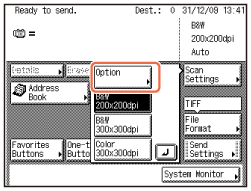
Specifying the Scanning Area to Cover the Original Size


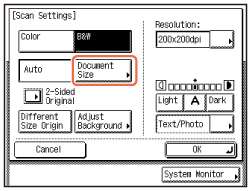
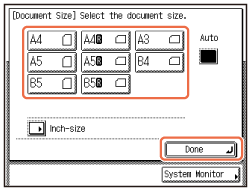
When the edges of the scanned image are missing, change the Document Size setting to a size that is larger than the actual original size.
Specifying the Document Size
Specifying the Document Size
Press [Scan Settings].
|
1
|
Press [Option].
 |
|
2
|
Press [Document Size].
 |
|
3
|
Select the document size that is larger than the original size → press [Done] → [OK].
 |
Scanning Fine Text and Images Clearly


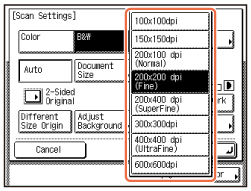
You can scan fine text in documents more clearly by setting a higher resolution. Note, however, that the file size increases as you increase the resolution.
Specifying the Color Mode and Resolution
Specifying the Color Mode and Resolution
Press [Scan Settings].
|
1
|
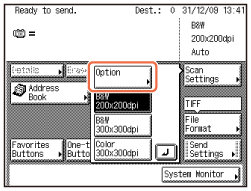
Press [Option].
 |
|
2
|
Press the [Resolution] drop-down list box → select the desired resolution → press [OK].
 |
Scanning Two-Sided Originals


You can scan both sides of the originals set in the feeder.
† The 2-Sided Original mode is available only when the machine is equipped with the feeder (optional for the imageRUNNER 2525/2520).
Scanning Two-Sided Originals
Scanning Two-Sided Originals
Press [Scan Settings].
|
1
|
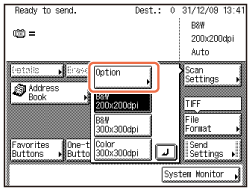
Press [Option].
 |
|
2
|
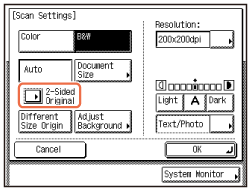
Press [2-Sided Original].
 |
|
3
|
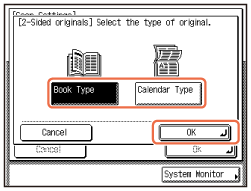
Select [Book Type] or [Calendar Type] → press [OK] → [OK].
 |
Scanning Different Size Originals Together


You can scan multiple originals of different sizes at the same time when using the feeder.
† The Different Size Originals mode is available only when the machine is equipped with the feeder (optional for the imageRUNNER 2525/2520).
Scanning Different Size Originals Together (Different Size Originals)
Scanning Different Size Originals Together (Different Size Originals)
Press [Scan Settings].
|
1
|
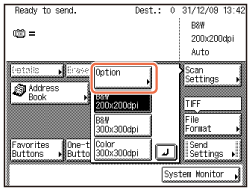
Press [Option].
 |
|
2
|
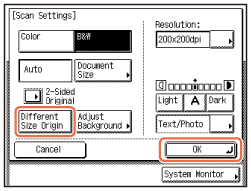
Press [Different Size Origin] → [OK].
 |
Adjusting the Background Color of Sent Documents


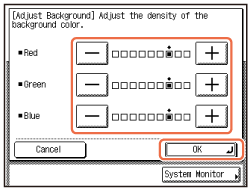
You can adjust the density of the background color when scanning color originals. You can adjust red, green, and blue separately.
Adjusting the Density of Background Color
Adjusting the Density of Background Color
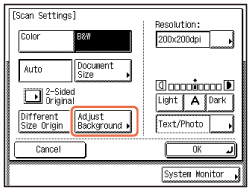
Press [Scan Settings].
|
1
|
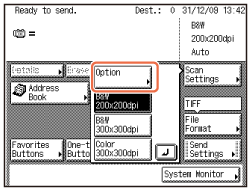
Press [Option].
 |
|
2
|
Press [Adjust Background].
 |
|
3
|
Press [-] or [+] to adjust the amount of each color → press [OK] → [OK].
 |
[Send Settings] key
This section describes the operation procedures for the Send and Fax functions you can access from the [Send Settings] key on the top screen of the Send and Fax functions.
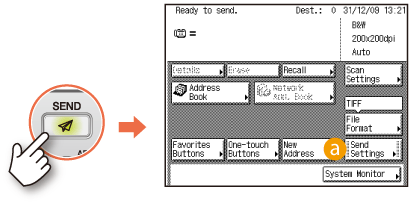
Adding the Reply Destination to Sent Documents


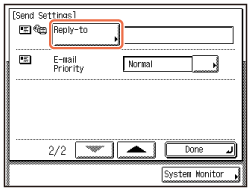
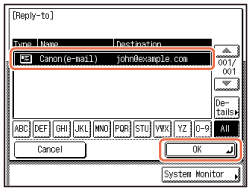
You can specify the reply-to address for your e-mails/I-faxes.
Basic Sending Methods
Basic Sending Methods
First, register the e-mail address you want to use as the reply-to address.
Press [Send Settings].
Press [Send Settings].
|
1
|
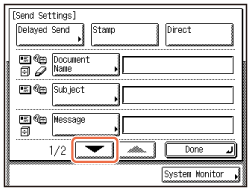
Press [
 ]. ]. |
|
2
|
Press [Reply-to].
 |
|
3
|
Select the reply-to address → press [OK] → [Done].
 |
Specifying the Time to Start Sending


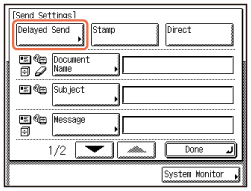
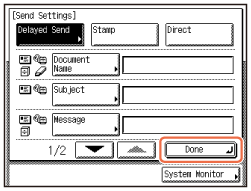
You can specify the time for sending the document. This function is useful, for example, when you want to send a document at a future time when you may not be near the machine.
Specifying the Time to Start Sending (Delayed Send)
Specifying the Time to Start Sending (Delayed Send)
Press [Send Settings].
|
1
|
Press [Delayed Send].
 |
|
2
|
Enter the time to send the document using
 – –  (numeric keys) → press [OK]. (numeric keys) → press [OK].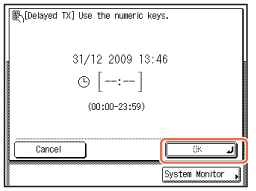 |
|
3
|
Press [Done].
 |
Affixing Stamps on Scanned Originals


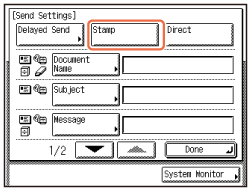
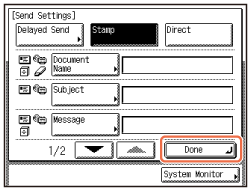
You can set the machine to affix a stamp on the front side of scanned originals to indicate they have been scanned.
† The Stamp mode is available only when the optional Stamp Unit-B1 is attached to the feeder (optional for the imageRUNNER 2525/2520).
Stamping Originals Which Have Already Been Scanned
Stamping Originals Which Have Already Been Scanned
Press [Send Settings].
|
1
|
Press [Stamp].
 |
|
2
|
Press [Done].
 |