Specifying Common Settings
You can specify the settings that are fundamental to the machine operations.
|
NOTE
|
|
The Common Settings menu consists of several pages. Use [
 ] or [ ] or [ ] to scroll to the items you want to set. ] to scroll to the items you want to set. |
Initial Function at Power ON
You can specify the default top screen that is displayed, such as when you turn ON the machine.
|
NOTE
|
|
The default settings are as follows:
Select Initial Function: ‘Copy’
Set System Monitor Screen as Initial Function: ‘Off’
Set [Device] as Default for System Monitor Screen: ‘On’
|
1
Press  (Additional Functions).
 (Additional Functions).
The Additional Functions menu appears.
2
Press [Common Settings].
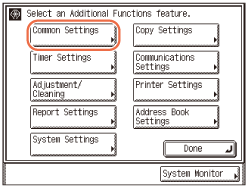
3
Press [Initial Function].
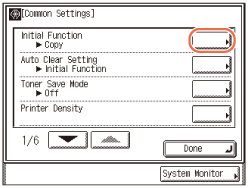
4
Select the settings for the default top screen → press [OK].
The screen shot below may differ from the actual display depending on the machine configuration.
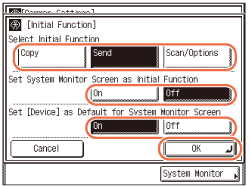
<Select Initial Function>
Press [Copy], [Send](or [Fax]), or [Scan/Options] to select the initial function.
Press [Copy], [Send](or [Fax]), or [Scan/Options] to select the initial function.
IMPORTANT:
To use the Send function with the imageRUNNER 2545/2535/2530/2525/2520, the function must be activated with the optional Color Send Kit-Y1.
[Fax] is displayed only when both of the following conditions are met:
- The optional Super G3 Fax Board-AG1 is attached.
- The Send function is not activated.
<Set System Monitor Screen as Initial Function>
|
|
[On]:
|
Press to set the System Monitor screen as the default top screen.
|
|
[Off]:
|
Press to set the top screen of the selected function (Copy, Send, or Scan/Options) as the default top screen.
|
<Set [Device] as Default for System Monitor Screen>
|
|
[On]:
|
Press to set the Device status screen as the default screen of the System Monitor. (The Device status screen is displayed when you press [System Monitor].)
|
|
[Off]:
|
Press to set the Copy status screen as the default screen of the System Monitor.
|
The selected mode is set.
5
Press  (Reset) to return to the top screen.
 (Reset) to return to the top screen.
Default Display after Auto Clear
You can select whether the display returns to the default top screen or the top screen of the selected function after the Auto Clear mode is activated.
|
NOTE
|
|
For more information on the Auto Clear mode, see Auto Clear Time.
The default setting is ‘Initial Function’.
|
1
Press  (Additional Functions) → [Common Settings] → [Auto Clear Setting].
 (Additional Functions) → [Common Settings] → [Auto Clear Setting].
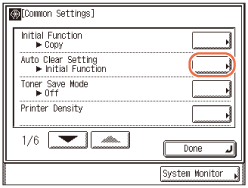
2
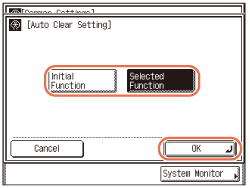
Select [Initial Function] or [Selected Function] → press [OK].
|
|
[Initial Function]:
|
Press to return the display to the top screen of the initial function. (Initial Function at Power ON)
Example) Initial Function: [Scan/Options], Display: any Copy screen The Auto Clear mode returns the display to the default top screen (Scan/Options). |
|
[Selected Function]:
|
Press to return the display to the top screen of the function that is displayed when the Auto Clear mode initiates.
Example) Initial Function: [Scan/Options], Display: any Copy screen The Auto Clear mode returns the display to the top screen (Copy). |
The selected mode is set.
3
Press  (Reset) to return to the top screen.
 (Reset) to return to the top screen.
Setting the Toner Save Mode
The Toner Save Mode enables you to select the level of toner consumption for printing. Use this setting if you want to save toner and prolong the life of the toner cartridge.
|
IMPORTANT
|
|
This setting does not apply to print jobs sent from a computer via a printer driver. To save toner when printing from a computer, enable the Toner Save setting in the Print Quality settings. (Customizing Settings)
|
|
NOTE
|
|
The default setting is ‘Off’.
|
1
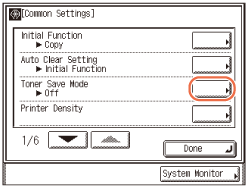
Press  (Additional Functions) → [Common Settings] → [Toner Save Mode].
 (Additional Functions) → [Common Settings] → [Toner Save Mode].
2
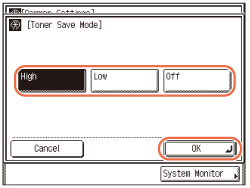
Select [High], [Low], or [Off] → press [OK].
NOTE:
Selecting ‘High’ may affect the print quality. If you notice a degradation in print quality, set this mode to ‘Off’.
The selected mode is set.
3
Press  (Reset) to return to the top screen.
 (Reset) to return to the top screen.
Adjusting the Print Density
You can adjust the density for your prints. Use this setting if you notice a difference in density between the image on the original and the print.
|
IMPORTANT
|
|
This setting does not apply to print jobs sent from a computer via a printer driver. To adjust the density when printing from a computer, use the Density setting in the Print Quality settings. (Customizing Settings)
|
|
NOTE
|
|
The default setting is ‘±0’, in the middle of the scale of ‘-4’ to ‘+4’.
|
1
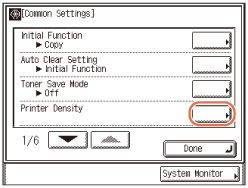
Press  (Additional Functions) → [Common Settings] → [Printer Density].
 (Additional Functions) → [Common Settings] → [Printer Density].
2
Press [Light] or [Dark] to set the desired density on the scale → press [OK].
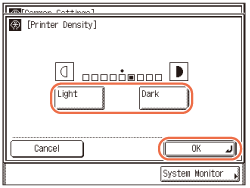
The selected mode is set.
3
Press  (Reset) to return to the top screen.
 (Reset) to return to the top screen.
Entering Values in Inches
The Inch Entry mode enables you to select either inch or millimeter as the unit of measurement. In this mode, the key for converting values from millimeters to inches (or vice versa) is displayed on the various numeric entry screens.
|
NOTE
|
|
The default setting is ‘Off’.
|
1
Press  (Additional Functions) → [Common Settings].
 (Additional Functions) → [Common Settings].
For help, see steps 1 and 2 in Initial Function at Power ON.
2
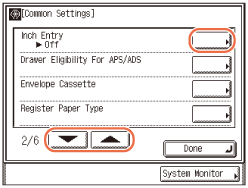
Press [ ] or [
 ] until [Inch Entry] appears → press [Inch Entry].
 ] or [
 ] until [Inch Entry] appears → press [Inch Entry].
3
Press [On] or [Off] → press [OK].
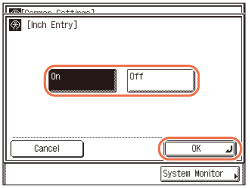
[On]: Press to enable the Inch Entry mode.
[Off]: Press to disable the Inch Entry mode.
The selected mode is set.
4
Press  (Reset) to return to the top screen.
 (Reset) to return to the top screen.
Auto Paper Selection/Auto Drawer Switching
The machine is equipped with the Automatic Paper Selection (APS) and Automatic Drawer Switching (ADS) functions.
APS: The machine automatically selects the appropriate paper size (paper source) based on the size of the page or image to be printed. In copying, for example, the paper source is automatically selected based on the original’s size and the copy ratio setting.
ADS: If a paper source runs out of paper during a continuous print job, the machine automatically selects another paper source loaded with the same size paper, and begins feeding paper from that paper source.
The Drawer Eligibility For APS/ADS setting defines which paper source (such as the stack bypass and Paper Drawer 1/2/3/4) is used for a specific purpose (such as copying, printing, receiving (RX), and other types of jobs). The setting can be made independently for all types of jobs (except sending (TX) jobs), and is especially useful when you want to use different paper sources for different purposes.
|
IMPORTANT
|
|
The number of available paper sources may vary depending on the machine configuration.
|
|
NOTE
|
|
The default settings are ‘Off’ for the stack bypass and ‘On’ for the paper drawers.
|
1
Press  (Additional Functions) → [Common Settings].
 (Additional Functions) → [Common Settings].
For help, see steps 1 and 2 in Initial Function at Power ON.
2
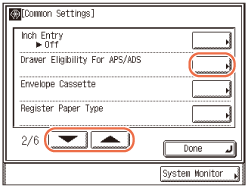
Press [ ] or [
 ] until [Drawer Eligibility For APS/ADS] appears → press [Drawer Eligibility For APS/ADS].
 ] or [
 ] until [Drawer Eligibility For APS/ADS] appears → press [Drawer Eligibility For APS/ADS].
3
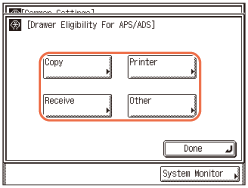
Press [Copy], [Printer], [Receive](or [Fax]), or [Other].
The screen shot below may differ from the actual display depending on the machine configuration.
|
|
[Copy]:
|
Press to select the paper sources used for the copy jobs.
|
|
[Printer]:
|
Press to select the paper sources used for the print jobs.
|
|
|
[Receive](or [Fax]):
|
Press to select the paper sources used for the receiving (RX) jobs (printing received I-faxes or traditional faxes).
|
|
|
[Other]:
|
Press to select the paper sources used for printing reports, such as the Address Book List, User’s Data List, etc.
|
IMPORTANT:
[Receive] is displayed only when the Send function (optional for the imageRUNNER 2545/2535/2530/2525/2520) is activated.
[Fax] is displayed only when both of the following conditions are met:
- The optional Super G3 Fax Board-AG1 is attached.
- The Send function is not activated.
4
Press [On] or [Off] for the stack bypass and the paper drawers → press [OK].
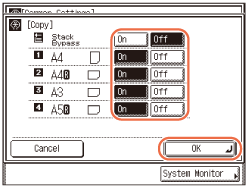
The available paper sources can be identified by the following icons:
|
|
|
: Stack Bypass
|
|
|
: Drawer 1
|
|
|
|
: Drawer 2 (optional for the imageRUNNER 2520i/2520)
|
|
|
|
: Drawer 3 (optional)
|
|
|
|
: Drawer 4 (optional)
|
|
|
[On]
|
: Press to enable the paper source for the selected job type.
|
|
|
[Off]
|
: Press to disable the paper source for the selected job type.
|
NOTE:
You cannot disable all of the paper drawers at the same time. At least one of the paper drawers must be enabled.
The selected mode is set.
5
Press  (Reset) to return to the top screen.
 (Reset) to return to the top screen.
Identifying the Type of Envelope in Paper Drawer 2
You can use Paper Drawer 2 as an envelope cassette if the optional Envelope Feeder Attachment-D1 is attached to it. (Envelope Feeder Attachment-D1) The Envelope Cassette settings define the type of envelopes loaded in the paper drawer.
|
NOTE
|
|
For more information on the envelope types available for the machine, see Available Paper Stock.
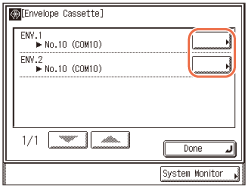
The default setting is ‘No.10 (COM10)’ for both [ENV.1] and [ENV.2].
|
1
Press  (Additional Functions) → [Common Settings].
 (Additional Functions) → [Common Settings].
For help, see steps 1 and 2 in Initial Function at Power ON.
2
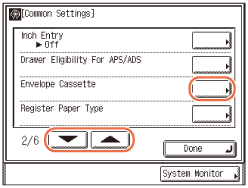
Press [ ] or [
 ] until [Envelope Cassette] appears → press [Envelope Cassette].
 ] or [
 ] until [Envelope Cassette] appears → press [Envelope Cassette].
3
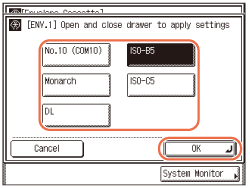
Press [ENV.1] or [ENV.2].
4
Press [No.10 (COM10)], [ISO-B5], [Monarch], [ISO-C5], or [DL] to select the desired envelope type → press [OK].
IMPORTANT:
Make sure that the selected envelope type is the same type of envelopes loaded in the drawer.
The selected mode is set.
5
Press  (Reset) to return to the top screen.
 (Reset) to return to the top screen.
Identifying the Type of Paper in a Paper Source
To avoid frequent trouble, you should specify the correct paper type for the paper loaded in each paper source. Use this setting to specify the type of paper loaded in each paper drawer.
|
IMPORTANT
|
|
Make sure that the paper type setting is correct. An incorrect paper type setting may adversely affect the image quality, damage the fixing unit, and cause paper jams.
The number of available paper drawers may vary depending on the machine configuration.
|
|
NOTE
|
|
For more information on the paper types available for the machine, see Available Paper Stock.
The default setting is ‘Plain’ for all paper sources.
|
1
Press  (Additional Functions) → [Common Settings].
 (Additional Functions) → [Common Settings].
For help, see steps 1 and 2 in Initial Function at Power ON.
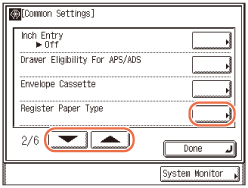
2
Press [ ] or [
 ] until [Register Paper Type] appears → press [Register Paper Type].
 ] or [
 ] until [Register Paper Type] appears → press [Register Paper Type].
3
Select the desired paper source.
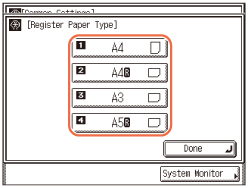
The available paper sources can be identified by the following icons:
|
|
|
: Drawer 1
|
|
|
: Drawer 2 (optional for the imageRUNNER 2520i/2520)
|
|
|
|
: Drawer 3 (optional)
|
|
|
|
: Drawer 4 (optional)
|
4
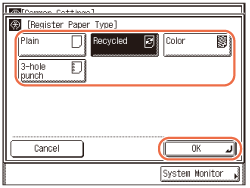
Press [Plain  ], [Recycled
  ], [Color
  ], or [3-hole punch
  ] to select the desired paper type → press [OK].
 ], [Recycled
  ], [Color
  ], or [3-hole punch
  ] to select the desired paper type → press [OK].
The selected mode is set.
Repeat steps 3 and 4 to set the paper type for the other drawers.
IMPORTANT:
Make sure that the selected paper type is the same type of paper loaded in the selected paper source.
5
Press  (Reset) to return to the top screen.
 (Reset) to return to the top screen.
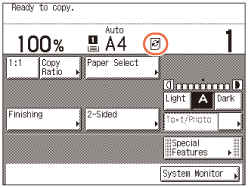
NOTE:
The registered paper types are indicated for each paper source with the corresponding paper type icons.
Energy Consumption in the Sleep Mode
You can select the level of energy consumed by the machine that is in the Sleep mode.
|
NOTE
|
|
Regardless of the setting, the energy consumption level is ‘High’ in the Sleep mode while the machine is processing jobs (such as when receiving/forwarding faxes).
The default setting is ‘Low’.
|
1
Press  (Additional Functions) → [Common Settings].
 (Additional Functions) → [Common Settings].
For help, see steps 1 and 2 in Initial Function at Power ON.
2
Press [ ] or [
 ] until [Energy Consumption in Sleep Mode] appears → press [Energy Consumption in Sleep Mode].
 ] or [
 ] until [Energy Consumption in Sleep Mode] appears → press [Energy Consumption in Sleep Mode].
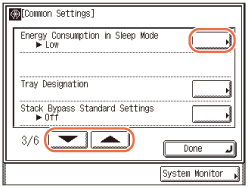
3
Press [Low] or [High] to select the desired setting → press [OK].
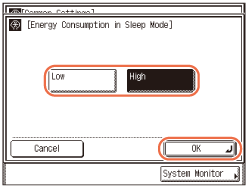
|
|
[Low]: Energy consumption level in the Sleep mode is low, but it takes longer to wake from the Sleep mode.
|
|
|
[High]: Energy consumption level in the Sleep mode is high, but it takes less time to wake from the Sleep mode.
|
The selected mode is set.
4
Press  (Reset) to return to the top screen.
 (Reset) to return to the top screen.
Tray Designation
You can designate the machine’s output trays to be used for specific job types. The output trays are indicated by Tray A and Tray B.
|
Options Attached
|
Job Types
|
Trays A and B
|
|
Inner Finisher-B1 and Inner Finisher Additional Tray-B1
|
Copy:
(Copying)
Media Print: Print:
(See the help on the printer driver.)
Receiving (RX):
Others (e.g. report printing):
|
 |
|
Inner 2 Way Tray-G1
|
 |
Each of the output trays can be designated for multiple job types. If both of the output trays are enabled for the same job type, the prints are delivered to Tray A until it reaches its stacking limit.
|
IMPORTANT
|
|
The Tray Designation setting is available only when the optional Inner Finisher-B1 with the Inner Finisher Additional Tray-B1 or Inner 2 Way Tray-G1 is attached to the machine.
The Inner 2 Way Tray-G1 must be enabled prior to use. (Other System Settings)
If the optional Inner Finisher Additional Tray-B1 or Inner 2 Way Tray-G1 is attached, you must enable the functions for Tray B so that the machine can deliver the prints to it.
|
|
NOTE
|
|
The default settings are as follows:
Tray A: ‘On’ for all job types (All kinds of prints can be delivered to Tray A.)
Tray B: ‘Off’ for all job types (Tray B is disabled.)
|
1
Press  (Additional Functions) → [Common Settings].
 (Additional Functions) → [Common Settings].
For help, see steps 1 and 2 in Initial Function at Power ON.
2
Press [ ] or [
 ] until [Tray Designation] appears → press [Tray Designation].
 ] or [
 ] until [Tray Designation] appears → press [Tray Designation].
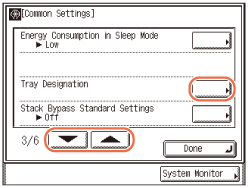
3
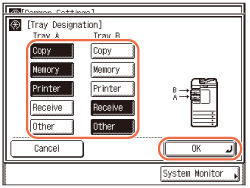
Press [Copy], [Memory], [Printer], [Receive](or [Fax]), or [Other] to select the desired job types for each output tray → press [OK].
The selected job types are highlighted.
The screen shot below may differ from the actual display depending on the machine configuration.
|
|
[Copy]:
|
Press to set the tray to handle copy jobs.
|
|
[Memory]:
|
Press to set the tray to handle prints from the USB memory media device.
|
|
|
[Printer]:
|
Press to set the tray to handle prints via the printer driver.
|
|
|
[Receive](or [Fax]):
|
Press to set the tray to handle received I-fax/fax documents.
|
|
|
[Other]:
|
Press to set the tray to handle report prints.
|
The selected mode is set.
IMPORTANT:
[Memory] is displayed only when the Use Media Print setting is set to ‘On’. (Other System Settings)
[Receive] is displayed only when the Send function (optional for the imageRUNNER 2545/2535/2530/2525/2520) is activated.
[Fax] is displayed only when both of the following conditions are met:
- The optional Super G3 Fax Board-AG1 is attached.
- The Send function is not activated.
4
Press  (Reset) to return to the top screen.
 (Reset) to return to the top screen.
Standard Paper for the Stack Bypass
You can set the default paper size and type for the stack bypass. Use this setting if you frequently load the same paper size and type in the stack bypass.
|
NOTE
|
|
To feed paper from the stack bypass with the APS/ADS mode, the stack bypass must be enabled for the desired job types. (Auto Paper Selection/Auto Drawer Switching)
For more information on the paper sizes/types available for the machine, see Available Paper Stock.
The default setting is ‘Off’.
|
1
Press  (Additional Functions) → [Common Settings].
 (Additional Functions) → [Common Settings].
For help, see steps 1 and 2 in Initial Function at Power ON.
2
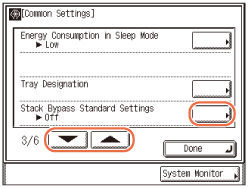
Press [ ] or [
 ] until [Stack Bypass Standard Settings] appears → press [Stack Bypass Standard Settings].
 ] or [
 ] until [Stack Bypass Standard Settings] appears → press [Stack Bypass Standard Settings].
3
Press [On] → [Store].
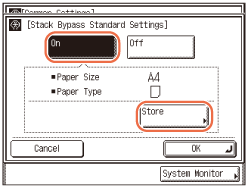
[Store] is activated only when [On] is pressed.
4
Select the desired paper size/type.
If you want to select a standard paper size:
|
1
|
Select the desired paper size → press [Next].
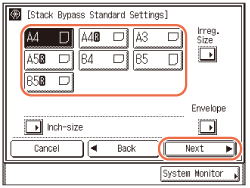 IMPORTANT:
Make sure that the paper size setting is correct. If the paper size loaded on the stack bypass and the paper size setting do not match, a paper jam may occur.
NOTE:
To select from North American paper sizes, press [Inch-size].
|
|
2
|
Select the desired paper type → press [OK].
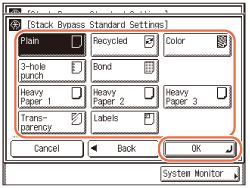 The selected mode is set.
IMPORTANT:
Make sure that the paper type setting is correct. An incorrect paper type setting may adversely affect the image quality, damage the fixing unit, and cause paper jams.
NOTE:
[Transparency] can be selected only when [A4] is selected as the paper size.
If [Transparency] or [Labels] is selected, you cannot select Rotate, Offset, or Staple as the Finishing mode.
|
If you want to select a nonstandard paper size:
|
1
|
Press [Irreg. Size].
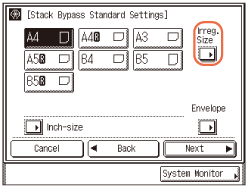 |
|
2
|
Press [X] → enter the length along the horizontal axis of the paper using the numeric keys.
The horizontal length can be set between 148 mm and 432 mm.
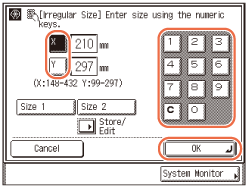 |
|
3
|
Press [Y] → enter the length along the vertical axis of the paper using the numeric keys.
The vertical length can be set between 99 mm and 297 mm.
|
|
4
|
Press [OK].
IMPORTANT:
Make sure that the paper size setting is correct. If the paper size loaded on the stack bypass and the paper size setting do not match, a paper jam may occur.
NOTE:
If you make a mistake when entering numbers, press
 (Clear) → enter the correct numbers. (Clear) → enter the correct numbers.When entering numbers in millimeters, you can also use
 - -  (numeric keys) and (numeric keys) and  (Clear) on the control panel. (Clear) on the control panel.To enter values in inches, press [Inch]. (Entering Values in Inches)
When entering the length in inches, an underbar (_) must be entered between integer and fraction.
You can press [Size 1] or [Size 2] to specify the paper size if the values for the horizontal and vertical axes are registered beforehand. (Registering Nonstandard Paper Sizes)
|
|
5
|
Press [Next].
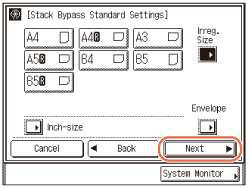 |
|
6
|
Select the desired paper type → press [OK].
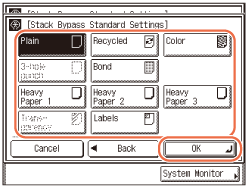 The selected mode is set.
IMPORTANT:
Make sure that the paper type setting is correct. An incorrect paper type setting may adversely affect the image quality, damage the fixing unit, and cause paper jams.
NOTE:
[3-hole punch] and [Transparency] cannot be selected for a nonstandard paper size.
|
If you want to select an envelope type:
|
1
|
Press [Envelope].
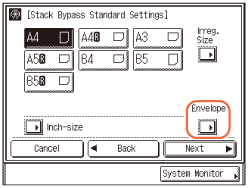 |
|
2
|
Select the desired envelope type → press [OK].
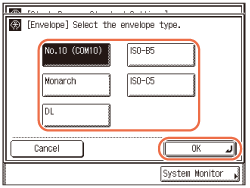 IMPORTANT:
Make sure that the envelope type setting is correct. If the envelopes loaded on the stack bypass and the envelope type setting do not match, a paper jam may occur.
|
|
3
|
Press [OK].
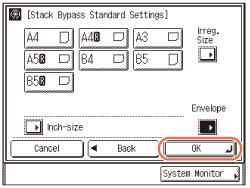 The selected mode is set.
|
5
Press  (Reset) to return to the top screen.
 (Reset) to return to the top screen.
Registering Nonstandard Paper Sizes
You can store the horizontal and vertical lengths for nonstandard paper sizes so that you can specify the lengths with the simple press of a key. (Standard Paper for the Stack Bypass) This setting is useful if you frequently use nonstandard size paper of more than one kind.
1
Press  (Additional Functions) → [Common Settings].
 (Additional Functions) → [Common Settings].
For help, see steps 1 and 2 in Initial Function at Power ON.
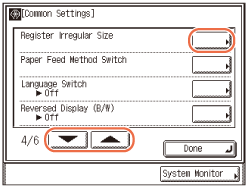
2
Press [ ] or [
 ] until [Register Irregular Size] appears → press [Register Irregular Size].
 ] or [
 ] until [Register Irregular Size] appears → press [Register Irregular Size].
3
Specify the desired nonstandard paper size:
|
1
|
Press [Size 1] or [Size 2].
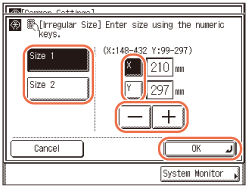 You can register two kinds of nonstandard paper sizes.
|
|
2
|
Press [X] → enter the length along the horizontal axis of the paper using [-] or [+].
The horizontal length can be set between 148 mm and 432 mm.
|
|
3
|
Press [Y] → enter the length along the vertical axis of the paper using [-] or [+].
The vertical length can be set between 99 mm and 297 mm.
|
|
4
|
Press [OK].
Repeat this step to register or edit another size of nonstandard paper.
|
IMPORTANT:
Make sure that the paper size setting is correct. If the paper size loaded on the stack bypass and the paper size setting do not match, a paper jam may occur.
NOTE:
If you make a mistake when entering numbers, press  (Clear) → enter the correct numbers.
 (Clear) → enter the correct numbers.
When entering numbers in millimeters, you can also use  -
-  (numeric keys) and
  (Clear) on the control panel.
 -
-  (numeric keys) and
  (Clear) on the control panel.
To enter values in inches, press [Inch]. (Entering Values in Inches)
When entering the length in inches, an underbar (_) must be entered between integer and fraction.
4
Press  (Reset) to return to the top screen.
 (Reset) to return to the top screen.
Selecting the Paper Feed Method
You can set whether the printing speed is the priority for your job, or whether to print on a specific side of the paper. This setting is useful when you want to make one- or two-sided prints on preprinted paper (paper which has logos or patterns already printed on it) without turning over the paper loaded in a paper source.
|
NOTE
|
|
The default settings are ‘Speed’ for all paper sources.
|
1
Press  (Additional Functions) → [Common Settings].
 (Additional Functions) → [Common Settings].
For help, see steps 1 and 2 in Initial Function at Power ON.
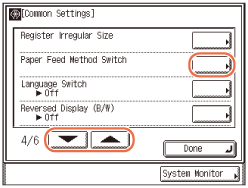
2
Press [ ] or [
 ] until [Paper Feed Method Switch] appears → press [Paper Feed Method Switch].
 ] or [
 ] until [Paper Feed Method Switch] appears → press [Paper Feed Method Switch].
3
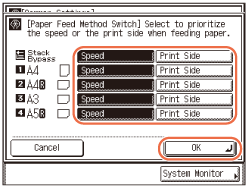
Press [Speed] or [Print Side] to select the desired paper feed method → press [OK].
|
|
[Speed]:
|
When you feed one- or two-sided prints into the machine, the method for delivering paper inside the machine changes, which affects the printing speed. To maximize the printing speed, load the paper manually as follows:
One-sided printing
Load the paper face up into a paper drawer, or face down into the stack bypass. The side facing up in the paper drawer, and the side facing down in the stack bypass, are the sides printed on. Two-sided printing
Load the paper face down into a paper drawer, or face up into the stack bypass. The side facing down in the paper drawer, and the side facing up in the stack bypass, are the sides that are printed on first. |
|
[Print Side]:
|
If [Print Side] is selected, the side of the paper facing down in the paper drawer is always the one printed on first, regardless of one- or two-sided prints. (The side facing up is the one printed on first for the stack bypass.) However, the print speed will be sacrificed when making one-sided prints.
|
The selected mode is set.
4
Press  (Reset) to return to the top screen.
 (Reset) to return to the top screen.
Changing the Language on the Display
You can change the language displayed on the touch panel display.
|
NOTE
|
|
The default setting is ‘Off’.
|
1
Press  (Additional Functions) → [Common Settings].
 (Additional Functions) → [Common Settings].
For help, see steps 1 and 2 in Initial Function at Power ON.
2
Press [ ] or [
 ] until [Language Switch] appears → press [Language Switch].
 ] or [
 ] until [Language Switch] appears → press [Language Switch].
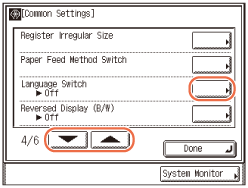
3
Specify the desired language:
|
1
|
Press [On].
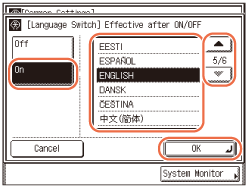 The language can be changed only when [On] is pressed.
|
|
2
|
Press [
 ] or [ ] or [ ] until the desired language appears in the list → select the desired language. ] until the desired language appears in the list → select the desired language. |
|
3
|
Press [OK].
|
4
Press [Language Switch].
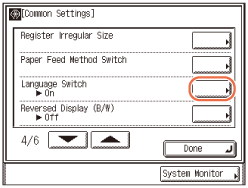
5
Press [Off] → [OK].
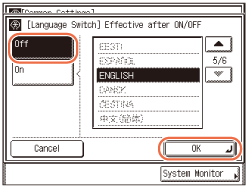
IMPORTANT:
If the Language Switch setting is set to ‘On’, some characters are restricted and cannot be entered. To enter all characters, set the Language Switch setting to ‘Off’.
6
Restart the machine.
Turn OFF the machine, wait at least 10 seconds, and then turn it ON.
The top screen is displayed in the selected language.
Reversing the Display Contrast
In the Reversed Display mode, the light and dark areas are reversed on the touch panel display. Use this mode when you find it hard to see what is shown on the display.
|
NOTE
|
|
The default setting is ‘Off’.
|
1
Press  (Additional Functions) → [Common Settings].
 (Additional Functions) → [Common Settings].
For help, see steps 1 and 2 in Initial Function at Power ON.
2
Press [ ] or [
 ] until [Reversed Display (B/W)] appears → press [Reversed Display (B/W)].
 ] or [
 ] until [Reversed Display (B/W)] appears → press [Reversed Display (B/W)].
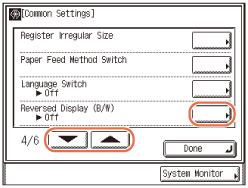
3
Press [On] or [Off] to enable or disable the mode → press [OK].
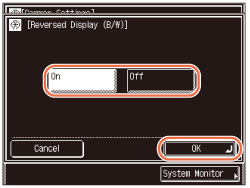
The selected mode is set.
4
Press  (Reset) to return to the top screen.
 (Reset) to return to the top screen.
Displaying a Feeder Error Message Prompt
If the feeder is not clean, the machine may scan and print dust and grime on the output. You can set the machine to prompt you to clean the scanning area when the machine detects streaks or stains.
|
IMPORTANT
|
|
This mode is available only when the machine is equipped with the feeder (optional for the imageRUNNER 2545/2535/2530/2525/2520).
|
|
NOTE
|
|
The feeder error message prompt appears when originals are placed in the feeder.
The default setting is ‘On’.
|
1
Press  (Additional Functions) → [Common Settings].
 (Additional Functions) → [Common Settings].
For help, see steps 1 and 2 in Initial Function at Power ON.
2
Press [ ] or [
 ] until [Error Display for Dirty Feeder] appears → press [Error Display for Dirty Feeder].
 ] or [
 ] until [Error Display for Dirty Feeder] appears → press [Error Display for Dirty Feeder].
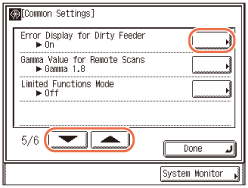
3
Press [On] or [Off] to enable or disable the feeder error message prompt → press [OK].
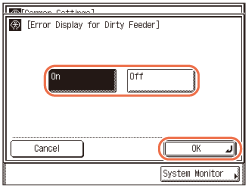
The selected mode is set.
4
Press  (Reset) to return to the top screen.
 (Reset) to return to the top screen.
Setting the Gamma Value for Remote Scans
You can set the gamma value used when scanning color documents into your computer on the network. Select a gamma value that is most suited to your computer settings so that your scans can be reproduced on the computer display to the closest approximation of the original.
|
NOTE
|
|
For more information on the remote scan function, see the help on the Color Network ScanGear.
The default setting is ‘Gamma 1.8’.
|
1
Press  (Additional Functions) → [Common Settings].
 (Additional Functions) → [Common Settings].
For help, see steps 1 and 2 in Initial Function at Power ON.
2
Press [ ] or [
 ] until [Gamma Value for Remote Scans] appears → press [Gamma Value for Remote Scans].
 ] or [
 ] until [Gamma Value for Remote Scans] appears → press [Gamma Value for Remote Scans].
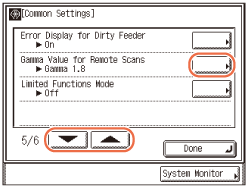
3
Press [Gamma 1.0], [Gamma 1.4], [Gamma 1.8], or [Gamma 2.2] to select the desired gamma value → press [OK].
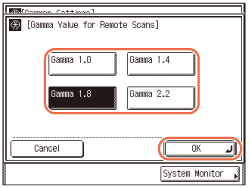
The selected mode is set.
4
Press  (Reset) to return to the top screen.
 (Reset) to return to the top screen.
Setting the Limited Functions Mode
Using the finishing modes may sometimes result in problems due to their functional complexity. You can manually limit the use of the finishing modes to prevent the recurrence of the problems, if they occur.
|
IMPORTANT
|
|
The Limited Functions Mode is available only when the optional Inner Finisher-B1 is attached to the machine.
|
|
NOTE
|
|
The default setting is ‘Off’.
|
1
Press  (Additional Functions) → [Common Settings].
 (Additional Functions) → [Common Settings].
For help, see steps 1 and 2 in Initial Function at Power ON.
2
Press [ ] or [
 ] until [Limited Functions Mode] appears → press [Limited Functions Mode].
 ] or [
 ] until [Limited Functions Mode] appears → press [Limited Functions Mode].
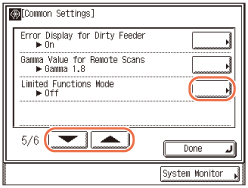
3
Press [On] or [Off] to enable or disable the mode → press [OK].
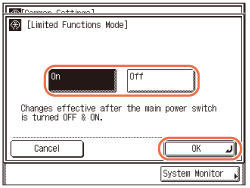
The selected mode is set.
4
Restart the machine.
Turn OFF the machine, wait at least 10 seconds, and then turn it ON.
Specifying B5/EXEC Paper
Specify B5 or EXEC when paper of these sizes is loaded in the paper drawers.
|
NOTE
|
|
The default setting is ‘B5’.
|
1
Press  (Additional Functions) → [Common Settings].
 (Additional Functions) → [Common Settings].
For help, see steps 1 and 2 in Initial Function at Power ON.
2
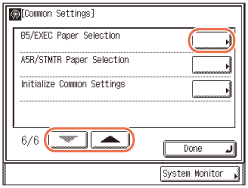
Press [ ] or [
 ] until [B5/EXEC Paper Selection] appears → press [B5/EXEC Paper Selection].
 ] or [
 ] until [B5/EXEC Paper Selection] appears → press [B5/EXEC Paper Selection].
3
Press [B5] or [EXEC] for each paper source to select the desired paper size → press [OK].
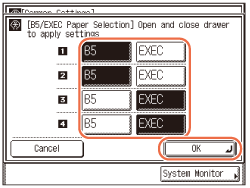
The available paper sources can be identified by the following icons:
|
|
|
: Drawer 1
|
|
|
: Drawer 2 (optional for the imageRUNNER 2520i/2520)
|
|
|
|
: Drawer 3 (optional)
|
|
|
|
: Drawer 4 (optional)
|
4
Open the paper drawer and then close it.
The selected mode is set.
5
Press  (Reset) to return to the top screen.
 (Reset) to return to the top screen.
Specifying A5R/STMTR Paper
Specify A5R or STMTR when paper of these sizes is loaded in the paper drawers.
|
NOTE
|
|
The default setting is ‘A5R’.
|
1
Press  (Additional Functions) → [Common Settings].
 (Additional Functions) → [Common Settings].
For help, see steps 1 and 2 in Initial Function at Power ON.
2
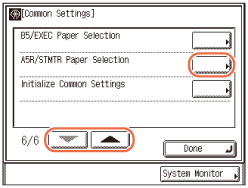
Press [ ] or [
 ] until [A5R/STMTR Paper Selection] appears → press [A5R/STMTR Paper Selection].
 ] or [
 ] until [A5R/STMTR Paper Selection] appears → press [A5R/STMTR Paper Selection].
3
Press [A5R] or [STMTR] for each paper source to select the desired paper size → press [OK].
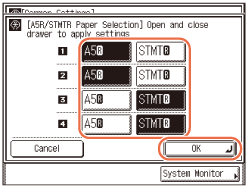
The available paper sources can be identified by the following icons:
|
|
|
: Drawer 1
|
|
|
: Drawer 2 (optional for the imageRUNNER 2520i/2520)
|
|
|
|
: Drawer 3 (optional)
|
|
|
|
: Drawer 4 (optional)
|
4
Open the paper drawer and then close it.
The selected mode is set.
5
Press  (Reset) to return to the top screen.
 (Reset) to return to the top screen.
Returning the Common Settings to Their Defaults
You can restore all of the Common Settings to their factory default settings.
|
NOTE
|
|
Returning the Common Settings to their default settings does not change the language shown on the touch panel display. (Changing the Language on the Display)
|
1
Press  (Additional Functions) → [Common Settings].
 (Additional Functions) → [Common Settings].
For help, see steps 1 and 2 in Initial Function at Power ON.
2
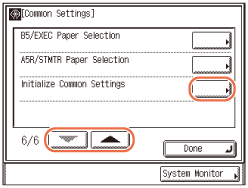
Press [ ] or [
 ] until [Initialize Common Settings] appears → press [Initialize Common Settings].
 ] or [
 ] until [Initialize Common Settings] appears → press [Initialize Common Settings].
3
Press [Yes] to restore the defaults.
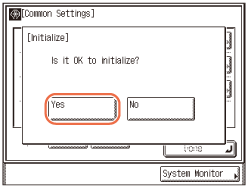
To quit, press [No].
4
Press  (Reset) to return to the top screen.
 (Reset) to return to the top screen.