Connecting the Printer (IPP/IPPS)
If You Are Using Windows Vista, 7, 8, 8.1, 10 or Server 2008/Server 2012/Server 2012 R2
IMPORTANT |
When using IPPS printingYou need to obtain the public key for this printer and install it on Windows Vista, 7, 8, 8.1, 10 or Server 2008/Server 2012/Server 2012 R2. For details on the procedure for obtaining the public key, see "Obtaining the Public Key for This Printer When Using TLS Encrypted Communication." |
NOTE |
About the screenshotsThis procedure is described using screenshots from Windows 7. |
1
Confirm the setting for [IP Address Filter].
Make sure that the IP address of the computer on which the printer driver is installed is not restricted to print.
IMPORTANT |
If printing is restrictedYou cannot install the printer driver. If printing is restricted after the installationIf the IP address of the computer on which the printer driver is installed is restricted to perform printing in [IP Address Filter], you cannot print from the computer. |
2
Open the printer folder.
3
Click [Add a printer].
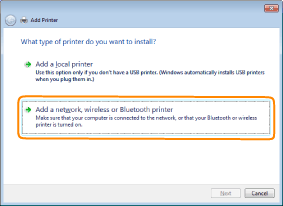
4
Click [Add a network, wireless or Bluetooth printer].
5
Click [The printer that I want isn't listed].

6
Perform the following procedure.
(1) | Select [Select a shared printer by name]. | ||
(2) | Enter "http://<the IP address or name of the printer>/ipp."
| ||
(3) | Click [Next]. |


IMPORTANT |
About IPPSIPPS can be used only when the TLS encrypted communication function is enabled. For details on the TLS encrypted communication function, see "Setting Keys and Certificates." |
7
Click [Have Disk], and then specify the folder that contains the printer driver from the CD-ROM drive.

NOTE | ||
When you are using the IPP authentication functionIf you are asked to enter the password, enter the user name and password, and then click [OK].
|
8
Follow the on-screen instructions to install the printer driver.
If You Are Using Windows Server 2003
NOTE |
About the screenshotsThis procedure is described using screenshots from Windows XP. |
1
Confirm the setting for [IP Address Filter].
Make sure that the IP address of the computer on which the printer driver is installed is not restricted to print.
NOTE |
If printing is restrictedYou cannot install the printer driver. If printing is restricted after the installationIf the IP address of the computer on which the printer driver is installed is restricted to perform printing in [IP Address Filter], you cannot print from the computer. |
2
Open the printer folder.
3
Display [Add Printer Wizard].
Double-click [Add Printer].
4
Click [Next].

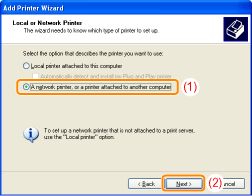
5
Select a printer type.
(1) | Select [A network printer, or a printer attached to another computer]. |
(2) | Click [Next]. |
6
Select the printer to be connected.
Select [Connect to a printer on the Internet or on a home or office network].

7
Enter [URL].
(1) | Enter "http://<the IP address or name of the printer>/ipp."
| ||
(2) | Click [Next]. |

IMPORTANT |
About IPPSIPPS can be used only when the TLS encrypted communication function is enabled. For details on the TLS encrypted communication function, see "Setting Keys and Certificates." |
8
Click [Have Disk], and then specify the folder that contains the printer driver from the CD-ROM drive.

NOTE | ||
When you are using the IPP authentication functionIf you are asked to enter the password, enter the user name and password, and then click [OK].
|
9
Follow the on-screen instructions to install the printer driver.