Basic Operations/Various Information for Windows
Checking the IP Address Using the PING Command
1
Run Command Prompt.
Windows Vista/7/Server 2003/Server 2008
From the [Start] menu, select [All Programs] or [Programs] → [Accessories] → [Command Prompt].
Windows 8/8.1/Server 2012/Server 2012 R2
Right-click the lower-left corner of the screen, select [Command Prompt].
Windows 10
Right-click [  ] → select [Command Prompt].
] → select [Command Prompt].2
Enter "ping <the IP address of the printer>", and then press the [ENTER] key on your keyboard.
Input example: "ping 192.168.0.215"
 | Correctly enter the IP address which is set for the printer. If the wrong IP address is entered, you cannot obtain an appropriate check result. |
3
Check the displayed result.
Windows Server 2003
When "Packets: Sent = 4, Received = 4, Lost = 0 (0% loss)," is displayed
The IP address is set properly.
When "Packets: Sent = 4, Received = 0, Lost = 4 (100% loss)," is displayed
Ask your network administrator about the problem.
Windows Vista/7/8/8.1/10/Server 2008/Server 2012/Server 2012 R2
When "Packets: Sent = 4, Received = 4, Lost = 0 (0% loss)," is displayed
The IP address is set properly.
When "Packets: Sent = 4, Received = 0, Lost = 4 (100% loss)," is displayed
Ask your network administrator about the problem.
4
Enter "exit", and then press [ENTER] on the keyboard to exit Command Prompt.
NOTE | |||||||||
When using DHCP, BOOTP, or RARPConsult your network administrator and perform either of the following settings. Configure DHCP or other settings so that the same IP address is always assigned to the printer when the printer is started.  "Configuring the Protocol Settings" "Configuring the Protocol Settings"Checking and configuring the subnetEnter "ipconfig" as a command in Command Prompt. The network setting information of the computer appears. Confirm that the computer and printer are on the same subnet.
|

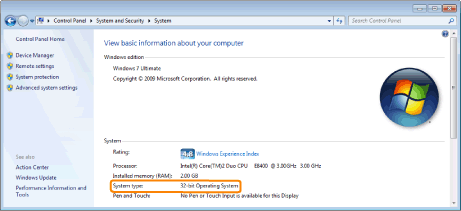
Checking the Processor Version of Windows Vista, 7, 8, 8.1, 10, Server 2008, Server 2012, or Server 2012 R2
If you are not sure whether you are using 32-bit Windows Vista/7/8/8.1/10/Server 2008/Server 2012/Server 2012 R2 or 64-bit Windows Vista/7/8/8.1/10/Server 2008/Server 2012/Server 2012 R2, you can check that using the following procedure.
1
From the [Start] menu, select [Control Panel].
Windows Vista/7/Server 2008
From the [Start] menu, select [Control Panel].
Windows 8/8.1/Server 2012/Server 2012 R2
Right-click the lower-left corner of the screen, select[Control Panel].
Windows 10
Skip to step 2.
2
Display [System].
Windows Vista/7/8/8.1/Server 2008 R2/Server 2012/Server 2012 R2
Click [System and Security] or [System and Maintenance] → [System].
Windows Server 2008
Double-click [System].
Windows 10
Select [ ] → select [Settings] → [System] → [About] → [Version].
] → select [Settings] → [System] → [About] → [Version].3
Check the processor version.
For a 32-bit operating system
[32-bit Operating System] is displayed.
For a 64-bit operating system
[64-bit Operating System] is displayed.
Printing a Test Page in Windows
You can check the operations of the printer driver by printing a test page in Windows.
1
Load A4 size paper in the multi-purpose tray or paper drawer.
2
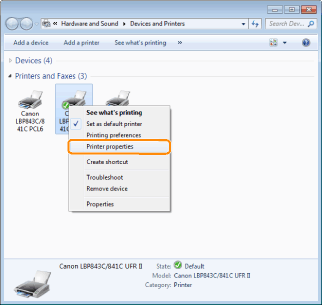
Open the printer folder.
3
Right-click the icon for this printer, and then select [Printer properties] or [Properties] from the pop-up menu.
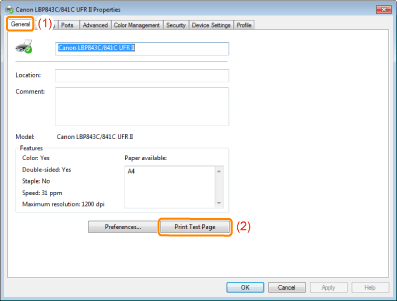
4
Print a test page.
(1) | Display the [General] tab. |
(2) | Click [Print Test Page] to print a test page. |
Checking the Bi-directional Communication
1
Open the printer folder.
2
Right-click the icon for this printer, and then select [Printer properties] or [Properties] from the pop-up menu.
3
Check the bi-directional communication.
(1) | Display the [Ports] tab. |
(2) | Check the [Enable bidirectional support] check box is selected. |
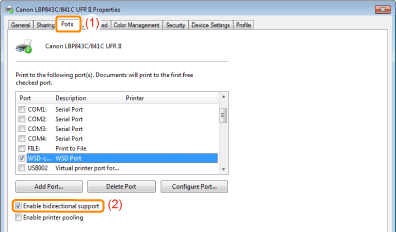
IMPORTANT |
Do not clear the [Enable bidirectional support] check box.If the check box is cleared, you cannot perform printing. |
Displaying the Printer Folder
Windows Server 2003
From the [Start] menu, select [Printers and Faxes].
Windows Vista
From the [Start] menu, select [Control Panel], and then click [Printer].
Windows 7/Server 2008 R2
From the [Start] menu, select [Devices and Printers].
Windows Server 2008
From the [Start] menu, select [Control Panel], and then double-click [Printers].
Windows 8/Server 2012
Right-click the lower-left corner of the screen, select [Control Panel] → [View devices and printers].
Windows 8.1/Server 2012 R2
Right-click [Start] → select [Control Panel] → [View devices and printers].
Windows 10
Right-click [ ] → select [Control Panel] → [Hardware and Sound] → [Devices and Printers].
] → select [Control Panel] → [Hardware and Sound] → [Devices and Printers].Checking Printers in the Print Server
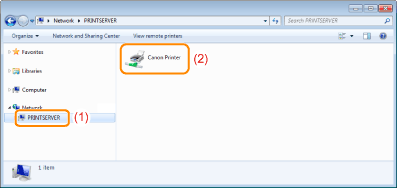
1
Display [Windows Explorer].
Windows Vista/7/Server 2003/Server 2008
From the [Start] menu, select [All Programs] or [Programs] → [Accessories] → [Windows Explorer].
Windows 8/8.1/Server 2012/Server 2012 R2
Right-click the lower-left corner of the screen, select [File Explorer].
Windows 10
Select [ ] → [File Explorer].
] → [File Explorer].2
Check printers in the print server.
(1) | Select the print server from [Network] or [My Network Places]. |
(2) | Check the icon for this printer is displayed. |
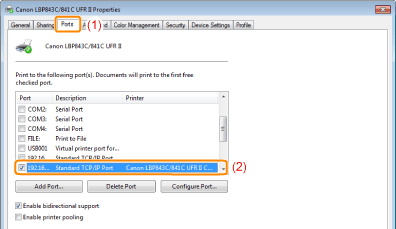
Checking the Port
1
Open the printer folder.
2
Right-click the icon for this printer, and then select [Printer properties] or [Properties] from the pop-up menu.
3
Check a port.
(1) | Display the [Ports] tab. |
(2) | Confirm the port is selected properly. |
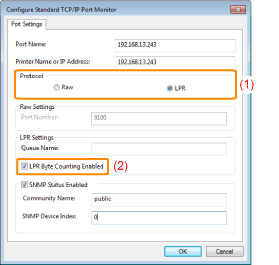
Changing the Printing Protocol
Change the printing protocol to LPR and specify the setting for the LPR byte count using the following procedure.
1
Open the printer folder.
2
Right-click the icon for this printer, and then select [Printer properties] or [Properties] from the pop-up menu.
3
Display the [Ports] tab.
4
Click [Configure Port].
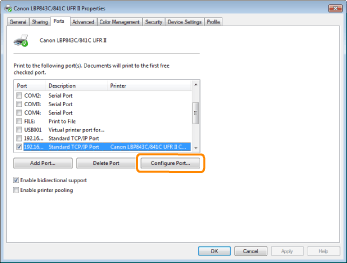
5
Perform the following procedure.
(1) | To change the printing protocol to LPR, select [LPR] for [Protocol]. |
(2) | To enable the LPR byte count, select the [LPR Byte Counting Enabled] check box. |
6
Click [OK].
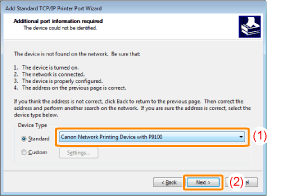
Setting for [Device Type] when Setting a Port
If the printer cannot be detected when setting a port, set [Device Type] as follows.
(1) | Select [Standard], and then select [Canon Network Printing Device with P9100]. |
(2) | Click [Next]. |