Creating TIFF Documents/JPEG Documents with Desktop Editor
You can export documents in the TIFF format (*.tiff) or JPEG format (*.jpg) with the range of pages specified in Desktop Editor.
Since the annotations are also converted when you convert documents to TIFF/JPEG documents, if there are some areas in the documents that you do not want to show, you can mask these areas with annotations before converting the documents to prevent the masked sections from being viewed.
|
IMPORTANT
|
|
If a document is converted into a TIFF/JPEG document, annotations containing unrenderable characters are deleted.
|
|
NOTE
|
|
The print settings specified for the document are not reflected in the exported TIFF/JPEG document.
For more information on how to export a document to Therefore in the TIFF format and JPEG format, see the following.
Exporting a Document Edited with Desktop Editor to Therefore (Administrator Guide)
|
Exporting as a TIFF Document
This section describes how to export a document as a TIFF document.
|
NOTE
|
|
A document with multiple pages is exported as a single TIFF document.
|
1.
Open a document with Desktop Editor.
For information on how to open a document with Desktop Editor, see the following.
2.
Click  (Export as Image) on the ribbon.
(Export as Image) on the ribbon.Or, select [File] menu > [Export as Image].
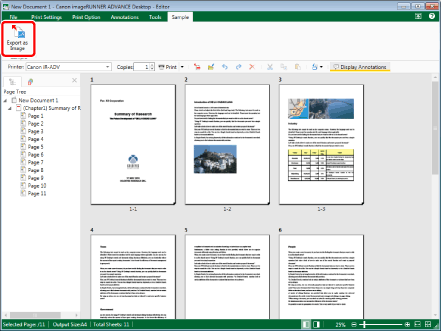
The [Select Export Destination] dialog box is displayed.
|
NOTE
|
|
If commands are not displayed on the ribbon of Desktop Editor, see the following to display them.
This operation can also be performed with the tool buttons on the toolbar. If tool buttons are not displayed on the toolbar of Desktop Editor, see the following to display them.
|
3.
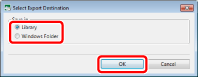
Select [Library] or [Windows Folder], and click [OK].
The [Export as Image] dialog box is displayed.
4.
Select the library or Windows Folder to save to.
5.
Specify [Document Name] or [File name].
6.
Select [TIFF File (*.tiff;*.tif)] in [Document Type] or [Files of type].
7.
To specify the pages to export, select [Original Pages] in [Export Range] and specify the page number in the displayed [Specify Range].
You can use the following formats to specify a range of page numbers.
When exporting from page "a" to the last page: a-
("a" indicates the page number to start exporting)
When exporting from the first page to page "b": -b
("b" indicates the page number to end exporting)
When exporting continuous pages: a-b
("a" and "b" indicate the page numbers to start and end exporting respectively)
When exporting discontinuous pages: c,d
("c" and "d" indicate the individual page numbers to export, separated by commas)
|
NOTE
|
|
The entry order of [Specify Range] is not the order of pages of the document to be exported. Even when you enter "1,2" or "2,1", pages are exported in the order "1,2".
|
8.
If you want to export with advanced settings specified, click [Detailed Settings].
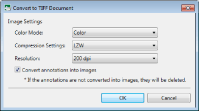
The [Convert to TIFF Document] dialog box is displayed.
9.
Specify the advanced settings for the TIFF document.
|
[Color Mode]
|
Specifies the color.
|
|
[Compression Settings]
|
Specifies the compression format.
|
|
[Resolution]
|
Specifies the resolution.
|
|
[Convert annotations into images]
|
Select this check box to convert annotations to images as well. If this check box is deselected, annotations are deleted when converting.
|
10.
Click [OK].
The [Export as Image] dialog box is displayed again.
11.
Click [Save].
The document is exported as a TIFF document.
|
NOTE
|
|
If the following dialog box is displayed after saving, select the appropriate update process and then click [OK].
[Checked Out Document Confirmation] dialog box
[Modify Shared Document] dialog box
If the [Check in automatically after exiting the application that is editing documents] check box in [System Settings] is deselected, you need to perform check in/check out manually.
[File] menu > [Option] > [System Settings] > [Browser] > [Shared Document Management] > [Check in automatically after exiting the application that is editing documents]
|
Exporting as a JPEG Document
This section describes how to export a document as a JPEG document.
|
NOTE
|
|
A document with multiple pages is exported as a separate JPEG document for each page.
|
1.
Open a document with Desktop Editor.
For information on how to open a document with Desktop Editor, see the following.
2.
Click (Export as Image) on the ribbon.
(Export as Image) on the ribbon.Or, select [File] menu > [Export as Image].
The [Select Export Destination] dialog box is displayed.
|
NOTE
|
|
If commands are not displayed on the ribbon of Desktop Editor, see the following to display them.
This operation can also be performed with the tool buttons on the toolbar. If tool buttons are not displayed on the toolbar of Desktop Editor, see the following to display them.
|
3.
Select [Library] or [Windows Folder], and click [OK].
The [Export as Image] dialog box is displayed.
4.
Select the library or Windows Folder to save to.
5.
Specify [Document Name] or [File name].
6.
Select [JPEG File (*.jpg;*.jpeg)] in [Document Type] or [Files of type].
7.
To specify the pages to export, select [Original Pages] in [Export Range] and specify the page number in the displayed [Specify Range].
You can use the following formats to specify a range of page numbers.
When exporting from page "a" to the last page: a-
("a" indicates the page number to start exporting)
When exporting from the first page to page "b": -b
("b" indicates the page number to end exporting)
When exporting continuous pages: a-b
("a" and "b" indicate the page numbers to start and end exporting respectively)
When exporting discontinuous pages: c,d
("c" and "d" indicate the individual page numbers to export, separated by commas)
|
NOTE
|
|
When exporting a document with multiple pages, the name of the exported JPEG documents is the name of the document with "_<serial number>" appended. If you specify a page range to export, the page numbers of the specified range are used as the serial number. The serial numbers have the same number of digits as the number of pages of the original document.
If a document with the same name exists in the destination folder, "(2)" is appended to the document name.
|
8.
If you want to export with advanced settings specified, click [Detailed Settings].
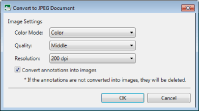
The [Convert to JPEG Document] dialog box is displayed.
9.
Specify the advanced settings for the JPEG document.
|
[Color Mode]
|
Specifies the color.
|
|
[Quality]
|
Specifies the quality.
|
|
[Resolution]
|
Specifies the resolution.
|
|
[Convert annotations into images]
|
Select this check box to convert annotations to images as well. If this check box is deselected, annotations are deleted when converting.
|
10.
Click [OK].
The [Export as Image] dialog box is displayed again.
11.
Click [Save].
The document is exported as a JPEG document.
|
NOTE
|
|
If the following dialog box is displayed after saving, select the appropriate update process and then click [OK].
[Checked Out Document Confirmation] dialog box
[Modify Shared Document] dialog box
If the [Check in automatically after exiting the application that is editing documents] check box in [System Settings] is deselected, you need to perform check in/check out manually.
[File] menu > [Option] > [System Settings] > [Browser] > [Shared Document Management] > [Check in automatically after exiting the application that is editing documents]
|