Adding a Header/Footer to a Document
You can configure the header/footer for documents.
The following settings can be specified for the header/footer. Advanced settings can also be specified.
Page Number
Date
Chapter Name
Document Name
Custom String
Image
You can select [Insert Header/Footer into Print Pages] or [Insert Header/Footer into Original Pages] to configure the header/footer.
Print Pages: Set the header/footer for each page to print.
Original Pages: Set the header/footer for each original page.
|
NOTE
|
|
The operation procedure is the same for [Insert Header/Footer into Print Pages] and [Insert Header/Footer into Original Pages].
For information on how to change the header/footer settings, see the following.
You can also register header/footer settings in Favorites and easily insert them in a document. For information on header/footer favorites, see the following.
For information on how to configure the header/footer on a chapter basis, see the following.
|
Setting Page Numbers/Dates/Chapter Names/Document Names in the Header/Footer
You can set page numbers/dates/chapter names/document names in the header/footer.
1.
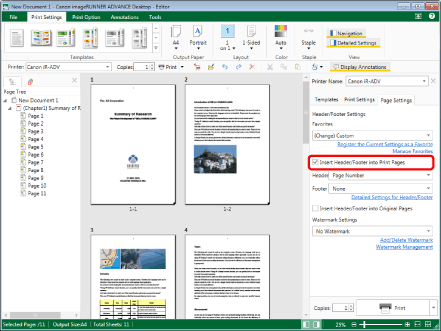
Select the [Insert Header/Footer into Print Pages] check box in [Header/Footer Settings] on the [Page Settings] tab on the Details Window.
Or, select the [Insert Header/Footer] check box in the [Print Pages] group on the ribbon.
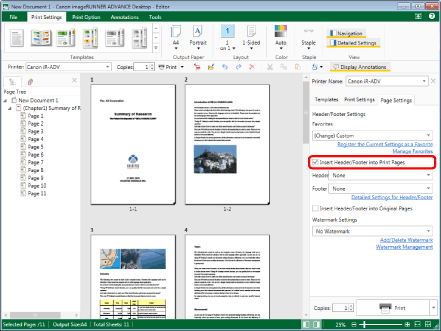
The pull-down list of settings to configure in the header/footer is displayed.
|
NOTE
|
|
If the Details Window is not displayed, see the following.
Select the [Insert Header/Footer into Original Pages] check box to set the header/footer for the original page. To use a ribbon command to do this, select the [Insert Header/Footer] check box in the [Original Pages] group on the ribbon.
If commands are not displayed on the ribbon of Desktop Editor, see the following to display them.
This operation can also be performed with the tool buttons on the toolbar. If tool buttons are not displayed on the toolbar of Desktop Editor, see the following to display them.
|
2.
Select the header/footer settings from the pull-down list in [Header/Footer Settings] on the [Page Settings] tab on the Details Window.
Or, select the items to set for the header/footer from the pull-down list of each [Header]/[Footer] in the [Print Pages]/[Original Pages] groups on the ribbon.
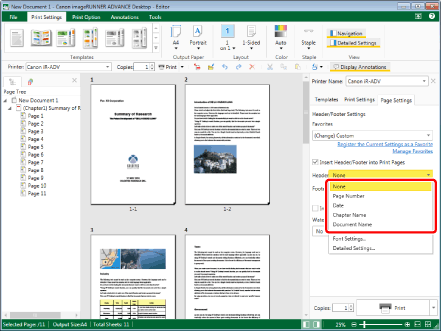
The header/footer settings are reflected and the Work Window is updated.
|
NOTE
|
|
For information on the detailed header/footer settings, see the following.
If commands are not displayed on the ribbon of Desktop Editor, see the following to display them.
This operation can also be performed with the tool buttons on the toolbar. If tool buttons are not displayed on the toolbar of Desktop Editor, see the following to display them.
|
Setting a Custom String for the Header/Footer
You can set a custom string for the header/footer.
1.
Select the [Insert Header/Footer into Print Pages] check box in [Header/Footer Settings] on the [Page Settings] tab on the Details Window.
Or, select the [Insert Header/Footer] check box in the [Print Pages] group on the ribbon.
|
NOTE
|
|
If the Details Window is not displayed, see the following.
Select the [Insert Header/Footer into Original Pages] check box to set the header/footer for the original page. To use a ribbon command to do this, select the [Insert Header/Footer] check box in the [Original Pages] group on the ribbon.
If commands are not displayed on the ribbon of Desktop Editor, see the following to display them.
This operation can also be performed with the tool buttons on the toolbar. If tool buttons are not displayed on the toolbar of Desktop Editor, see the following to display them.
|
2.
Click [Detailed Settings for Header/Footer] in [Header/Footer Settings] on the [Page Settings] tab on the Details Window.
Or, follow one of the steps described below.
Select [Detailed Settings] from each [Header]/[Footer] pull-down list
Click  (Header/Footer on Print) on the ribbon
(Header/Footer on Print) on the ribbonClick  (Header/Footer on Original) on the ribbon
(Header/Footer on Original) on the ribbonSelect [Detailed Settings] from the pull-down list of each [Header]/[Footer] in the [Print Pages]/[Original Pages] groups on the ribbon
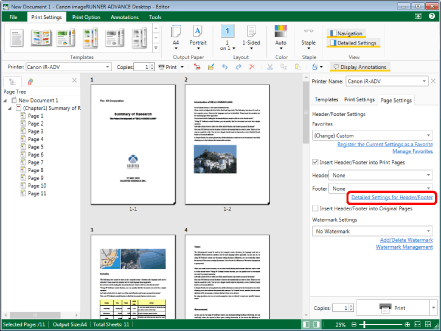
The [Detailed Settings for Headers/Footers (Print Pages)] dialog box is displayed.
|
NOTE
|
|
If commands are not displayed on the ribbon of Desktop Editor, see the following to display them.
This operation can also be performed with the tool buttons on the toolbar. If tool buttons are not displayed on the toolbar of Desktop Editor, see the following to display them.
|
3.
Click the text box in the position to insert the custom string in [Header Settings].
The caret is displayed in the text box and you can enter text.
|
NOTE
|
|
The position of the displayed caret differs according to the position of the selected text box.
|
4.
Enter the custom string to insert in the header/footer.
|
NOTE
|
|
Click [Apply] to check the document preview in the Work Window without closing the [Detailed Settings for Headers/Footers (Print Pages)]/[Detailed Settings for Headers/Footers (Original Pages)] dialog box.
|
5.
Click [OK].
|
NOTE
|
|
For information on the detailed header/footer settings, see the following.
|
Setting an Image in the Header/Footer
You can set an image in the header/footer
|
NOTE
|
|
The image file formats that can be inserted in the header/footer are indicated below.
JPEG (*.jpg/*.jpeg)
TIFF (*.tif/*.tiff) (For a multi-page TIFF image, the first page is used.)
BMP (*.bmp)
PNG (*.png)
GIF (*.gif)
The types of image files that can be inserted into the header/footer may increase, depending on the codecs installed in your computer.
An image can be set for each insertion position in the header/footer.
When an image is inserted into the header/footer, you cannot insert another item in the same position.
|
1.
Select the [Insert Header/Footer into Print Pages] check box in [Header/Footer Settings] on the [Page Settings] tab on the Details Window.
Or, select the [Insert Header/Footer] check box in the [Print Pages] group on the ribbon.
|
NOTE
|
|
If the Details Window is not displayed, see the following.
Select the [Insert Header/Footer into Original Pages] check box to set the header/footer for the original page. To use a ribbon command to do this, select the [Insert Header/Footer] check box in the [Original Pages] group on the ribbon.
If commands are not displayed on the ribbon of Desktop Editor, see the following to display them.
This operation can also be performed with the tool buttons on the toolbar. If tool buttons are not displayed on the toolbar of Desktop Editor, see the following to display them.
|
2.
Click [Detailed Settings for Header/Footer] in [Header/Footer Settings] on the [Page Settings] tab on the Details Window.
Or, follow one of the steps described below.
Select [Detailed Settings] from each [Header]/[Footer] pull-down list
Click (Header/Footer on Print) on the ribbon
(Header/Footer on Print) on the ribbonClick (Header/Footer on Original) on the ribbon
(Header/Footer on Original) on the ribbonSelect [Detailed Settings] from the pull-down list of each [Header]/[Footer] in the [Print Pages]/[Original Pages] groups on the ribbon
The [Detailed Settings for Headers/Footers (Print Pages)] dialog box is displayed.
|
NOTE
|
|
If commands are not displayed on the ribbon of Desktop Editor, see the following to display them.
This operation can also be performed with the tool buttons on the toolbar. If tool buttons are not displayed on the toolbar of Desktop Editor, see the following to display them.
|
3.
In [Header Settings], click [Insert] in the position you want to insert the image.
4.
Select [Image] as the type of header from the displayed list.
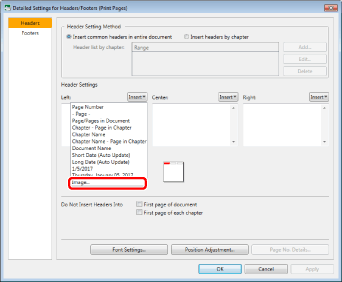
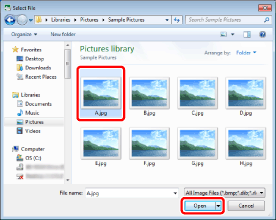
The [Select File] dialog box is displayed.
5.
Select the image document you wish to insert and click [Open].
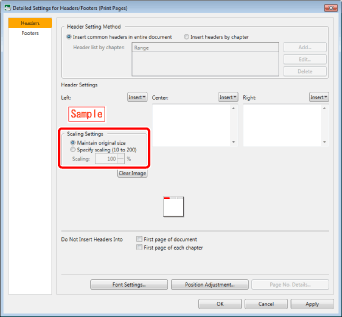
A preview of the image is displayed.
6.
Set the image size in [Scaling Settings].
|
[Maintain original size]
|
Uses the default size of the selected image.
|
|
[Specify scaling (10 to 200)]
|
Set the image zoom ratio. You can enter a value or use
|
|
NOTE
|
|
Click [Apply] to check the document preview in the Work Window without closing the [Detailed Settings for Headers/Footers (Print Pages)]/[Detailed Settings for Headers/Footers (Original Pages)] dialog box.
Click [Clear Image] to cancel the set image.
|
7.
Click [OK].
|
NOTE
|
|
For information on the detailed header/footer settings, see the following.
|
Configuring the Detailed Header/Footer Settings
You can configure the detailed header/footer settings.
1.
Select the [Insert Header/Footer into Print Pages] check box in [Header/Footer Settings] on the [Page Settings] tab on the Details Window.
Or, select the [Insert Header/Footer] check box in the [Print Pages] group on the ribbon.
|
NOTE
|
|
If the Details Window is not displayed, see the following.
Select the [Insert Header/Footer into Original Pages] check box to set the header/footer for the original page. To use a ribbon command to do this, select the [Insert Header/Footer] check box in the [Original Pages] group on the ribbon.
If commands are not displayed on the ribbon of Desktop Editor, see the following to display them.
This operation can also be performed with the tool buttons on the toolbar. If tool buttons are not displayed on the toolbar of Desktop Editor, see the following to display them.
|
2.
Click [Detailed Settings for Header/Footer] in [Header/Footer Settings] on the [Page Settings] tab on the Details Window.
Or, follow one of the steps described below.
Select [Detailed Settings] from each [Header]/[Footer] pull-down list
Click (Header/Footer on Print) on the ribbon
(Header/Footer on Print) on the ribbonClick (Header/Footer on Original) on the ribbon
(Header/Footer on Original) on the ribbonSelect [Detailed Settings] from the pull-down list of each [Header]/[Footer] in the [Print Pages]/[Original Pages] groups on the ribbon

The [Detailed Settings for Headers/Footers (Print Pages)] dialog box is displayed.
|
NOTE
|
|
If commands are not displayed on the ribbon of Desktop Editor, see the following to display them.
This operation can also be performed with the tool buttons on the toolbar. If tool buttons are not displayed on the toolbar of Desktop Editor, see the following to display them.
|
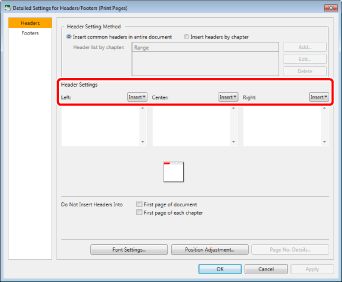
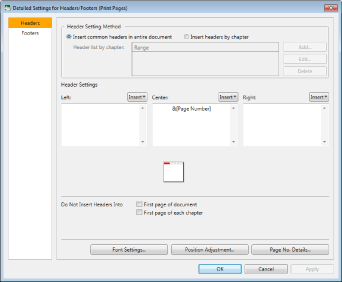
3.
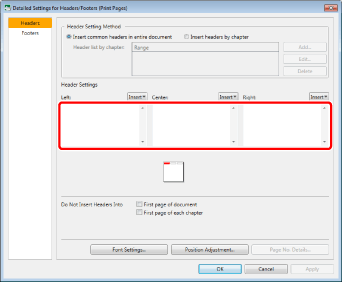
Configure the detailed header/footer settings.
|
[Header Setting Method]
|
Options for setting the header.
|
|
[Insert common headers in entire document]
|
Select this when you want to insert headers throughout an entire document.
|
|
[Insert headers by chapter]
|
Select this when you want to insert headers individually for each chapter.
|
|
[Add]
|
You can select this when [Insert headers by chapter] has been selected. It will insert the same header for all chapters between the first and last chapter you selected.
|
|
[Edit]
|
Click this to change the range in which to insert the header.
|
|
[Delete]
|
Click this to delete the set range in which to insert the header.
|
|
[Header Settings]
|
The items you selected in [Header Setting Method] are displayed.
|
|
[Left]
|
Inserts the header on the left side.
|
|
[Center]
|
Inserts the header in the middle.
|
|
[Right]
|
Inserts the header on the right side.
|
|
[Do Not Insert Headers Into]
|
Use this when there is an item in which you do not want to insert a header.
|
|
[First page of document]
|
Select this check box when you do not want to insert a header in the first page.
|
|
[Last page of document]*
|
Select this check box when you do not want to insert a header in the last page.
|
|
[First page of each chapter]
|
Select this check box when you do not want to insert a header in the first page of the chapter.
|
|
[Place headers in opposite positions for front and back sides]*
|
Select this check box when you want to place the headers in the opposite positions for the front and back sides.
|
|
[Place headers in opposite positions for odd- and even-numbered pages]*
|
Select this check box when you want to place the headers in opposite positions for odd and even numbered pages.
|
*:Not displayed for [Insert Header/Footer into Original Pages].
|
NOTE
|
|
The operation procedure is the same for [Insert Header/Footer into Print Pages] and [Insert Header/Footer into Original Pages].
Click [Apply] to check the document preview in the Work Window without closing the [Detailed Settings for Headers/Footers (Print Pages)]/[Detailed Settings for Headers/Footers (Original Pages)] dialog box.
The items displayed in [Do Not Insert Headers Into] differ according to the printing method.
1-Sided Printing:
[First page of document]
[First page of each chapter]
2-Sided Printing:
[First page of document]
[Last page of document]
[First page of each chapter]
[Place headers in opposite positions for front and back sides]
Booklet Printing:
[First page of document]
[Last page of document]
[First page of each chapter]
[Place headers in opposite positions for odd- and even-numbered pages] (This setting is available for book type booklet printing.)
When specifying detailed footer settings, detailed footer settings are displayed. The settings are the same as those for the header.
|
4.
Click [OK].