Configuring the Header/Footer on a Chapter Basis
You can specify the header/footer settings by chapter.
1.
Configure the header/footer to be inserted into a document on a chapter basis.
|
NOTE
|
|
For information on specifying header/footer settings, see the following.
|
2.
Click [Detailed Settings for Header/Footer] in [Header/Footer Settings] on the [Page Settings] tab on the Details Window.
Or, follow one of the steps described below.
Select [Detailed Settings] from each [Header]/[Footer] pull-down list
Click  (Header/Footer on Print) on the ribbon
(Header/Footer on Print) on the ribbonClick  (Header/Footer on Original) on the ribbon
(Header/Footer on Original) on the ribbonSelect [Detailed Settings] from the pull-down list of each [Header]/[Footer] in the [Print Pages]/[Original Pages] groups on the ribbon
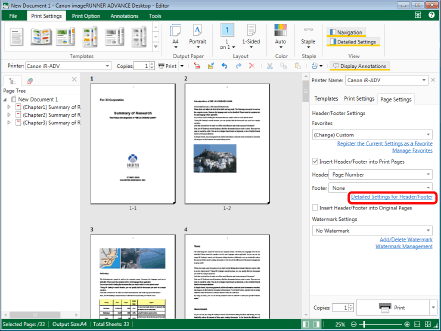
The [Detailed Settings for Headers/Footers (Print Pages)] dialog box is displayed.
|
NOTE
|
|
The operation procedure is the same for [Insert Header/Footer into Print Pages] and [Insert Header/Footer into Original Pages].
When specifying detailed footer settings, detailed footer settings are displayed. The settings are the same as those for the header.
If commands are not displayed on the ribbon of Desktop Editor, see the following to display them.
This operation can also be performed with the tool buttons on the toolbar. If tool buttons are not displayed on the toolbar of Desktop Editor, see the following to display them.
|
3.
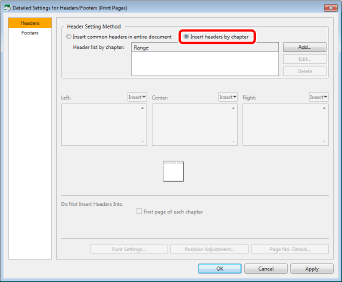
Select [Header Setting Method] > [Insert headers by chapter].
4.
Click [Add].
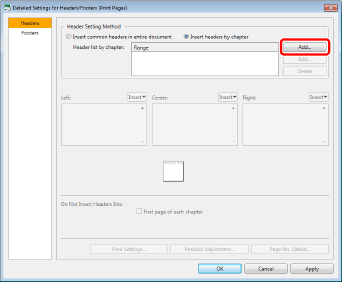
The [Header Settings by Chapter] dialog box is displayed.
5.
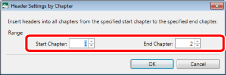
Enter a chapter number in [Start Chapter] and [End Chapter].
6.
Click [OK].
The [Detailed Settings for Headers/Footers (Print Pages)] dialog box is displayed again.
If you want to set the header/footer for other chapters, repeat step 4.
|
NOTE
|
|
The following items cannot be selected when setting the header/footer by chapter.
[First page of document]
|
7.
Click [OK].