Setting the Page Layout
You can select the page layout to set for the entire document.
|
NOTE
|
|
For more information on specifying a page layout only for the specified chapter that is different from that of the entire document, see the following.
If [Auto (Size)] is selected in the output paper size settings, the page layout is changed to [1 on 1].
|
1.
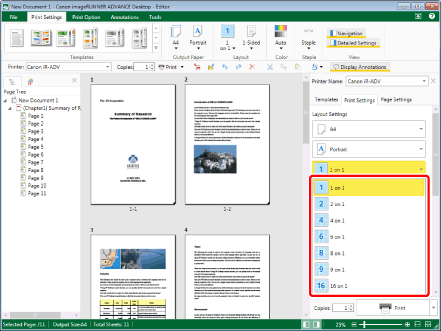
Select the page layout pattern in [Layout Settings] on the [Print Settings] tab on the Details Window.
Or, select [Page Layout] on the ribbon > select the page layout.

The Work Window is updated according to the selected page layout settings.
The page order and boundary are displayed under the page layout when something other than [1 on 1] is selected.
Proceed to step 2.
|
NOTE
|
|
If the Details Window is not displayed, see the following.
You can select the page layout from the pull-down list.
[1 on 1]: one page per sheet of paper
[2 on 1]: two pages per sheet of paper
[4 on 1]: four pages per sheet of paper
[6 on 1]: six pages per sheet of paper
[8 on 1]: eight pages per sheet of paper
[9 on 1]: nine pages per sheet of paper
[16 on 1]: 16 pages per sheet of paper
This operation can also be performed with the tool buttons. If tool buttons are not displayed on the toolbar of Desktop Editor, see the following to display them.
|
2.
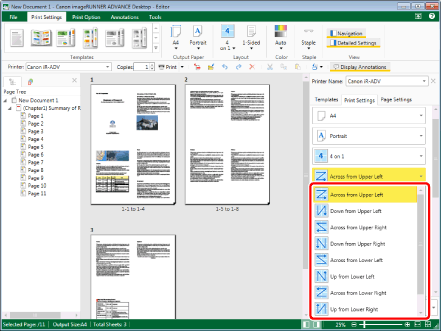
Select the page order in [Layout Settings] on the [Print Settings] tab on the Details Window.
Or, select [Page Order] on the ribbon > select the page order.

The Work Window is updated according to the selected page order.
|
NOTE
|
|
If you selected [2 on 1] for the page layout, the orders you can select differ according to the orientation of the output paper.
For portrait orientation: [Top to Bottom] or [Bottom to Top]
For landscape orientation: [Left to Right] or [Right to Left]
If you selected something other than [2 on 1] for the page layout, you can select the following orders from the pull-down list.
[Across from Upper Left]
[Down from Upper Left]
[Across from Upper Right]
[Down from Upper Right]
[Across from Lower Left]
[Up from Lower Left]
[Across from Lower Right]
[Up from Lower Right]
If commands are not displayed on the ribbon of Desktop Editor, see the following to display them.
This operation can also be performed with the tool buttons. If tool buttons are not displayed on the toolbar of Desktop Editor, see the following to display them.
|
3.
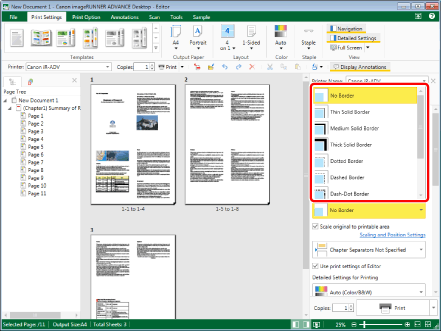
Select the boundary of the page layout in [Layout Settings] on the [Print Settings] tab on the Details Window.
Or, select [Border] on the ribbon > select the boundary of the page layout.

The Work Window is updated according to the selected type of boundary.
|
NOTE
|
|
If you selected something other than [1 on 1] for the page layout, you can select the boundary from the pull-down list.
[No Border]
[Thin Solid Border]
[Medium Solid Border]
[Thick Solid Border]
[Dotted Border]
[Dashed Border]
[Dash-Dot Border]
[Dash-Dot-Dot Border]
[Crop Marks]: Applies marks for trimming on the top/bottom/left/right centers and four corners so that the trimmed paper size becomes the specified size.
If commands are not displayed on the ribbon of Desktop Editor, see the following to display them.
This operation can also be performed with the tool buttons. If tool buttons are not displayed on the toolbar of Desktop Editor, see the following to display them.
|