Canceling Print Settings Specified on a Page Basis
You can cancel the following print settings specified for a document on a page basis.
Enlarging/Reducing Original Pages
Color Mode
Header/Footer Settings Canceled on a Page Basis
Paper Source
Watermark Settings Canceled on a Page Basis
There are two methods for canceling settings; canceling the settings for all pages and canceling the settings for certain pages.
Canceling Settings of All Pages
This section describes how to cancel the settings of all the pages at once.
1.
Select [Page Settings] on the ribbon > select [Clear All Original Page Settings].
Or, click [Clear All Original Page Settings] on the ribbon.
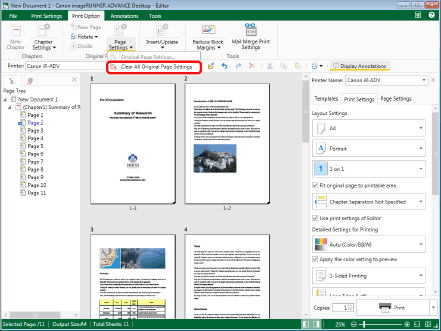
All the settings specified on a page basis are canceled and the same settings are used for the entire document.
|
NOTE
|
|
If commands are not displayed on the ribbon of Desktop Editor, see the following to display them.
This operation can also be performed with the tool buttons on the toolbar. If tool buttons are not displayed on the toolbar of Desktop Editor, see the following to display them.
|
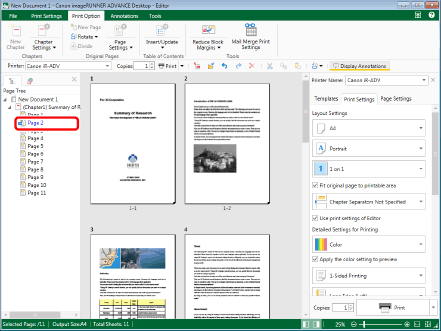
Canceling Settings of Certain Pages
This section describes how to cancel the settings of specified pages.
Canceling Color Mode Settings
This section describes how to cancel the color mode that was configured on the specified page.
1.
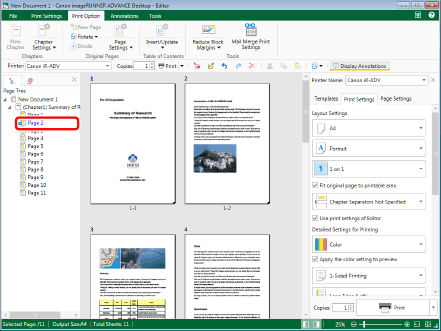
Select the page to cancel the color mode for on the [Page Tree] tab on the Navigation Window.
|
NOTE
|
|
If the [Page Tree] tab on the Navigation Window is not displayed, see the following.
|
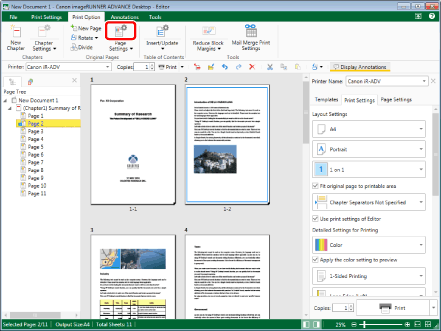
2.
Click the icon for the ribbon command.
Or, follow one of the steps described below.
Select [Page Settings] on the ribbon > [Original Page Settings]
Click [Original Page Settings] on the ribbon
Right-click and select [Original Page Settings]
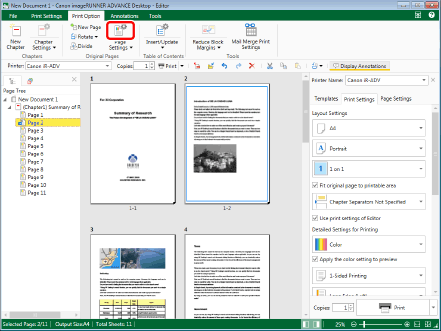
[Original Page Settings] is displayed.
|
NOTE
|
|
If commands are not displayed on the ribbon of Desktop Editor, see the following to display them.
This operation can also be performed with the tool buttons. If tool buttons are not displayed on the toolbar of Desktop Editor, see the following to display them.
|
3.
Deselect the [Specify the color mode for the selected pages] check box in [Print Settings] on the [Print Settings] tab.
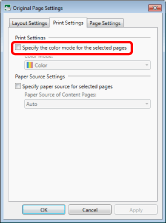
4.
Click [OK].
|
NOTE
|
|
You can also right-click the page to change the settings for on the [Page Tree] tab on the Navigation Window, and select [Clear Settings] from [Color Mode for Original Pages].
|
Canceling Enlargement/Reduction Settings
This section describes how to cancel the enlargement/reduction setting that was configured on the specified page.
1.
Select the page to cancel the enlargement/reduction setting for on the [Page Tree] tab on the Navigation Window.
|
NOTE
|
|
If the [Page Tree] tab on the Navigation Window is not displayed, see the following.
|
2.
Click the icon for the ribbon command.
Or, follow one of the steps described below.
Select [Page Settings] on the ribbon > [Original Page Settings]
Click [Original Page Settings] on the ribbon
Right-click and select [Original Page Settings]
[Original Page Settings] is displayed.
|
NOTE
|
|
If commands are not displayed on the ribbon of Desktop Editor, see the following to display them.
This operation can also be performed with the tool buttons. If tool buttons are not displayed on the toolbar of Desktop Editor, see the following to display them.
|
3.
Deselect the [Configure scaling settings for the selected pages] check box on the [Layout Settings] tab.
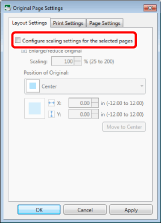
4.
Click [OK].
Canceling Paper Source Settings
This section describes how to cancel the paper source setting that was configured on the specified page.
1.
Select the page to cancel the paper source settings for on the [Page Tree] tab on the Navigation Window.
|
NOTE
|
|
If the [Page Tree] tab on the Navigation Window is not displayed, see the following.
|
2.
Click the icon for the ribbon command.
Or, follow one of the steps described below.
Select [Page Settings] on the ribbon > [Original Page Settings]
Click [Original Page Settings] on the ribbon
Right-click and select [Original Page Settings]
[Original Page Settings] is displayed.
|
NOTE
|
|
If commands are not displayed on the ribbon of Desktop Editor, see the following to display them.
This operation can also be performed with the tool buttons. If tool buttons are not displayed on the toolbar of Desktop Editor, see the following to display them.
|
3.
Deselect the [Specify paper source for selected pages] check box in [Paper Source Settings] on the [Print Settings] tab.
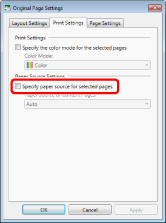
4.
Click [OK].
|
NOTE
|
|
You can also right-click the page to change the settings for on the [Page Tree] tab on the Navigation Window, and select [Clear Settings] from [Paper Source for Original Pages].
|
Restoring Header/Footer Settings on a Page Basis
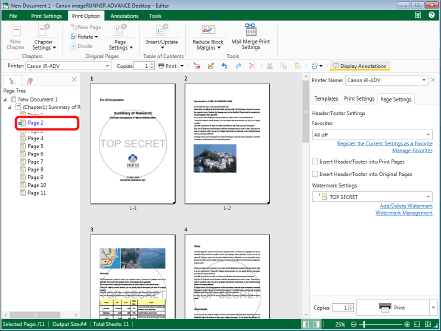
Select the page to cancel the color mode for on the [Page Tree] tab on the Navigation Window.
|
NOTE
|
|
The procedure for the header/footer settings are the same for both print pages and original pages.
|
1.
Select the page to restore the header/footer settings for on the [Page Tree] tab on the Navigation Window.
|
NOTE
|
|
If the [Page Tree] tab on the Navigation Window is not displayed, see the following.
|
2.
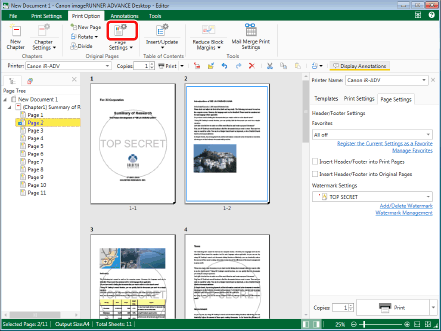
Click the icon for the ribbon command.
Or, follow one of the steps described below.
Select [Page Settings] on the ribbon > [Original Page Settings]
Click [Original Page Settings] on the ribbon
Right-click and select [Original Page Settings]
[Original Page Settings] is displayed.
|
NOTE
|
|
If commands are not displayed on the ribbon of Desktop Editor, see the following to display them.
This operation can also be performed with the tool buttons. If tool buttons are not displayed on the toolbar of Desktop Editor, see the following to display them.
|
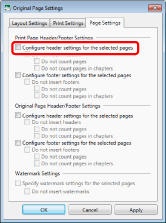
3.
Deselect the [Configure header settings for the selected pages] check box in [Print Page Header/Footer Settings] on the [Page Settings] tab.
|
NOTE
|
|
To cancel the footer settings for the print page, deselect the [Configure footer settings for the selected pages] check box.
|
4.
Click [OK].
Restoring Watermark Settings on a Page Basis
This section describes how to restore the canceled watermark setting on the specified page to the previous setting.
1.
Select the page to restore watermark settings for on the [Page Tree] tab on the Navigation Window.
|
NOTE
|
|
If the [Page Tree] tab on the Navigation Window is not displayed, see the following.
|
2.
Click the icon for the ribbon command.
Or, follow one of the steps described below.
Select [Page Settings] on the ribbon > [Original Page Settings]
Click [Original Page Settings] on the ribbon
Right-click and select [Original Page Settings]
[Original Page Settings] is displayed.
|
NOTE
|
|
If commands are not displayed on the ribbon of Desktop Editor, see the following to display them.
This operation can also be performed with the tool buttons. If tool buttons are not displayed on the toolbar of Desktop Editor, see the following to display them.
|
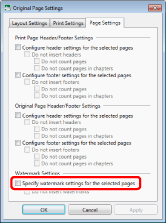
3.
Deselect the [Specify watermark settings for the selected pages] check box in [Watermark Settings] on the [Page Settings] tab.
4.
Click [OK].
|
NOTE
|
|
You can also right-click the page to change the settings for on the [Page Tree] tab on the Navigation Window, and deselect the [Do Not Insert Watermarks into Selected Pages] check box by clicking it.
|