
<System Management Settings>
All the settings related to System Management Settings are listed with descriptions. Default settings are marked with a dagger ( ).
).
). |
Asterisks (*)Settings marked with "*1" may be unavailable or vary or have different defaults depending on your country or region. Settings marked with "*2" may not be displayed depending on the model you are using, or other setting items. |
<Network Settings>
See <Network Settings>.
<System Manager Information Settings>
Specify the PIN exclusively for Administrators who have access privileges to <Network Settings> and <System Management Settings>. You can set the PIN from <System Manager PIN>. You can also register the name of an Administrator. Setting the System Manager PIN
<System Manager PIN>
Enter a number for the System Manager PIN.
<System Manager Name>
Enter alphanumeric characters for the name of an Administrator.
<Device Information Settings> 
Enter alphanumeric characters for the name and the installation location to identify the machine.
<Device Name> <Location> |
<Menu> ( )
)  <System Management Settings> <Device Information Settings> Select <Device Name> or <Location> Enter the device name or location (Entering Text) <Apply>
) <Security Settings>
Enable or disable settings for IP address or MAC address packet filtering.
<Use TLS>
Select whether to use the TLS encrypted communication. Configuring the Key and Certificate for TLS
<Off> <On> |
<IPv4 Address Filter>
Enable or disable settings for filtering packets received from devices with specified IPv4 addresses. Specifying IP Addresses for Firewall Settings
<Inbound Filter> <Off> <On> |
<Menu> () <System Management Settings> <Security Settings> <IPv4 Address Filter> <Inbound Filter> Select <Off> or <On>
) <IPv6 Address Filter>
Enable or disable settings for filtering packets received from devices with specified IPv6 addresses. Specifying IP Addresses for Firewall Settings
<Inbound Filter> <Off> <On> |
<Menu> () <System Management Settings> <Security Settings> <IPv6 Address Filter> <Inbound Filter> Select <Off> or <On>
) <MAC Address Filter>
Enable or disable settings for filtering packets received from devices with specified MAC addresses. Specifying MAC Addresses for Firewall Settings
<Inbound Filter> <Off> <On> |
<Menu> () <System Management Settings> <Security Settings> <MAC Address Filter> <Inbound Filter> Select <Off> or <On>
) <Select Country/Region> *1
Specify the country or region where the machine is used. The default setting may vary depending on the setting selected at initial power-on.
<United States (US)> <Canada (CA)> <Brazil (BR)> <Mexico (MX)> <Other> |
<Menu> () <System Management Settings> <Select Country/Region> Select a country or region
) <Remote UI Settings>
Configure settings for using the Remote UI. Using the Remote UI allows you to configure machine settings from a Web browser.
<Use Remote UI>
Select whether to use the Remote UI. Disabling Remote UI
<Off> <On> |
<Menu> () <System Management Settings> <Remote UI Settings> <Use Remote UI> Select <Off> or <On>
) <Remote UI Access Security Settings>
Specify a PIN for access to the Remote UI. Set a PIN of up to 7 digits. All users use a common PIN. Setting a Remote UI PIN
<Off> <On> <Remote UI Access PIN> |
<Auto Online for Remote Scan>
Select whether to use this feature to go online for remote scanning, even without using the operation panel.
<Off> <On> |
<Menu> () <System Management Settings> <Auto Online for Remote Scan> Select <Off> or <On>
) <Restrict TX Function> *2
Specify settings for restricting access to sending functions for selected destinations.
<Address Book PIN>
Specify a PIN and require entering it to add new entries to or edit existing entries in the Address Book. Restricting Use of the Address Book
<Restrict New Destinations>
Select whether to limit the fax numbers and e-mail addresses that can be specified as destinations to those already registered in the Address Book. Limiting Available Destinations
<Off> <On> |
<Restrict Resending from Log>
Select whether to prevent a destination from being selected from the sent job logs. Disabling Use of Previously Used Destinations
<Off> <On> |
<One-Touch/Coded Dial TX Confirmation>
Select whether to display the details of an entered coded dial number when it is selected as a destination. Displaying Destinations in Address Book
<Off> <On> |
<Display Job Log>
Select whether to display the copying, printing, faxing, and scanning logs on the display of the machine and in the Communication Management Report.
<Off> <On> |
<Menu> () <System Management Settings> <Display Job Log> Select <Off> or <On>
) <Use as USB Device>
Enable or disable the USB port that is used for connecting the machine to a computer. Restricting the USB Connection with a Computer
<Off> <On> |
<Enable Product Extended Survey Program>
Enable or disable the Product Extended Survey Program (a program for the machine usage survey).
<Off> <On> |
<Menu> () <System Management Settings> <Enable Product Extended Survey Program> Select <Off> or <On>
) <Displ. Consmbls. Info (RUI/Toner Status)>
Set whether to display a button in the Remote UI or Toner Status for accessing the Web site for purchasing toner cartridges, etc. Also set whether to use Toner Status.
<Displ. Consumables Purchase Button (RUI)> <Off> <On> <Toner Status Settings> <Off> <On> <Displ. Purchase Button> <Off> <On> |
<Menu> () <System Management Settings> <Displ. Consmbls. Info (RUI/Toner Status)> Specify the settings
) 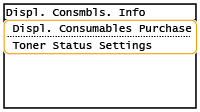
<Displ. Consumables Purchase Button (RUI)>
Select <Off> to prevent a button that accesses sites for purchasing toner cartridges, etc. from being displayed in the Remote UI.
Select <Off> to prevent a button that accesses sites for purchasing toner cartridges, etc. from being displayed in the Remote UI.
<Toner Status Settings>
If you do not want to use Toner Status, select <Off>. To prevent a button that accesses sites for purchasing toner cartridges, etc. from being displayed in Toner Status, select <On> and then <Off>.
If you do not want to use Toner Status, select <Off>. To prevent a button that accesses sites for purchasing toner cartridges, etc. from being displayed in Toner Status, select <On> and then <Off>.
<Google Cloud Print Settings>
Enable or disable Google Cloud Print. Registering the Machine with Google Cloud Print
<Enable Google Cloud Print> <Off> <On> <Google Cloud Print Registration Status> |
<Import/Export Address Book> *2
You can import an Address Book from a computer or export an Address Book from the machine. Importing/Exporting Address Book Data with the Supplied Software
<PDL Selection (Plug and Play)>
Select a page description language so that the machine is detected as a printer that is compatible with that language when it is connected to a computer by using Plug and Play.
<Network>
Select a page description language so that the machine is detected as a printer that is compatible with that language when it is detected over the network.
<FAX>*2 <UFRII LT> <UFRII LT (V4)> <PCL6> <PCL6 (V4)> |
<USB>
Select a page description language so that the machine is detected as a printer that is compatible with that language when it is connected to a computer via USB.
<UFRII LT> <UFRII LT (V4)> <PCL6> <PCL6 (V4)> |
<Menu> () <System Management Settings> <PDL Selection (Plug and Play)> Select <Network> or <USB> Select a page description language Restart the machine
) 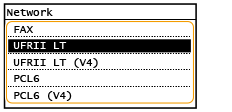
<FAX>*2
Detects and connects the machine as a fax device.
Detects and connects the machine as a fax device.
<UFRII LT>
Detects and connects the machine as a UFRII printer.
Detects and connects the machine as a UFRII printer.
<UFRII LT (V4)>
Detects and connects the machine as a UFRII printer that is compatible with XML Paper Specification (XPS).
Detects and connects the machine as a UFRII printer that is compatible with XML Paper Specification (XPS).
<PCL6>
Detects and connects the machine as a PCL6 printer.
Detects and connects the machine as a PCL6 printer.
<PCL6 (V4)>
Detects and connects the machine as a PCL6 printer.
Detects and connects the machine as a PCL6 printer.
<Update Firmware>
Select how to install the firmware update according to the environment of the machine. Updating the Firmware
<Via PC> <Via Internet> <Version Information> |
<Initialize Address Book> *2
Select to restore the Address Book settings to the factory defaults. Initializing Address Book
<Initialize Eco Report Counter>
Select to restore the Eco Report Counter settings to the factory defaults. Initializing Eco Report Counter
<Initialize Menu>
Select to restore the settings listed below to the factory defaults. You can restore all the settings listed below at once, or you can restore individual settings separately. Initializing Menu
<Preferences> <Timer Settings> <Common Settings> <Copy Settings> <Fax Settings>*2 <Scan Settings> <Printer Settings> <Adjustment/Maintenance> <System Management Settings> <Initialize All> |
<Initialize All Data/Settings>
Restores all data including logs and setting values to their default settings. Initializing All Data/Settings