Printing Files Stored in Memory Media
The explanation of the procedures assumes that the memory media is connected to the USB port (front side of the machine).
For instructions on inserting/removing memory media, see "Inserting and Removing Memory Media."
IMPORTANT |
<Memory Media> in [Store Location Display Settings] is set to 'Off' by default. To use memory media, set <Memory Media> to 'On'. (See "Store Location Display Settings.") It is necessary to set <Use MEAP Driver for USB Storage Device> to 'Off' to use memory media. (See "Using the MEAP Driver for USB External Storage.") To print files in the memory media, set <Use Print Function> in [Use Scan/Print Function] to 'On'. (See "Memory Media Settings.") Insert the USB memory straight into the USB port (front side of the machine). If you insert it at an angle, or insert USB memory that does not meet the USB specifications, the USB port (front side of the machine) may be damaged. |
NOTE |
If  does not appear, re-insert the memory media. does not appear, re-insert the memory media. |
1.
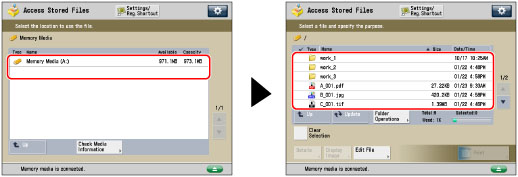
Press  (Main Menu) → [Access Stored Files] → [Memory Media].
(Main Menu) → [Access Stored Files] → [Memory Media]. 
If the desired function is not displayed on the Main Menu screen, press [Show All].
2.
Select the desired memory media → select the destination folder.
NOTE |
If the USB Device Port-A and Multimedia Reader/Writer-A are installed, you can use SD cards, Memory Sticks, CF cards, and Microdrives as memory media. For more information, see "USB Device Port-A" and "Multimedia Reader/Writer-A." |
3.
Select the files in the order that you want to print them → press [Print].

If there are seven or more stored files/folders, press  or
or  to scroll through the stored files.
or to scroll through the stored files.You can select and print multiple files with the same settings if they are in the same file format.
If you specify PDF file, proceed to step 5.
NOTE |
You can cancel a selection by selecting the document again. If there are two or more files stored in the memory media, you can press [Name] or [Date/Time] to sort the list of files. If you close the File Selection screen after sorting the files, the files will be unsorted the next time you open the File Selection screen. If you press [Name], or [Date/Time] with a file selected, that file is unselected, and the top of the file list appears. |
4.
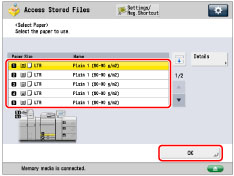
Select the paper source → press [OK].
NOTE |
For more information on paper types, see "Available Paper Stock." If you press [Details], the detailed information on the selected paper is displayed. If you press  , you can switch whether to display the device illustration. For more information, see "Changing the Default Display of Select Paper List Screen ." , you can switch whether to display the device illustration. For more information, see "Changing the Default Display of Select Paper List Screen ." |
5.
Select the print settings on the Print Settings screen.

To change the paper source, see "Paper Selection."
To change the number of prints, enter the desired number using  -
-  (numeric keys).
- (numeric keys).NOTE |
If multiple files are selected, you can change the number of prints by pressing [Change No. of Copies]. |
To specify which page to print, press [Specify Pages].
To set various other print modes, press [Options] and select the desired mode.
For more information on setting each mode, see the corresponding section.
6.
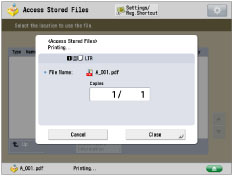
Press [Start Printing].

If there is a current or reserved print job, the machine will start printing your file after that job is complete.
When printing starts, the following screen appears.
NOTE |
To cancel printing, press [Cancel]. (You cannot cancel printing by pressing  (Stop).) (Stop).)To reserve the next print job, press [Close] → follow the procedure to reserve a print job. (See "Reserving Jobs.") |
NOTE |
You can select and print up to six files in the same memory media at a time. However, you cannot select files with different file formats at the same time. You can only select multiple files when the files are stored in the same folder. To cancel all settings, press [Restore Default Set.]. For information on how to load paper, see "Loading Paper." |