Installing as a Print Server
This explains how to configure the share settings of and install the driver in order to use a computer connected to the device as a print server.
 NOTE
NOTEWhen [Department ID] and [PIN] are set for the department ID management function in the server side print settings, they are not reflected in the client side print settings.
Prerequisites
When starting the computer, log on as a user with administrator privileges.
Procedures
1.
Start the installer → proceed according to the instructions on the screen.
2.
If the [Select Process] screen is displayed, select [Add New Printers] and [Canon Driver Information Assist Service] → click [Next].
3.
Select the device to install from [Printer List] → click [Next].
4.
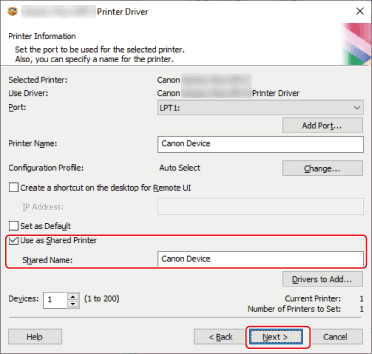
Select [Use as Shared Printer] → change [Shared Name] if necessary → click [Next].
If a client computer with an operating system that differs from the print server is connected to a shared printer, click [Drivers to Add] and select an alternate driver to automatically download an alternate driver.

5.
Follow the instructions on the screen → click [Exit].