Installing by Specifying a Port or IP Address
You can manually specify the port or IP address to use for network connected or locally connected devices and install the driver. Install according to this procedure when you cannot discover a device on the network or when unique settings are required.
As well as using an existing port, you can add a new port.
If the device is connected during installation, a configuration profile corresponding to the printer model is set. You can also change or import the configuration profile if necessary.
A device is installed for each applied configuration profile. You can also change the number of devices during installation to simultaneously install multiple devices to which the same configuration profile is applied.
Prerequisites
Confirm the port to be specified.
Specify a network connection port (standard TCP/IP port or WSD port) or local port. You can specify an already registered port. You can select a temporary port ([LPT1] etc.) and set it after installation is complete.
Confirm the name or IP address of the device (if adding a standard TCP/IP port or WSD port).
If you are installing by adding a network connection port (standard TCP/IP port or WSD port), you need to enter the name (or host name) and IP address of the device. For the name of the device, use the name by which the device is known on the network. If you do not know the value to set, check with your network administrator.
When starting the computer, log on as a user with administrator privileges.
Procedures
1.
Start the installer.
If you are using an installer downloaded from the web site:
Double-click the downloaded file to decompress it. If the installer does not start automatically after it is decompressed, double-click [Setup.exe].
If you are using the accompanying CD-ROM:
(1) Set the CD-ROM in the computer.
If the CD-ROM menu is not displayed, click the subsequent "Open details."
Start the installer by following the procedure below.
If a message prompting you to insert a CD-ROM is displayed or if Windows Explorer is displayed: Execute [MInst.exe].
If nothing is displayed: Double-click the CD-ROM icon.
If the above [MInst.exe] does not exist: Execute [Setup.exe] in the driver folder of the CD-ROM.
If you executed [Setup.exe], proceed to step 2.
(2) If the language selection screen is displayed, select a language → click [OK].
(3) Click [Installation] from the menu screen.
(4) If the [Select the Type of Connection] screen is displayed, select [Network Connection] → click [Next].
(5) In the displayed screen, confirm that the driver(s) to be installed have been selected → click [Install].
(6) Confirm the content of the CANON SOFTWARE LICENSE AGREEMENT → click [Yes].
Select a language → click [Next].
3.
When the CANON SOFTWARE LICENSE AGREEMENT is displayed, confirm the content → click [Yes].
4.
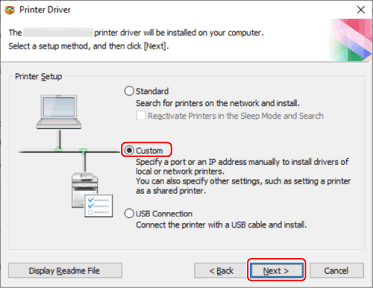
Select [Custom] → click [Next].
5.
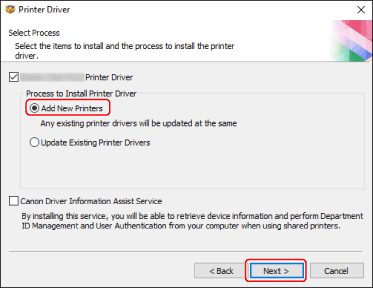
If the following screen is displayed, select [Add New Printers] → click [Next].
[Update Existing Printer Drivers]: Select this if you want to update drivers only. When you select this, in the next screen, click [Select Printers to Update] → select the device to update from [Printer List] → click [OK]. Then click [Start] → skip to step 11.
[Canon Driver Information Assist Service]: Select this when you want to use the acquire device information function in a print server environment.
Select a configuration profile → click [Next].
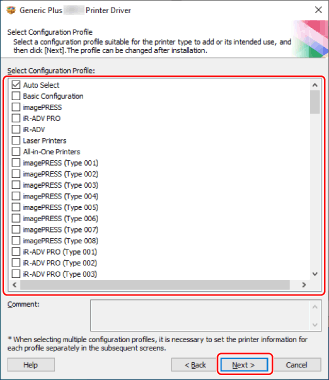
 IMPORTANT
If the device is connected to the computer you are using, set [Auto Select] under normal circumstances. Select the configuration profile manually only if the computer cannot be connected to the device and device information cannot be retrieved, or if it is necessary to customize the configuration profile.
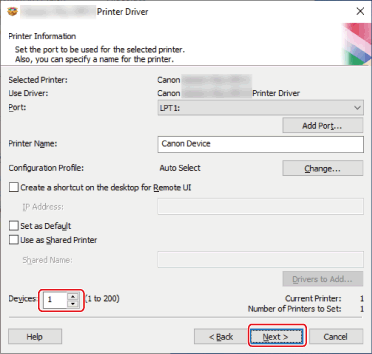
Set the port.

(1) Click [Add Port] → select the type of port to add in [Port to Add] → click [OK].
You can add the following types of ports.
Standard TCP/IP / Local / WSD
(2) Follow the instructions in the displayed dialog box or wizard.
If you selected local port or WSD port, enter the value to set, then click [OK] and proceed to step 8.
If you selected standard TCP/IP port, a wizard is displayed. Follow the instructions in the wizard and proceed to the next step.
(3) Enter the device name or IP address.
[Port Name] is automatically entered. Change the port name if required.
If the [Additional port information required] screen is displayed, click the subsequent "Open details" and perform the necessary operations.
Perform one of the following.
Return to the previous screen in the wizard → re-enter the information for [Printer Name or IP Address] → click [Next].
Select [Device Type] > [Standard] > [Canon Network Printing Device with P9100] → click [Next].
Depending on the device you are using, the name you select in [Device Type] > [Standard] may differ from [Canon Network Printing Device with P9100].
Select a port from [Port].
Set [Printer Name] if necessary.
[Configuration Profile] > [Change]: Click this only when you need to change or import a configuration profile.
Click the subsequent "Open details" and perform the necessary operations.
Select a configuration profile.
When manually selecting a configuration profile:
Select a configuration profile from [Select Config. Profile] → click [OK].
When importing a configuration profile:
Click [Import] → select a configuration profile file (*.typ) → click [OK].
[Create a shortcut on the desktop for Remote UI]: Creates a shortcut to the Remote UI of the device on the desktop. Enter the IP address of the device in [IP Address].
To update the IP address of the device set in the shortcut after installing the driver, or delete the shortcut, do so manually.
[Set as Default]: Select this to set the device as the device that is normally used.
[Use as Shared Printer]: Select this if you want to share the device.
If you selected a network printer port, you cannot set [Printer Name] and [Use as Shared Printer].
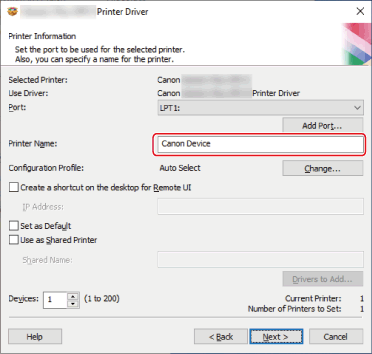
If necessary, change the number of devices to be installed in [Devices] → click [Next].
You can change the number of devices for each configuration profile selected in step 6.
When you click [Next], the change to [Devices] is applied to [Current Printer] and [Number of Printers to Set].
[Current Printer] shows which number device is currently being set.
For an example of the number of devices being applied to [Current Printer]/[Number of Printers to Set], click and refer to the subsequent "Open details."
An example where the following two configuration profiles are selected and the number of devices is changed is shown below.
Configuration profile A: changing from one device to three devices
Configuration profile B: one device
(1) For the devices to which configuration profile A is applied, the following values are initially displayed.
[Current Printer]: 1 / [Number of Printers to Set]: 2
(2) Change [Devices] from 1 to 3 → click [Next].
The information for devices to which configuration profile A is applied is updated as follows.
[Current Printer]: 2 / [Number of Printers to Set]: 4
This indicates that the device currently being set is the second device and that the total number of devices installed is now four (The number of devices to which configuration profile A is applied is three, and the number of devices to which configuration profile B is applied is one).
If multiple configuration profiles were selected in step 6., or multiple devices were specified in [Devices], the [Printer Information] screen is repeatedly displayed the number of times corresponding to [Number of Printers to Set]. Repeat steps 7. to 9. for each device.
10.
Check [Printer List for Driver Installation] → click [Start].
Proceed with the installation according to the instructions on the screen.
Click [Restart] or [Exit].
If device information cannot be acquired during installation, set the device information before printing. You can also change or import a configuration profile while setting the device information.
For details about how to set the device information, refer to the driver help.