
Checking Status and Log for Sent and Received Documents
You can check the statuses and communication logs for sent and received documents.
|
When personal authentication management is used, you can restrict users from performing operations on the jobs of other users on the <Status Monitor> screen. <Restrict Access to Other User Jobs> |
Checking the Statuses for Sent Documents
1
Press  (Status Monitor).
(Status Monitor).2
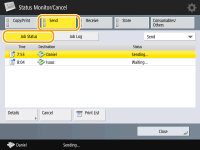
Press <Send>  <Job Status>.
To display only fax documents, select <Fax> from the drop-down list in the upper-right of the screen.
3
Check the statuses.
Selecting a document and pressing <Details> enables you to check detailed information such as the destinations and the number of pages.
Selecting a document and pressing <Cancel> enables you to cancel sending. You cannot select multiple jobs and cancel them all at once. Select and cancel one job at a time.
|
Pressing <Details> You can resend documents when <Delete Failed TX Jobs> is set to <Off> (<Delete Failed TX Jobs>). Note that you cannot resend the documents sent with Direct Send/Manual Sending/PC fax. You can change the destinations of documents that are set to be sent at a specified time as well as documents that failed to send. Note that you cannot change the destinations for documents with multiple destinations specified that are being sent, or when entering a new destination is restricted (Limiting Available Destinations). The destination can be changed for a job that is canceled because of transmission errors, or a job that is waiting to be sent in the Delayed Send mode. You cannot change multiple destinations at one time. Also, you cannot change the destinations in a group at one time. |
Checking the Statuses for Received Documents
1
Press (Status Monitor).
(Status Monitor).2
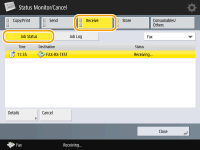
Press <Receive> <Job Status>.
To display only fax documents, select <Fax> from the drop-down list in the upper-right of the screen.
3
Check the statuses.
Selecting a document and pressing <Details> enables you to check detailed information such as the sender's names and the number of pages.
Selecting a document and pressing <Cancel> enables you to cancel receiving. You cannot select multiple jobs and cancel them all at once. Select and cancel one job at a time.
If you press <Check I-Fax RX>, reception starts if an I-fax has been received by the POP server. You can display <Check I-Fax RX> by selecting <Forward> from the drop-down list on the top right of the screen.
NOTE |
To use <Check I-Fax RX>, set <POP> to <On> in <Communication Settings> to enable the machine to receive via POP. Setting E-mail/I-Fax Communication You can automatically receive I-faxes in the following cases: Setting E-mail/I-Fax Communication <POP Interval> in <Communication Settings> is set to a value other than '0'. I-faxes are received with SMTP without going via a server. |
Checking If Documents Are Sent or Received Successfully
1
Press (Status Monitor).
(Status Monitor).2
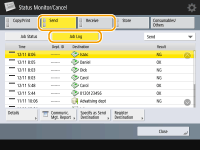
Press <Send> or <Receive> <Job Log>.
To display only fax documents, select <Fax> from the drop-down list in the upper-right of the screen.
3
Check if documents are sent or received successfully.
<OK> is displayed in the <Result> column when a document was sent or received successfully. If <NG> is displayed, this shows that a document failed to be sent or received because it was canceled or there was some error.
Selecting a document and pressing <Details> enables you to check detailed information about the document. A three-digit number in the <Error Code> column on the information represents an error code. You can check the causes and solutions for errors based on error codes. Countermeasures for Each Error Code
Pressing <Communic. Mgt. Report> or <Fax Activity Report> prints a log list of sent and received documents displayed on the screen.
TIPS |
Registering an address from the send historyYou can register an address to the Address Book or a one-touch button via the send history on the <Status Monitor> screen. This saves you the effort of directly entering the fax number, and also helps avoid sending a fax to an incorrect number due to entering the wrong fax number. |