Front Side


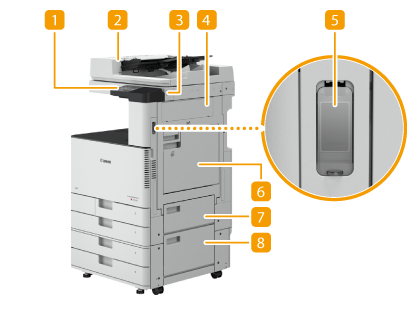
 Operation panel
The operation panel consists of keys such as Home key, Stop key, a display, and status indicators. You can perform all the operations and specify settings from the operation panel.
 Feeder / Platen cover
Automatically feeds originals into the machine for scanning. When two or more sheets are loaded in the feeder, originals can be scanned continuously. Feeder
The platen cover secures the originals placed on the platen glass.

The platen cover is optional.
 USB port (Front-right side of the machine)
You can connect devices such as a USB memory device to the machine. Connecting a USB Memory Device

Memory media that does not meet the USB specification is not supported. Some types of memory media may not be able to save data correctly.
The USB port (front-right side of the machine) supports USB 2.0.
 Right cover of the main unit
Open this cover when clearing a paper jam inside the machine. Paper Jams in a Paper Source
 Power switch
Press the power switch when turning ON or OFF the machine.
 Multi-purpose tray
Load paper into the multi-purpose tray when you want to use a type of paper different from that which is loaded in the paper drawer.
 Upper-right cover of the paper drawer
Open this cover when clearing a paper jam inside the machine. Paper Jams in a Paper Source
 Lower-right cover of the paper drawer
Open this cover when clearing a paper jam inside the machine. Paper Jams in a Paper Source
 Glass cleaning sheet storage box
Use this box to store sheets for cleaning the platen glass.
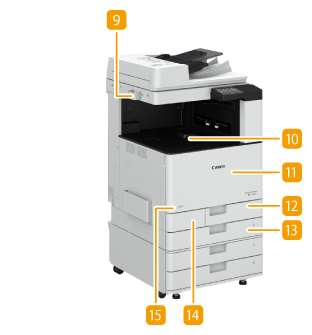
 Output tray
Paper is output here when printing finishes.
 Front cover of the main unit
Open this cover when replacing the toner cartridge, the drum unit, or cleaning the dust-proof glass.
Replacing the Toner Cartridge
Replacing the Toner Cartridge
 Paper drawer 1
Load the type of paper that you frequently use. Paper Drawer
 Paper drawer 2
Load the type of paper that you frequently use. You can load paper that cannot be loaded in the paper drawer 1, such as A3 size paper. Paper Drawer
 Waste toner container cover
Open this cover when replacing the waste toner container. Replacing the Waste Toner Container
 Toner Code
This code indicates the type of genuine toner that can be used with the machine. Use toner with a code that includes the same letters as the code on the front cover of the machine.
 |
For more information about the configuration of optional equipment installed on the machine, see Options. |
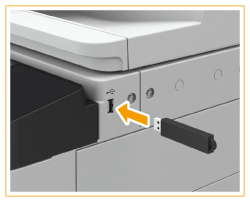
Connecting a USB Memory Device
You can connect a USB memory device to the USB ports located on the right side of the machine, and directly print data from the USB memory device. Originals scanned using the machine can also be saved directly to the USB memory device.

 Disconnecting the USB memory device
1 | Select <Status Monitor>. |
2 | Select <Rmv. Mem. Media>. Wait until the <The memory media can be safely removed.> message is displayed. |
3 | Remove the memory media. |
 |
Make sure to follow the proper procedure when removing the memory media. Failure to do so may cause the memory media or machine to malfunction. The machine supports FAT16/FAT32 format memory media. Make sure that the memory media is oriented properly when connecting it to the machine. If it is not connected properly, it may cause the memory media or machine to malfunction. Be sure to check before using memory mediaSet <Use Scan Function> and <Use Print Function> to <On>. <Memory Media Settings> |
 |
Unsupported devices and usagesMemory media with security functions Memory media that does not meet the USB specification Memory card readers connected via USB Connecting memory media via an extension cable Connecting memory media via a USB hub |