Configuring SMB
 | Server Message Block (SMB) is a protocol for sharing resources, such as files and printers, with more than one device in a network. The machine uses SMB to store scanned documents into a shared folder. Depending on your network, you may have to set the NetBIOS name and workgroup name. |
 |
For more information about the basic operations to be performed when setting the machine from the Remote UI, see Setting Up Menu Options from Remote UI. |
Specifying the Computer Name and the Workgroup Name
Specify the name of the machine on the network and the name of the workgroup it belongs to. If your environment does not have workgroups, create a workgroup in Windows and enter the name of that workgroup.
1
Start the Remote UI and log in to System Manager Mode. Starting Remote UI
2
Click [Settings/Registration] on the Portal page.Remote UI Screen
3
Select [Network Settings]  [Computer Name/Workgroup Name Settings].
4
Click [Edit].
5
Specify the required settings.
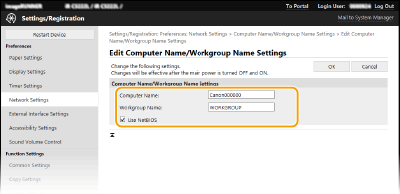
[Computer Name]
Enter the name of the machine on the network using alphanumeric characters.
Enter the name of the machine on the network using alphanumeric characters.
[Workgroup Name]
Workgroup name is a name for grouping multiple computers so that basic network functions, such as file sharing, become available in a Windows network. Enter alphanumeric characters for the name of the workgroup that the machine belongs to.
Workgroup name is a name for grouping multiple computers so that basic network functions, such as file sharing, become available in a Windows network. Enter alphanumeric characters for the name of the workgroup that the machine belongs to.
[Use NetBIOS]
Select the check box if you use NetBIOS.
Select the check box if you use NetBIOS.

NetBIOS names or workgroup names that start with an asterisk (*) cannot be registered to a WINS server.
6
Click [OK].
7
Restart the machine. Restarting the Machine
Specifying the SMB Client Settings
Specify the settings when the machine connects to a network as an SMB client.
1
Start the Remote UI and log in to System Manager Mode. Starting Remote UI
2
Click [Settings/Registration] on the Portal page. Remote UI Screen
3
Select [Network Settings] [SMB Client Settings]
4
Click [Edit].
5
Specify the required settings.
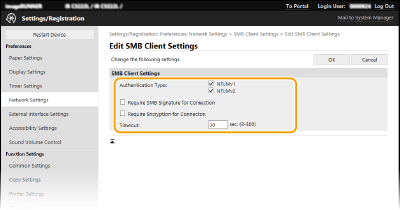
[Authentication Type]
Select the authentication protocol version. Select either [NTLMv1] or [NTLMv2], according to the destination SMB server. You can also select both.
Select the authentication protocol version. Select either [NTLMv1] or [NTLMv2], according to the destination SMB server. You can also select both.
[Require SMB Signature for Connection]
To request an SMB packet signature when connecting to an SMB server, select the check box.
To request an SMB packet signature when connecting to an SMB server, select the check box.
[Require Encryption for Connection]
To request a connection with SMB v3.0 encrypted communication when connecting to an SMB server, select the check box.
To request a connection with SMB v3.0 encrypted communication when connecting to an SMB server, select the check box.
[Timeout]
Set the wait time until the SMB connection destination responds.
Set the wait time until the SMB connection destination responds.
When communicating to an SMB server, the network connection may be lost or the response on the server side may be slow, resulting in timeout on the machine side before the data is sent or forwarding is completed. If this happens, you may be able to avoid a timeout by increasing the wait time.
6
Click [OK].
7
Restart the machine. Restarting the Machine
Specifying the SMB Client Version
Specify the SMB version used by the SMB client.
1
Start the Remote UI and log in to System Manager Mode. Starting Remote UI
2
Click [Settings/Registration] on the Portal page. Remote UI Screen
3
Select [Network Settings] [Specified SMB Client Versions]
4
Click [Edit].
5
Select the check box of the SMB version used by the SMB client.
6
Click [OK].
7
Restart the machine. Restarting the Machine
 When [Require Encryption for Connection] is enabled, the machine can only connect to SMB servers that support SMB v3.0 encrypted communication. Even if [1.0] and [2.0] are selected for [Specified SMB Client Versions], if [3.0] is not selected, the machine cannot connect to SMB servers that do not support SMB v3.0 encrypted communication. Use the same version of SMB with the SMB server and SMB client. SMB cannot be used if the versions differ. |