| User's Guide (Notification of New and Enhanced Functions) | |
|---|---|
| User's Guide (Notification of New and Enhanced Functions) | |
|---|---|
 Utilizing the Machine through Applications

 [Settings/Registration]
  [Network Settings]
  [Mopria Settings]
  select the [Use Mopria] check box
  [OK]
[OK] |
If you enable the Mopria® setting, <Use Network Link Scan> also changes to <On>. To use the Mopria® scan service, <Use Network Link Scan> must be set to <On>. |

 |
You can also connect the machine to a Chromebook using a USB cable. See the Chromebook website (https://support.google.com/chromebook/answer/7225252) for information on the connection procedure. |
 |
Printing from Chrome OS may not be available, depending on your country or region. |
 MEAP
MEAP  Managing MEAP Applications
 [MEAP Application Management]" of step 3 has been changed (description of the bottom row of the table under the second bullet point changed).
[Installed] | The MEAP application has been installed, but it is not ready for use. Even if you restart the machine after stopping the use of the MEAP application, [Installed] is displayed. |
[Started] | The MEAP application is ready for use. |
[Stopped] | The MEAP application is not ready for use. |
[Starting] | The MEAP application is starting. |
[Stopping] | The MEAP application is stopping. |
 System Specifications
  System Environment
Compatible mail forwarding server software | Microsoft Exchange Server 2010 Microsoft Exchange Server 2013 Microsoft Exchange Server 2016 Microsoft Exchange Server 2019 Sendmail 8.14.7 Qpopper 4.1.0 |
Compatible mail receiving server software | Microsoft Exchange Server 2010 Microsoft Exchange Server 2013 Microsoft Exchange Server 2016 Microsoft Exchange Server 2019 Sendmail 8.14.7 Qpopper 4.1.0 |
 System Specifications
  Printer Functions
 Hardware Specifications
  Main Unit
Memory Capacity | RAM: 5 GB (Main CPU Side: 2 GB, Image Processing CPU Side: 2 GB + 1 GB (reserved for image processing)) Storage Disk: Standard: 256 GB Maximum: 1 TB*7 |
 Main Unit Maintenance
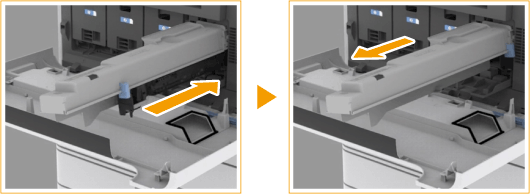
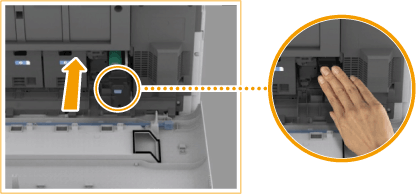
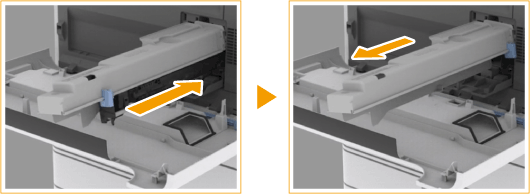
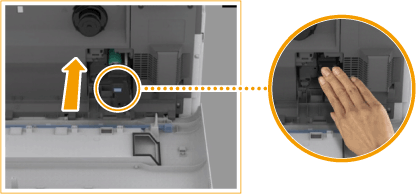
  Replacing the Drum Unit


 Setting up the Network Environment
 |
When <Sleep Mode Energy Use> is set to <Low>Depending on the utility software, communication may fail if the machine is in sleep mode. Return the machine from sleep status. |
 Setting up the Network Environment
  Selecting the Network Connection Method
 |
When using a sub line, see "Cautions When Using the Sub Line" in the User's Guide. If you selected <Wireless LAN> or <Wired LAN + Wireless LAN>The settings of <Wireless LAN Settings> are cleared. You cannot set wireless LAN as the main line and wired LAN as the sub line. Set <Sleep Mode Energy Use> to <High>. Cautions When Using Wired LAN (Sub Line)Set <Sleep Mode Energy Use> to <High>. |
 Setting Sounds
 Setting Sounds
 <Alarm Volume> and
  <Monitor Volume> in Step 2 of "Adjusting the Volume for Sending/Receiving Faxes" has been changed.
 <Alarm Volume>
 several times to set the volume to the far left.
 <Monitor Volume>
 several times to set the volume to the far left.
 Entering Sleep Mode
 |
When using a wireless LAN or Bluetooth also while in sleep modeSet <Sleep Mode Energy Use> to <High>. |
 <Preferences>
  <Timer/Energy Settings>
Item | Setting Description | DeviceAdmin | NetworkAdmin | Can be set in Remote UI | Device Information Delivery Available | Import All Function | Name of Item When Exporting with the Remote UI |
<Sleep Mode Energy Use> | <Low>, <High> | Yes | Yes | Yes | Yes | C | Settings/Registration Basic Information |
 <Preferences>
  <Timer/Energy Settings>
 |
When performing wireless communication while <Wireless LAN Settings> or <Use Bluetooth> is enabled, <Sleep Mode Energy Use> changes to <High>. If the energy consumption level is set to <Low>, communication failure may occur, depending on the network utility software you are using. To avoid this, press the Energy Saver key to cancel the Sleep mode before using the machine. |
 <Preferences>
  <Network>
 |
When either <Wireless LAN> or <Wired LAN + Wireless LAN> is selected, <Sleep Mode Energy Use> will be set to <High>. |
 <Preferences>
  <Network>
  <Bluetooth Settings>
 |
If you set this to <On>, <Sleep Mode Energy Use> changes to <High>. |
 Setting the Dither Pattern
 Main Unit Maintenance
  Replacing the Drum Unit


