
Paper Jams in the Fixing Station
This section describes how to clear a paper jam which occurs in the fixing unit. Check the paper jam location on the screen, and follow the procedure below to remove the paper.
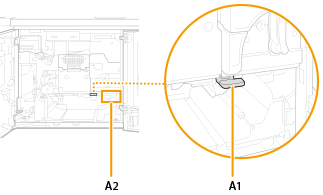
The location of the fixing unit is indicated in the following illustration.

Paper Jams at the 2-sided Guide (Right) (A1) and 2-sided Outlet Unit (A2)
Paper jam locations are indicated by number such as guide (A1) or unit (A2), which is shown in the illustration below.
 |
There is a hot part around the 2-sided guide (right) (A1) and 2-sided outlet unit (A2). Be careful not to touch the guide when removing the paper. When opening and closing each guide or cover, be careful not to get your fingers caught in the gap. |
1
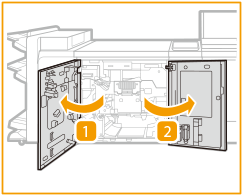
Open the fixing station front cover in the order of left and right.
2
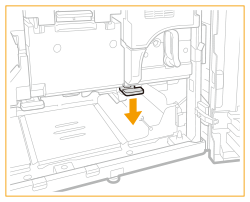
Open the guide (A1) ( ).
).
 ).
).
3
If paper is jammed, gently pull it out in the direction of the arrow.
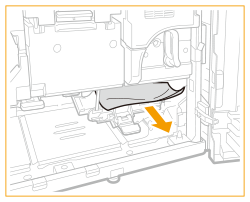

If the front LED on the unit (A2) is blinking and the back LED is lit, remove the jammed paper from the unit (A2).
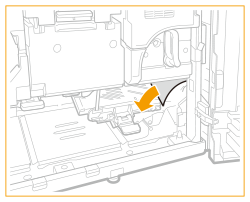
The LEDs do not turn off when you remove the jammed paper. Visually check that there is no paper left.
4
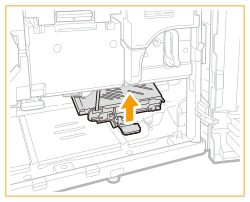
Close the guide (A1) ( ).
).
 ).
).
5
Close the fixing station front cover in the order of right and left.
Continue following the instructions on the screen to proceed with the interrupted operation or continue clearing paper jams.
Paper Jams in Each Unit
The positions of each unit and the "lever (C1)" and "guide (D1)" in the procedure are as shown in the figure.
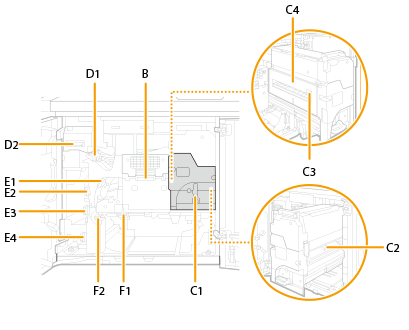
 |
There is a hot part around the fixing unit. Be careful not to touch the guide when removing the paper. When opening and closing each guide or cover, be careful not to get your fingers caught in the gap. |
1
Open the fixing station front cover in the order of left and right.

2
Check whether paper is jammed in the cooling unit.
 | Open the lever (B). |
 | If paper is jammed, gently pull it out in the direction of the arrow. 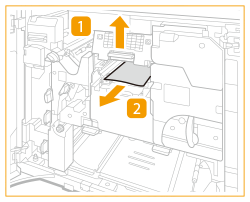 |

Leave the lever (B) open. Close after checking for a paper jam in the fixing unit.
3
Check whether paper is jammed in the fixing unit.
 | Tilt the lever (C1) to the left to release the lock. |
 | Holding the lever (C1), pull the fixing unit out. 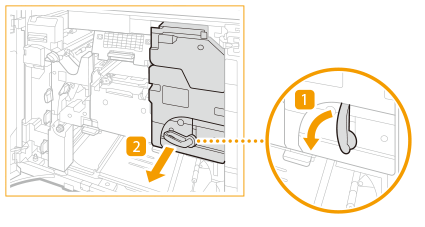 |
 | If paper is jammed at the entrance of the fixing unit, gently pull it out in the direction of the arrow. 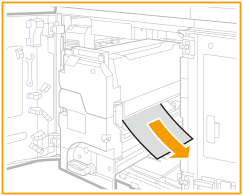 |
 | Open the guide (C3). |
 | If paper is jammed, gently pull it out in the direction of the arrow keeping the guide (C3) open by hand. 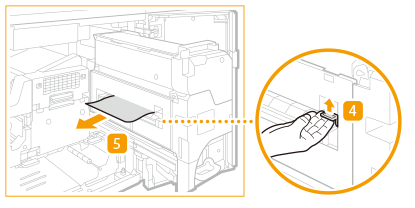  When you release the guide (C3), it closes. |
 | Open the cover (C4). 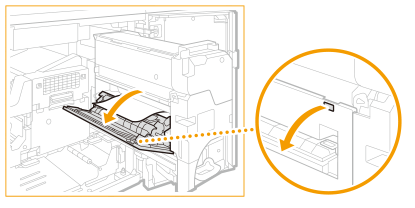 |
 | If paper is jammed, gently pull it out in the direction of the arrow. 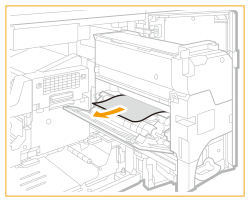 |
 | Close the cover (C4). |
 | Gently push the fixing unit back into the machine holding the lever (C1).  When pushing in the fixing unit, the lever (C1) you hold may move so that it pops up, but this is not a malfunction. Push it all the way in and proceed to the next step. |
 | Turn the lever (C1) to the right to lock. 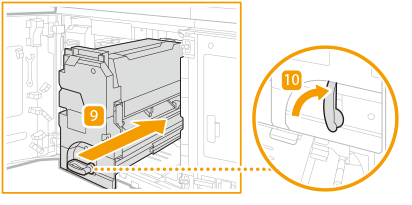 |
 | Close the lever (B) of the cooling unit. |
4
Check whether paper is jammed in the upper feeding guide.
 | Open the guide (D1). 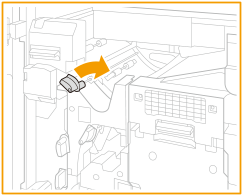 |
 | If paper is jammed, gently pull it out in the direction of the arrow. 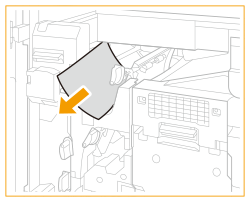 |
 | Close the guide (D1). |
5
Check whether paper is jammed in the decala unit.
 | Open the lever (D2). 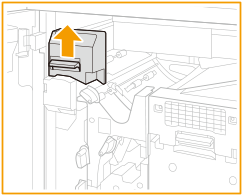 |
 | If paper is jammed, gently pull it out in the direction of the arrow. 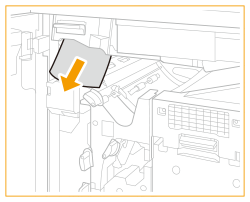 |
 | Close the lever (D2). |
6
Check whether paper is jammed in the inverted pull-in guide (right).
 | Open the guide (E1). 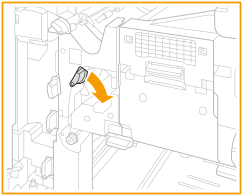 |
 | If paper is jammed, gently pull it out in the direction of the arrow. 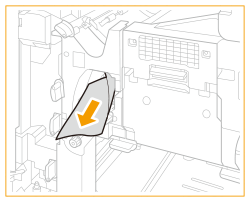 |
 | Close the E1 guide (E1). |
7
Check whether paper is jammed in the inverted upper vertical path guide (left).
 | Open the guide (E2). 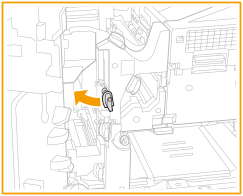 |
 | If paper is jammed, gently pull it out in the direction of the arrow. 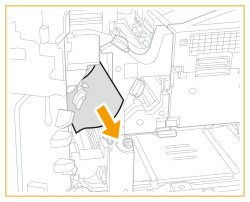 |
 | Close the guide (E2). |
8
Check whether paper is jammed in the path guide (left).
 | Open the guide (E3). 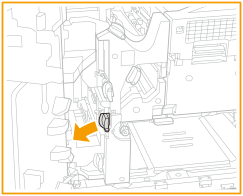 |
 | If paper is jammed, gently pull it out in the direction of the arrow. 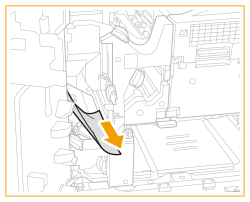 |
 | Close the guide (E3). |
9
Check whether paper is jammed in the inversion shift (left) or 2-sided inversion part.
 | Open the guide (E4). 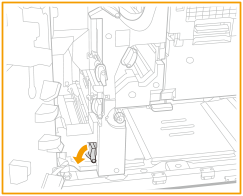 |
 | If paper is jammed in the inversion shift (left), gently pull it out in the direction of the arrow. 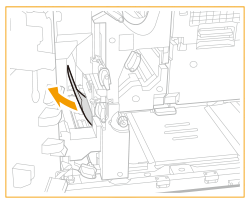 |
 | If paper is jammed in the 2-sided inversion part, gently pull it out in the direction of the arrow. 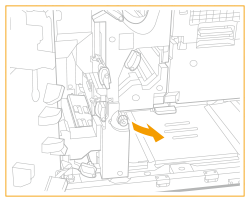 |
 | Close the guide (E4). |
10
Check whether paper is jammed in the 2-sided guide (right).
 | Open the guide (F1). 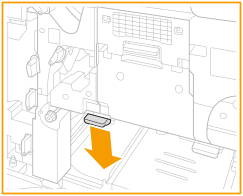 |
 | Turn the knob (F2) clockwise. 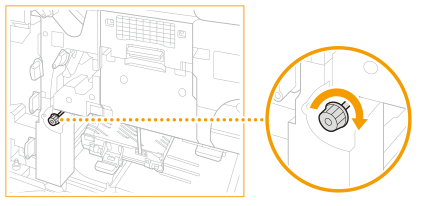 |
 | If paper is jammed, gently pull it out in the direction of the arrow. 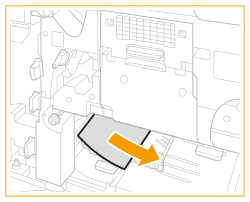 |
 | Close the guide (F1). |
11
Close the fixing station front cover in the order of right and left.
Continue following the instructions on the screen to proceed with the interrupted operation or continue clearing paper jams.