
Clearing Paper Jams
If a paper jam occurs, a message, the location of the paper jam, and the procedure for clearing it are displayed on the screen. If you do not know how to clear the paper jam from viewing the screen, see Paper Jam Locations to clear the paper jam. For information on cautions when clearing paper jams, see Important Safety Instructions.
|
Do not forcibly remove the jammed paper from the machine. Forcibly removing the paper may result in personal injury or damage parts of the machine. If you cannot remove the paper, contact your dealer or service representative. When all paper jams have been cleared, immediately remove your hands from the machine and optional equipment so that your clothing and hands do not get caught in the rollers. |
 |
Cautions when clearing paper jamsWhen clearing paper jams, do not turn the power OFF. Data being printed is erased when you turn the power OFF. When the paper gets torn, be sure to remove all of it so that no pieces remain. Prints may be output to optional equipment while you are clearing paper jams. Take care when handling optional equipment that is installed. |
If Paper Jams Frequently Occur 
If paper jams frequently occur even though there are no problems with the machine and its optional equipment, check the following.
Is the rear edge retainer and size change plate misaligned?
Match the rear edge retainer and the size change plate with the loaded paper.
Is the paper type correct?
On the <Status Monitor> screen, check the paper type. <Status Monitor> Screen
If the paper loaded in a paper source differs from the paper type setting, see Loading Paper to set the paper type again.
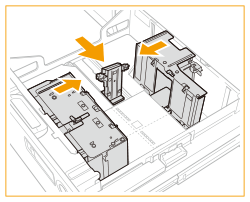
Do pieces of paper remain in the machine?
Pieces of paper may remain in the machine after removing a paper jam. Open the location where the paper was jammed, and remove any pieces of paper (do not forcibly pull the paper when removing it).
Paper Jam Locations
For information on locations where a paper jam can occur and how to resolve it, see  to
to  in the figure below and the reference.
to in the figure below and the reference.The  to
to  symbols at the top of the figure indicate the unit number displayed on the screen when a paper jam occurs.
to symbols at the top of the figure indicate the unit number displayed on the screen when a paper jam occurs.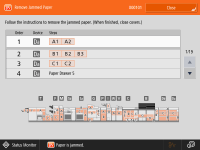
Inspection, Main Unit, and Paper Source Area

Paper jam location | Unit number | Unit name | Reference |
|  | Document Insertion Unit-R | |
 | | Inspection Unit-B | See the User's Guide for the "Inspection Unit-B." |
 |  | Sensing Unit-B | |
 |  | Fixing Station | |
 | | Buffer Pass Station | |
 | | Marking Engine | |
 | | Marking Engine (Paper source) | |
 | | POD Deck-E (Buffer path unit) | |
 |    | POD Deck-E/Secondary POD Deck-E (Paper deck) | |
 | | POD Deck-E/Secondary POD Deck-E (Right front cover/horizontal path) | |
| | Inspection Unit-C | See the User's Guide for the "Inspection Unit-C." |
Output Area
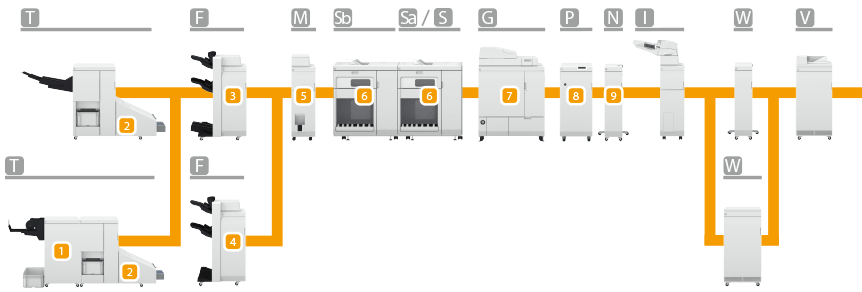
Paper jam location | Unit number | Unit name | Reference |
|  | Two-Knife Booklet Trimmer-B | See the instruction manual for the "Two-Knife Booklet Trimmer-B." |
| | Booklet Trimmer-G | See the instruction manual for the "Booklet Trimmer-G." |
|  | Booklet Finisher-AF | |
| | Staple Finisher-AF | |
|  | Paper Folding Unit-K | |
|    | High Capacity Stacker-J | See the instruction manual for the "High Capacity Stacker-J." |
|  | Perfect Binder-F | See the instruction manual for the "Perfect Binder-F." |
|  | Multi Function Professional Puncher-C | See the instruction manual for the Multi Function Professional Puncher-C." |
|  | Static Eliminator-A | See the instruction manual for the ”Static Eliminator-A." |
 |
Paper may not actually be jammed in the location you check. Even in this case, follow the instructions on the screen to check all the locations. The screen indicating that there is a paper jam is repeatedly displayed until you clear the paper jam. If you press <Close> on the screen indicating that there is a paper jam, you may be able to continue to perform operations and specify settings without immediately removing the paper jam. Do not remove paper from a location other than that displayed as a paper jam location on the screen. This may cause paper jams in other locations or missing pages in output documents. |