
Replacing the Toner Cartridges
Replace the toner cartridges at the appropriate time according to the displayed messages.
Before replacing the toner cartridges, check the precautions in Important Safety Instructions. Manuals of the Machine
|
Do not replace toner cartridges until the message prompting you to do so appears. Be sure to hold the toner cartridge using the handle. Do not touch the electrical contacts on the end of the toner cartridge.  |
 |
For information on the product numbers for toner cartridges, see Replacing Consumables You can check the current amount of toner remaining. Checking the Remaining Amount of Consumables |
When to Replace the Toner Cartridges
When a Message Appears on the Screen of the Control Panel or Remote UI
Follow the message on the screen to prepare a new toner cartridge and replace the old one.
For details about the message and how to resolve it, see the following:
A Message Appears
For details about the message and how to resolve it, see the following:
A Message Appears
Replacing Toner Cartridges
|
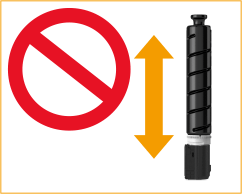
When replacing multiple toner cartridges at the same time, replace them in the following order: black, yellow, magenta, and cyan. Make sure to avoid applying shocks to the toner cartridge by hitting it against something, etc. Doing so may cause the toner to leak. When you pull out a toner cartridge which need not be replaced, a warning tone is produced. [Volume Settings] Screen |
1
Press [Next].

2
Open the front cover of the main unit.
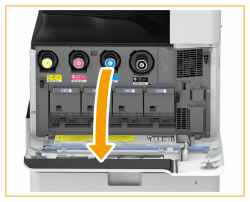
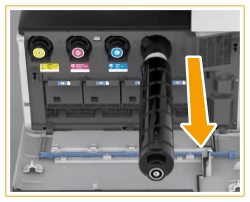
3
Pull out the toner cartridge.
Pull out the toner cartridge of the color displayed in the screen.
4
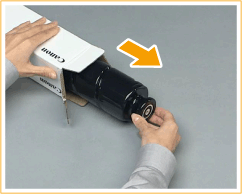
Remove the new toner cartridge from its box.
5
With the white part of the new toner cartridge facing up, shake the toner cartridge up and down approximately 10 times.
Shaking the toner cartridge evens out the toner inside.
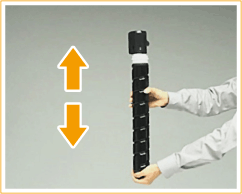
Do not have the white part of the toner cartridge face down. Doing so may prevent the toner from being supplied properly.
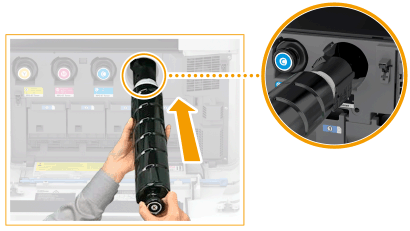
6
Install the new toner cartridge.
Before installing the toner cartridge, confirm that the color of the toner cartridge and the color indicated on the slot of the main unit are the same.
Holding the toner cartridge with the flat surface of its tip facing down, slide the cartridge into the main unit as far as it will go.
7
Close the front cover of the main unit.
The message [Checking the toner] is displayed. The procedure is complete when this message disappears.
|
If printing was interrupted because toner ran out, it will automatically resume when you replace the toner cartridge. Even if cyan, magenta, or yellow toner runs out, you can continue to print in black and white as long as black toner remains, but the printing quality will drop. If you want to continue printing in black and white, do not replace the toner cartridge until printing is complete. If the color and density of printing differ after replacing the toner cartridge, perform adjustment. |