Loading Media
Media must be in optimal condition and loaded according to the specified procedure.
If there are instructions on the media package about which side of the media to load, follow those instructions.
Required Preparations
Check the state of the media, and decurl the media as necessary.
Preparing Media
Preparing Media
1
Open the paper tray.
If you want to change the media size, proceed to step 2. If you want to use the same media size, proceed to step 3.
Open the paper tray by pressing the open button on the PIM control panel. You can open only one paper tray at a time.
* You can also open each paper tray individually from the main control panel.
* You can also open each paper tray individually from the main control panel.
You can open paper trays not in use while the press is printing.
When the paper tray in use is opened while the press is printing, the print process can be continued if the same media is available in another paper tray. If the same media is not available in another paper tray, the print process stops.
To change the media size, shift the paper holders.
1
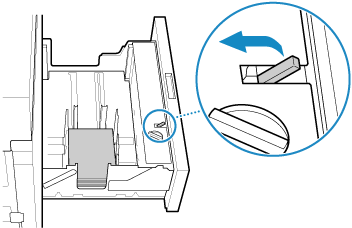
Push the lever toward the press to unlock the side paper holders.
2
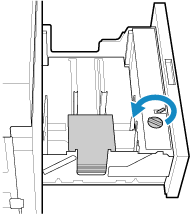
Turn the knob counterclockwise to release the side paper holders from the loaded media stack.
3
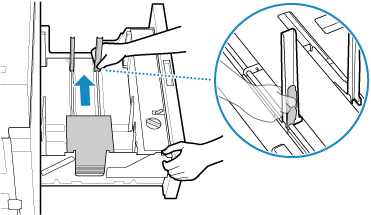
Push the lever on the right side of the near side rear paper holder, and shift the rear paper holders away from the media.
If any media remains, remove it.
4
Load some of the new media, and adjust the rear paper holders.
Take care not to damage the media.
1
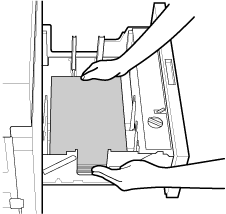
Place the media in the center of the paper tray.
Load the media with the print side face up.
Load the media in stacks no thicker than 20 mm (0.79") at a time. Loading a thick stack of media at once may cause printing problems due to the edge of the media being damaged or curled.
2
Align the media with the left guide plate.
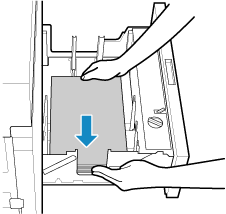
3
Slowly turn the knob clockwise to align the side paper holders with the media.
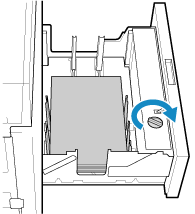
4
Push the lever away from the press to lock the side paper holders.
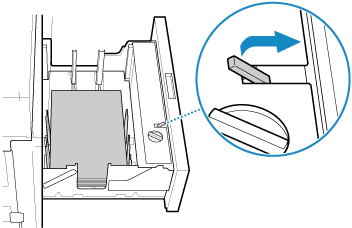
5
Push the lever on the right side of the near side rear paper holder, and shift the rear paper holders to align with the media.
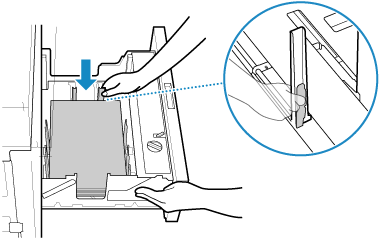
Prepare the media.
Remove the media from its packaging, then take out a stack of media that is easy to fan (no thicker than 20 mm (0.79")).
Fan the remaining media that was not loaded earlier.
* The arrow indicates the transport direction.
For the parts indicated by  to
to  , follow the procedure below to fan the media.
to , follow the procedure below to fan the media.The procedure for parts 1 and 2 is not required for the short side of the media.
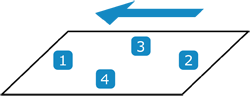
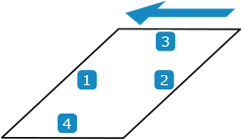
Fanning the media removes burrs and separates media that is stuck together, which can help prevent paper jams.
1
Separate the ends of the media.
Gently bend the corners of the media, then stand the media stack upright and bend the entire stack.
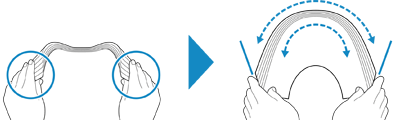
Separating the ends of the media makes it easier to fan the media.
2
Fan the center of the media.
Bend the media while holding it tightly with your hands to fan the center.
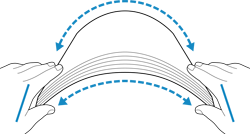
This allows air in between the sheets around the center to prevent the sheets from sticking together.
3
Fan the end of the media.
Allowing air in between the sheets near the end of the media helps eliminate factors that can cause the sheets to stick together due to close contact.
Place the media on a flat surface, hold the part to fan with your hands, then bend the media at least halfway to fan it.
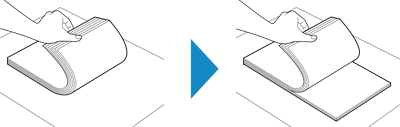
If the media is clumped into separate stacks, repeat the procedure until there is no longer any clumping.
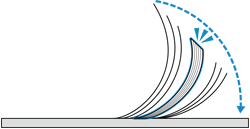
Place the fanned media on top of the loaded media.
8
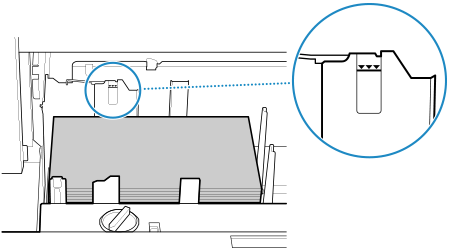
Load the media so that it does not exceed the loading limit mark on the far side paper holder.
9
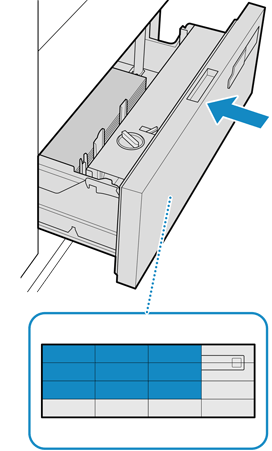
Gently push the paper tray until it clicks into place in the closed position.
When pushing in the paper tray, push the area indicated in blue in the illustration.
IMPORTANT
Lifting up the lifter in the paper tray by hand may cause the paper tray to malfunction or fail.
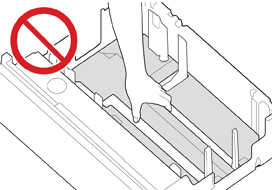
Never place media or any other items in the empty part of the paper tray next to the media stack. Doing so may result in failure.
NOTE
When removing the media that has remained in the paper tray, remove it before the press enters the shutdown mode, and then store it in its original packaging or wrapped in other moisture-proof material.
* When the press is in the sleep mode, you can leave media in the paper tray.
* When the press is in the sleep mode, you can leave media in the paper tray.
Media with curling or waving is detected by the media deformation detection unit and output to the TM waste tray or PIM waste tray*1.When Media Is Repeatedly Output to the Waste Tray
*1 If multiple PIMs are connected, the media with curling or waving is output to the waste tray of the first PIM.
If the media is misaligned when the paper tray is opened, reload the media correctly. Misaligned media may cause media folding or paper jams.