Displaying a Notice on the Machine Screens
You can display a notice on the machine screens in the two ways below. You can use either way according to the content or purpose of the notice.
Displaying Text
The text that you enter when configuring the settings can be displayed in the following locations:
At the bottom of the control panel screen (status display)
Over the entire control panel screen
In [Message Board] on the Portal page of Remote UI
The text can be displayed at all times, which is useful for operation tips and notices about suspension of use or maintenance.
Displaying File or Website Content
Image files and other files stored in the Advanced Space or on a file server on the same network can be displayed as content over the entire control panel screen.
You can also display the content of an Internet website if the machine is connected to the network using a proxy server.
The content can be displayed graphically, which is useful for company notices and event announcements.
You can also display the content of an Internet website if the machine is connected to the network using a proxy server.
The content can be displayed graphically, which is useful for company notices and event announcements.
Displaying Text on the Control Panel and Remote UI
Configure this setting using Remote UI from a computer. You cannot use the control panel to configure the setting.
Administrator privileges are required.
Administrator privileges are required.
1
Log in to Remote UI as an administrator. Starting Remote UI
2
On the Portal page of Remote UI, click [Settings/Registration]. Remote UI Portal Page
3
Click [License/Other]  [Message Board/Support Link].
The [Message Board/Support Link] screen is displayed.
4
In [Message Board], set the notice content and display methods.
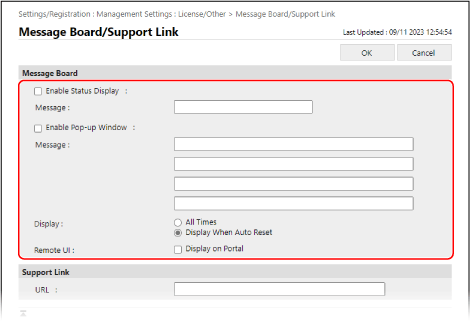
When Displaying at the Bottom of the Control Panel Screen
Select the [Enable Status Display] checkbox, and enter the notice content in [Message] below it.
* The entered content will be displayed at all times in the status display. This is suitable for displaying short text such as operation tips.
When Displaying Over the Entire Control Panel Screen or in Remote UI
1
Select the [Enable Pop-up Window] checkbox, and enter the notice content in [Message] below it.
You can enter up to four lines for the notice content.
2
Set the display method for the notice.
For [Display], select the timing of when to display the notice over the entire control panel screen.
When you select [All Times], users cannot close the notice screen and operate the machine. This is suitable for notices in situations such as when machine use is suspended.
When you select [Display When Auto Reset], users can close the notice screen and operate the machine. This is suitable for messages such as advance notifications of scheduled maintenance.
When you also want to display the notice in [Message Board] on the Portal page of Remote UI, select the [Display on Portal] checkbox for [Remote UI].
5
Click [OK].
The settings are applied.
6
Log out from Remote UI.
NOTE
Deleting a Notice
Clear the [Enable Status Display], [Enable Pop-up Window], and [Remote UI] checkboxes.
You can also delete the notice from the control panel. [Delete Message Board Contents]
Displaying File or Website Content on the Control Panel (Visual Message)
For the format and size of file or website content that can be displayed, see the specifications for Visual Messages. Visual Message
Configure this setting using Remote UI from a computer. You cannot use the control panel to configure the setting.
Administrator privileges are required.
Administrator privileges are required.
Required Preparations
When displaying content of a website on the Internet, configure the proxy settings, as needed. Using a Proxy
1
Log in to Remote UI as an administrator. Starting Remote UI
2
On the Portal page of Remote UI, click [Settings/Registration]. Remote UI Portal Page
3
Click [License/Other] [Visual Message Settings].
The [Display Settings] screen is displayed.
4
Specify [Display Timing and Content].
1
Set the timing to display the content.
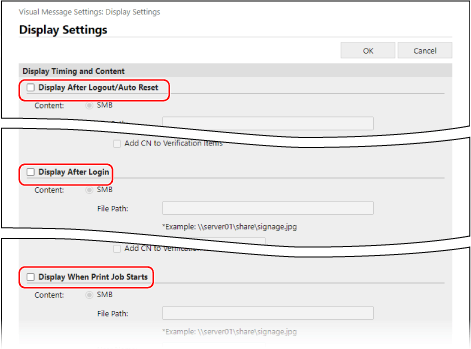
[Display After Logout/Auto Reset]
To display the content after the user has logged out or Auto Reset is performed, select this checkbox.
* To display the content after the user has logged out, you need to configure the login screen to be displayed when the user starts an operation. [Login Screen Display Settings]
* To display the content after Auto Reset, you need to set the time until Auto Reset is executed to one minute or more. [Auto Reset Time]
[Display After Login]
To display the content after the user has logged in, select this checkbox.
* You need to configure the login screen to be displayed when the user starts an operation. [Login Screen Display Settings]
[Display When Print Job Starts]
Select this checkbox to display the content when users start printing from the print screen, such as when they start printing a Forced Hold document.
2
Configure the content information for each display timing setting.
For [Content] in each display timing setting, select the protocol ([SMB] or [HTTP/WebDAV]) used to access the content to be displayed, and enter the path to the content.
If authentication is required when accessing the content, enter the user name and password to access the content.
When [HTTP/WebDAV] is selected, select the [Confirm Certificate for TLS Communication] checkbox to verify the server certificate when using TLS encrypted communication.
To add a Common Name (CN) to the verification items, also select the [Add CN to Verification Items] checkbox.
To add a Common Name (CN) to the verification items, also select the [Add CN to Verification Items] checkbox.
5
Set [Content to Display When an Error Occurs].
You can select whether to display an error message if the content is not displayed for some reason.
6
Click [OK].
The settings are applied and the [License/Other] screen is displayed again.
7
Configure the useful functions, as needed.
You can notify the specified web server of the login information (user name and domain name) of users who display the content, and collect that information. You can also use the machine to print out the PDF files linked from the content.
1
Click [Visual Message Settings] [Security Settings].
The [Security Settings] screen is displayed.
2
Configure the functions to be used.
When Notifying the Web Server of the User Login Information
Select the [Notify Server of Login Information When Content Is Displayed] checkbox, and enter the address of the web server.
* You can specify multiple addresses (up to 255 characters) by separating them with commas (,).
When Enabling the Printing of PDF Files Linked from the Content
Select the [Allow Printing from Content] checkbox.
3
Click [OK].
The settings are applied.
8
Log out from Remote UI.
NOTE
Operating the Machine When a Visual Message Is Displayed
Close the Visual Message screen before you operate the machine.
Displaying a Visual Message at Any Time
You can press [Visual Message] on the [Home] screen of the control panel to display a Visual Message regardless of the set display timing.
* If multiple timing and content settings have been configured in the Visual Message settings, the most recently displayed content will be displayed.
If Content Is Not Displayed When Using a Proxy
Content stored in the Advanced Space or on a file server may not be displayed when the machine is connected to the network using a proxy server. If this occurs, follow the procedure below to set the address of the content that is not displayed as an exception address (an address that does not use a proxy).
Administrator privileges are required to configure this setting.
Administrator privileges are required to configure this setting.
Log in to Remote UI as an administrator click [Settings/Registration] [License/Other] [Visual Message Settings] [Proxy Settings] enter an exception address [OK]
* You can specify multiple addresses (up to 255 characters) by separating them with commas (,).