Adjusting the Image Quality
You can adjust the image quality, such as when the scanned data image is not clear or the text is difficult to read.
You can also erase dark borders and shadows that appear around the edges of the original.
You can also erase dark borders and shadows that appear around the edges of the original.
Setting the Resolution
Increase the resolution when you want to scan originals more finely, and decrease the resolution for a smaller file size.
* You cannot set the resolution when saving scanned data to a Mail Box. (The resolution is fixed to [600x600 dpi].)
1
On the scan screen, press the resolution setting button. Scan Screen
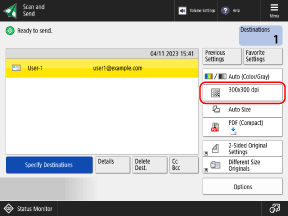
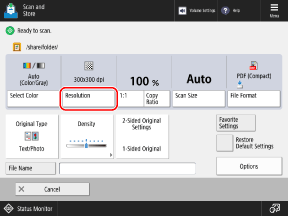
The [Resolution] screen is displayed.
2
Select the resolution.
The resolution that can be selected varies depending on the file format setting.
3
Press [OK].
The scan screen is displayed again.
Selecting the Original Type
Select the original type so that scanning is performed using the image quality that suits the content of the original.
1
On the scan screen, press [Original Type] or [Options]  [Original Type]. Scan Screen
The [Original Type] screen is displayed.
2
Select the original type.
For details on the original types, refer to the help screen displayed when you press [ ] at the top right of the screen.
] at the top right of the screen.When [Text/Photo] or [Map]*1 is selected, press [Adjust Level] to adjust whether to give priority to text or photos.
*1This is displayed only when saving scanned data to a Mail Box.
When [Thickness of Feeder Originals] Is Displayed
You can press [Thickness of Feeder Originals] to select the thickness of the original when you scan using the feeder.
When [BleedReduce] Is Displayed
You can press [BleedReduce] to select it, so as to prevent the back side of the page to be scanned or the next page from being visible.
3
Press [OK] or [OK] [Close].
The scan screen is displayed again.
NOTE
To create a clean scan of an original with a colored background or a newspaper, adjust the density of the background. Adjusting the Density
If a phenomenon called moiré (vertical pattern noise) occurs when you scan after selecting the original type, adjust the sharpness. Adjusting the Sharpness
Adjusting the Density
You can adjust the density to suit the original.
If text or images in the original are too faint or dark, adjust the density of the entire original.
To create a clean scan of an original with a colored background or a newspaper, adjust the density of the background.
If text or images in the original are too faint or dark, adjust the density of the entire original.
To create a clean scan of an original with a colored background or a newspaper, adjust the density of the background.
1
On the scan screen, press [Density] or [Options] [Density]. Scan Screen
The [Density] screen is displayed.
2
Adjust the density.
When Adjusting the Density of the Entire Original
Move the slider to the left or right to adjust the density.
To decrease the density, adjust it to [ ], and to increase the density, adjust it to [
 ].
].
To decrease the density, adjust it to [
], and to increase the density, adjust it to [].When Adjusting the Density of the Background
The background density can be adjusted by decreasing it automatically or by adjusting it manually.
If [BleedReduce] is displayed, you can press [BleedReduce] to select it so as to prevent the back side of the page to be scanned or the next page from being visible.
If [BleedReduce] is displayed, you can press [BleedReduce] to select it so as to prevent the back side of the page to be scanned or the next page from being visible.
To Automatically Decrease the Density of the Background
In [Background Density], press [Auto] to select it.
To Manually Adjust the Density of the Background
Press [Adjust] in [Background Density], adjust the density, and press [OK].
Move the slider to the left or right to adjust the density. To decrease the density, adjust it to [-], and to increase the density, adjust it to [+].
On the screen for adjusting the density, you can press [Adjust Each Color] to adjust the density of the background by color (red, green, and blue).
* When you adjust the background density, parts other than the background may also be affected depending on the color of the original.
3
Press [OK] or [OK] [Close].
The scan screen is displayed again.
Adjusting the Sharpness
By adjusting the sharpness, you can emphasize the contours and lines to make them clearer, or weaken them to make them softer.
1
On the scan screen, press [Options] [Sharpness]. Scan Screen
The [Sharpness] screen is displayed.
2
Move the slider to the left and right to adjust the sharpness.
Adjustment example:
To make blurry text clearer
Set to [High].
* When the target for adjustment is divided into [Text] and [Photo/Image], set [Text] to [High].

To reduce moiré (vertical pattern noise) in photos
Set to [Low].
* When the target for adjustment is divided into [Text] and [Photo/Image], set [Photo/Image] to [Low].
3
Press [OK] [Close].
The scan screen is displayed again.
Erasing Original Frame, Shadows, and Punch Holes (Erase Frame)
When you set the original size to a size larger than the actual original, or when you scan pages of a thick book, dark borders and shadows may appear around the edges of the original. You can configure the settings to erase the borders or shadows when scanning. You can also erase punch holes on the original.
IMPORTANT
When Placing an Original with Punch Holes
Place the original on the platen glass. Placing it in the feeder can result in a paper jam. Placing Originals
1
On the scan screen, press [Options] [Erase Frame]. Scan Screen
The [Erase Frame] screen is displayed.
2
Set the type and width of the frame to erase.
When Erasing the Frame of an Original
1
Press [Erase Original Frame].
2
Set the size of the original.
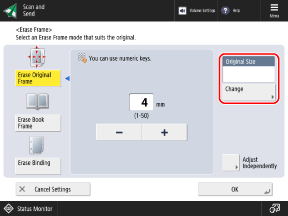
Press [Change], select the size of the original, and press [OK].
* You can erase the frame only when scanning the sizes displayed on the screen for selecting the original size.
3
Enter the erase width.
When entering the individual erase widths for the top, bottom, left, and right, press [Adjust Independently], and enter the erase widths.
When Erasing Shadows from a Book
You can erase the center shadow that forms when a book is spread open and shadows that form around the edges of a book.
1
Press [Erase Book Frame].
2
Set the size of the original.
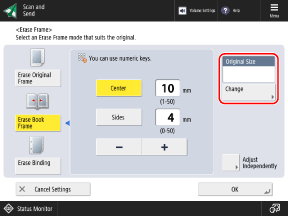
Press [Change], select the size of the original, and press [OK].
* You can erase shadows from a book only when scanning the sizes displayed on the screen for selecting the original size.
3
Enter the erase width.
In [Center], enter the erase width of the center shadow that forms when a book is spread open.
In [Sides], enter the erase width of the shadow that forms around the edges of the book.
When entering the individual erase widths for the top, bottom, left, and right, press [Adjust Independently], and enter the erase widths.
When Erasing Punch Holes on an Original
1
Press [Erase Binding].
2
Select the punch hole position, and enter the erase width.
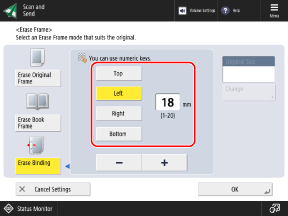
* If [Erase Binding] is set, the three edges other than the edge with the punch holes are always erased with a 4 mm (1/8") frame.
3
Press [OK] [Close].
The scan screen is displayed again.