Scan Screen
When you press [Scan and Send] or [Scan and Store] on the [Home] screen of the control panel, the scan screens below are displayed for each.
You can use the setting buttons on these screens to configure the settings for scanning the original and sending or storing the scanned data. The current setting status, such as the resolution and file format, is displayed on some setting buttons.
You can use the setting buttons on these screens to configure the settings for scanning the original and sending or storing the scanned data. The current setting status, such as the resolution and file format, is displayed on some setting buttons.
* When you use Easy Scan and Send/Easy Scan, the settings that can be configured are different. Sending with Easy Scan and Send/Easy Scan
Screen when Scanning from [Scan and Send]
When you press [Scan and Send] in the [Home] screen, the scan screen is displayed.
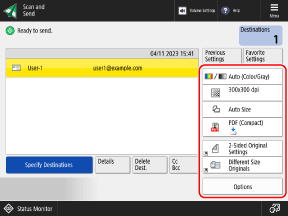
* You can replace some setting buttons with other buttons included in [Options], or you can hide them. Customizing the Scan, Fax, and Copy Screens
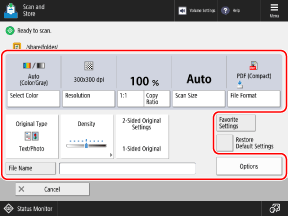
Screen when Scanning from [Scan and Store]
When you press [Scan and Store] in the [Home] screen to display the store location, and then press [Scan], the scan screen is displayed.
NOTE
Registering Frequently Used Settings from [ Menu]
Menu]
Menu]You can register frequently used scan settings as "Favorite Settings" to easily call them up from the scan screen, as needed. Registering and Recalling Favorite Settings
By registering scan settings as buttons on the [Home] screen, you can call up these settings from the [Home] screen with a single press of a button. Adding Buttons to the [Home] Screen (Personal and Shared Buttons)
You can also register settings as default scan settings. Changing the Default Settings
Recalling Previous Settings (Setting History)
You can press [Previous Settings] to call up the settings used to send scanned data in the past. Sending Scanned Data
* You cannot call up setting history when scanning from [Scan and Store].
When the Number of Pages That Can Be Scanned during Department ID Management Is Restricted
When you scan from [Scan and Store], the number of pages that can be scanned by the logged-in Department ID is displayed at the top of the screen.
