Setting Up a Firewall
Set up a packet-filtering firewall to prevent unauthorized access.
First, as a prerequisite, set whether to allow or block communication with other devices. Next, specify the IP addresses or MAC addresses of devices you want to block or allow as exceptions.
First, as a prerequisite, set whether to allow or block communication with other devices. Next, specify the IP addresses or MAC addresses of devices you want to block or allow as exceptions.
IMPORTANT
MAC address filtering is not available when connecting the machine to a wireless LAN.
Multicast and broadcast addresses are not restricted even when the setting is configured to block the sending of data from the machine to other devices.
Setting Up IP Address Filtering
Set up IPv4 address filtering or IPv6 address filtering according to your usage environment. In addition, after you set up IP address filtering, you can configure the settings to exclude inbound and outbound ICMP traffic such as ping commands from the restrictions.
* When the machine is connected to two different networks at the same time, set up IP address filtering for the main line, as described in this section. To set up IP address filtering for the sub line, see the following:
This section describes how to configure the settings using Remote UI from a computer.
On the control panel, select [ Settings/Registration] in the [Home] screen or other screen, and then select [Preferences] to configure the settings. [Firewall Settings]
Administrator or NetworkAdmin privileges are required.
On the control panel, select [
Settings/Registration] in the [Home] screen or other screen, and then select [Preferences] to configure the settings. [Firewall Settings]Administrator or NetworkAdmin privileges are required.
IMPORTANT
If you set an incorrect IP address, you may not be able to access Remote UI. If this happens, use the control panel to set the IP address again.
1
Log in to Remote UI as an administrator. Starting Remote UI
2
On the Portal page of Remote UI, click [Settings/Registration]. Remote UI Portal Page
3
Click [Network Settings].
4
Click [Outbound Filter] or [Inbound Filter] in the IP address filter.
The setting screen for the IP address filter is displayed.
To restrict sending of data from the machine to other devices, click [Outbound Filter].
To restrict receiving of data from other devices, click [Inbound Filter].
5
Select the [Use Filter] checkbox.
The IP address filter is enabled.
6
In [Default Policy], set the filtering prerequisites.
As a filtering prerequisite, select whether to allow or block communication with other devices.
7
Register exception addresses.
You can register up to 16 exception addresses.
1
Click [Register New] for [Exception Addresses].
The screen for registering exception addresses is displayed.
2
Specify the exception addresses.
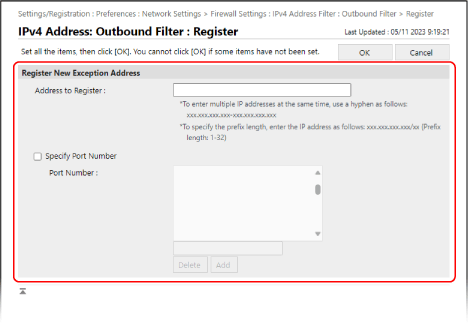
[Address to Register]
Enter the IP addresses of devices whose communication you want to block or allow as exceptions to the filter.
You can also specify a range of IP addresses by using a hyphen (-) or prefix notation.
You can also specify a range of IP addresses by using a hyphen (-) or prefix notation.
Input example: Specifying a range of IP addresses
192.168.0.10-192.168.0.20
192.168.0.32/27
fe80::1234/64
192.168.0.10-192.168.0.20
192.168.0.32/27
fe80::1234/64
[Specify Port Number]
To set exception addresses only for communication that uses specific port numbers when communicating with the registered IP addresses, select this checkbox and add the port numbers to the list.
To add a port number to the list, enter the port number in the input field above [Add], and click [Add].
You can enter up to 50 port numbers per exception address.
3
Click [OK].
The exception address is registered, and the screen for configuring the IP address filter settings is displayed again.
8
Click [OK].
9
Exclude inbound and outbound ICMP traffic from the restrictions, as needed.
To exclude inbound and outbound ICMP traffic such as ping commands from the restrictions, click [ICMP Sending/Receiving Settings] for the IP address filter, select the [Always Allow Sending/Receiving Using ICMP] checkbox, and click [OK].
10
Click [Apply Setting Changes]  [OK].
[OK].
The settings are applied.
11
Log out from Remote UI.
NOTE
Viewing the Block History of the IP Address Filter
When [Default Policy] is set to [Allow], you can check the log of communications blocked by the IP address filter.
Log in to Remote UI in as an administrator click [Settings/Registration] [Network Settings] [IP Address Block Log].
* You can check the 100 most recent communications in the log.
* You can click [Store in CSV Format] on the [IP Address Block Log] screen to store the communication log on a computer as a CSV file.
Editing a Registered Exception Address
To edit the registered information, click the exception address you want to edit on the settings screen for the IP address filter.
Setting MAC Address Filtering
When the machine is connected to two different networks at the same time, set up MAC address filtering for the main line, as described in this section. To set up MAC address filtering for the sub line, see the following:
This section describes how to configure the settings using Remote UI from a computer.
On the control panel, select [ Settings/Registration] in the [Home] screen or other screen, and then select [Preferences] to configure the settings. [MAC Address Filter]
Administrator or NetworkAdmin privileges are required.
On the control panel, select [
Settings/Registration] in the [Home] screen or other screen, and then select [Preferences] to configure the settings. [MAC Address Filter]Administrator or NetworkAdmin privileges are required.
IMPORTANT
If you set an incorrect MAC address, you may not be able to access Remote UI. If this happens, use the control panel to set the MAC address again.
1
Log in to Remote UI as an administrator. Starting Remote UI
2
On the Portal page of Remote UI, click [Settings/Registration]. Remote UI Portal Page
3
Click [Network Settings].
4
Click [Outbound Filter] or [Inbound Filter] for the MAC address filter.
The settings screen for the MAC address filter is displayed.
To restrict sending of data from the machine to other devices, click [Outbound Filter].
To restrict receiving of data from other devices, click [Inbound Filter].
5
Select the [Use Filter] checkbox.
The MAC address filter is enabled.
6
In [Default Policy], set the filtering prerequisites.
As a filtering prerequisite, select whether to allow or block communication with other devices.
7
Add exception addresses to the list of [Exception Addresses].
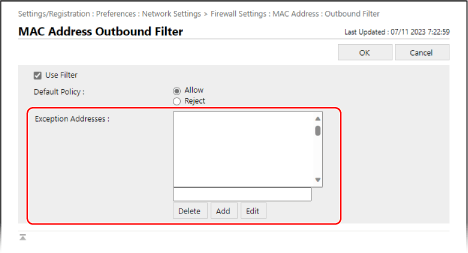
Add the MAC addresses of devices whose communication you want to block or allow as exceptions to the filter.
To add an exception address to the list, enter the MAC address in the input field above [Add], and then click [Add].
* Enter MAC addresses without including the hyphen (-) or colon (:) separators.
Input example:
123A456B789C
123A456B789C
You can add up to 100 exception addresses.
8
Click [OK].
9
Click [Apply Setting Changes] [OK].
The settings are applied.
10
Log out from Remote UI.
NOTE
Editing an Added Exception Address
Select the exception address you want to edit in the [Exception Addresses] list, edit the exception address displayed in the input field above [Edit], and then click [Edit].
Setting Up IP Address Filtering on the Sub Line
When the machine is connected to two different networks at the same time, set the IPv4 address filter on the sub line.
* By default, the IP address filter is set automatically on the sub line. Default Settings for the Firewall of the Sub Line
This section describes how to configure the settings using Remote UI from a computer.
On the control panel, select [ Settings/Registration] in the [Home] screen or other screen, and then select [Preferences] to configure the settings. [IPv4 Address Filter]
Administrator or NetworkAdmin privileges are required.
On the control panel, select [
Settings/Registration] in the [Home] screen or other screen, and then select [Preferences] to configure the settings. [IPv4 Address Filter]Administrator or NetworkAdmin privileges are required.
1
Log in to Remote UI as an administrator. Starting Remote UI
2
On the Portal page of Remote UI, click [Settings/Registration]. Remote UI Portal Page
3
Click [Network Settings].
4
Click [Firewall Settings] [IPv4 Address Filter] for the sub line settings.
The settings screen for the IP address filter on the sub line is displayed.
5
Select the [Use Filter] checkbox.
The IP address filter is enabled.
To restrict sending of data from the machine to other devices, use an outbound filter.
To restrict receiving of data from other devices, use an inbound filter.
6
In [Default Policy], set the filtering prerequisites.
As a filtering prerequisite, select whether to allow or block communication with other devices.
7
Register exception addresses.
You can register up to 16 exception addresses.
1
Click [Register New] for [Exception Addresses].
The screen for registering exception addresses is displayed.
2
Specify the exception addresses.
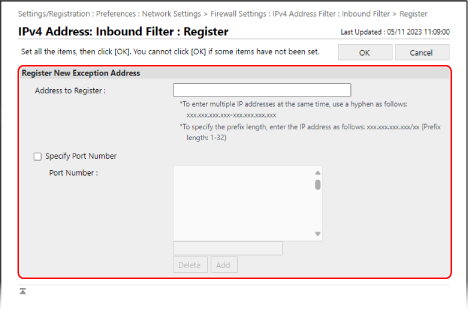
[Address to Register]
Enter the IP addresses of devices whose communication you want to block or allow as exceptions to the filter.
You can also specify a range of IP addresses by using a hyphen (-) or prefix notation.
You can also specify a range of IP addresses by using a hyphen (-) or prefix notation.
Input example: When specifying a range of IP addresses
192.168.0.10-192.168.0.20
192.168.0.32/27
192.168.0.10-192.168.0.20
192.168.0.32/27
[Specify Port Number]
To set exception addresses only for communication that uses specific port numbers when communicating with the registered IP addresses, select this checkbox and add the port numbers to the list.
To add a port number to the list, enter the port number in the input field above [Add], and click [Add].
You can enter up to 50 port numbers per exception address.
3
Click [OK].
The exception address is registered, and the screen for configuring the IP address filter settings for the sub line is displayed again.
8
Click [OK].
9
Click [Apply Setting Changes] [OK].
The settings are applied.
10
Log out from Remote UI.
NOTE
Viewing the Block History of the IP Address Filter
When [Default Policy] is set to [Allow], you can check the log of communications blocked by the IP address filter.
Log in to Remote UI in as an administrator click [Settings/Registration] [Network Settings] [IP Address Block Log].
* You can check the 100 most recent communications in the log.
* You can click [Store in CSV Format] on the [IP Address Block Log] screen to store the communication log on a computer as a CSV file.
Editing a Registered Exception Address
To edit the registered information, click the exception address you want to edit on the settings screen for the IP address filter on the sub line.
Setting up Mac Address Filtering on the Sub Line
When the machine is connected to two different networks at the same time, configure the Mac address filter settings for the sub line.
This section describes how to configure the settings using Remote UI from a computer.
On the control panel, select [ Settings/Registration] in the [Home] screen or other screen, and then select [Preferences] to configure the settings. [MAC Address Filter]
Administrator or NetworkAdmin privileges are required.
On the control panel, select [
Settings/Registration] in the [Home] screen or other screen, and then select [Preferences] to configure the settings. [MAC Address Filter]Administrator or NetworkAdmin privileges are required.
1
Log in to Remote UI as an administrator. Starting Remote UI
2
On the Portal page of Remote UI, click [Settings/Registration]. Remote UI Portal Page
3
Click [Network Settings].
4
In the sub line settings, click [MAC Address Filter] under [Firewall Settings].
The screen for setting the MAC address filter of the sub line is displayed.
5
Select the [Use Filter] checkbox.
The MAC address filter is enabled.
To restrict sending of data from the machine to other devices, configure the outbound filter settings.
To restrict receiving of data from other devices, configure the inbound filter settings.
6
In [Default Policy], set the filtering prerequisites.
As a filtering prerequisite, select whether to allow or block communication with other devices.
7
Add exception addresses to the list of [Exception Addresses].
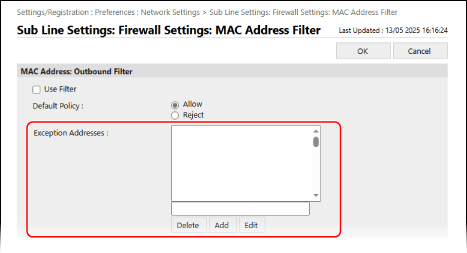
Add the MAC addresses of devices whose communication you want to block or allow as exceptions to the filter.
To add an exception address to the list, enter the MAC address in the input field above [Add], and then click [Add].
* Enter MAC addresses without including the hyphen (-) or colon (:) separators.
Input example:
123A456B789C
123A456B789C
You can add up to 100 exception addresses.
8
Click [OK].
9
Click [Apply Setting Changes] [OK].
The settings are applied.
10
Log out from Remote UI.
NOTE
Editing an Added Exception Address
Select the exception address you want to edit in the [Exception Addresses] list, edit the exception address displayed in the input field above [Edit], and then click [Edit].