Select the Mail Box to be specified as the store location.
When you press [New Destination] and select [Store in Mail Box], you can specify only one Mail Box.
If you select a Mail Box with an e-mail address that has been set, you can select [URL Send] to send an e-mail notice of the Mail Box URL when files are stored.
Specifying Destinations (Direct Entry)
To specify a destination not registered in the Address Book or LDAP server, directly enter the destination on the scan (Scan and Send) or fax screen of the control panel.
Using the Scan Screen
1
On the scan screen, press [New Destination].
If [New Destination] is not displayed, press [Specify Destinations].
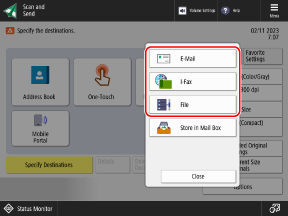
Select the type of destination.

When you specify a file store location (shared folder, file server, or Advanced Box), select [File].
You can select [Store in Mail Box] to store scanned data in a Mail Box on the machine.
Depending on the settings of the machine, you may also be able to specify fax destinations on the scan screen. [Display Fax Function]
3
Set the destination information according to the type of destination.
You can press [Register to Address Book] to register the configured destination information to the Address Book. Registering Destinations to the Address Book
When [Store in Mail Box] Is Selected in Step 2
* If you also specify a group containing a Mail Box destination at the same time, do not select [URL Send]. If you select [URL Send], you cannot send or store scanned data.
4
Press [OK].
The destination is specified.
You can press [Next Destination] to specify an additional destination of the same type.
Using the Fax Screen
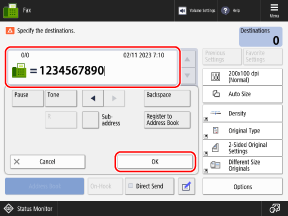
On the fax screen, enter the fax number, and press [OK].

Enter the fax number using the numeric keys.
When you send a fax to an international destination, enter the international access number first, followed by the country code, and then the fax number.
You can use the [Pause], [Tone], [PIN Code], and [R] keys when you enter the fax number, and press [Subaddress] or [Set Details] to set the fax sending details according to the send destination and service that you use. Fax Destination Settings
* Depending on the country, region, or model, the [PIN Code] and [R] key may not be displayed.
* Depending on the country, region, or model, the [PIN Code] and [R] key may not be displayed.
You can press [Register to Address Book] to register the configured destination information to the Address Book. Registering Destinations to the Address Book
When the [Fax: Confirm] Screen Is Displayed
Enter the fax number again, and press [OK].