* When you load paper in paper drawer 2, you can also use the loading method for improving print precision. Loading Method for Improving Print Precision (Paper Drawer 2)
* When using envelopes or paper with a logo, be careful of the orientation of the loaded paper and which side is face up.
Loading Paper in the Paper Drawer
Load paper you usually use into the paper drawer, which can hold large amounts of paper.
The setting method varies depending on the size of the paper to be loaded.
The setting method varies depending on the size of the paper to be loaded.
When Loading A3, A4, or Other Standard Size Paper or Envelopes
When Loading Tab Paper
When Loading Custom Size Paper
* For how to load paper in the optional High Capacity Cassette Feeding Unit-F paper drawer, see the following:
IMPORTANT
Do Not Load Printed Paper
If you load printed paper in a paper drawer, a malfunction may occur. When you want to print on the back side of printed paper (manual 2-sided printing), be sure to load the paper in the multi-purpose tray. Loading Paper in the Multi-purpose Tray
Loading Standard Size Paper
You can load paper correctly by aligning the paper guides on the paper drawer with the markings.
1
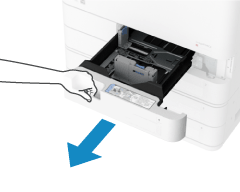
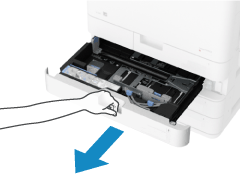
Pull the paper drawer toward you until it stops.

2
Align the paper guides with the size of the paper to be loaded.
1
Loosen the fixing screw.
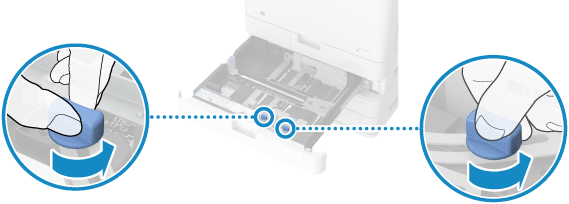
This step is not required for paper drawer 1. Proceed to Step 2.
2
While holding the lock release lever, move the paper guide.
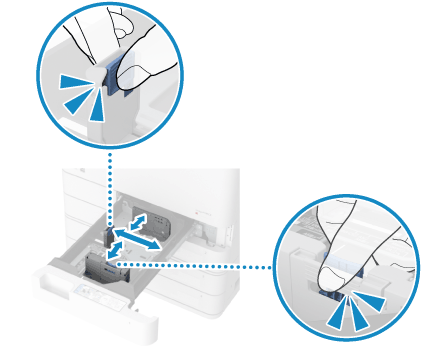

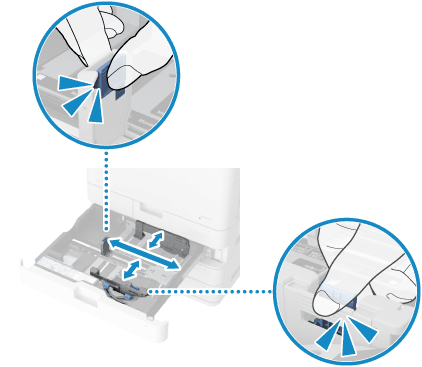
When loading envelopes, install the Envelope Feeder Attachment before moving the paper guides.
Paper drawer 1 Installing the Envelope Feeder Attachment and the Orientation of Envelopes (Paper Drawer 1)
Paper drawer 2 Installing the Envelope Feeder Attachment and Orientation of Envelopes (Paper Drawer 2)
3
Align the projections on the paper guides with the size indicator of the paper to be loaded.
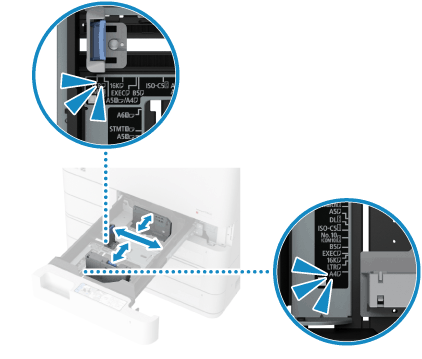

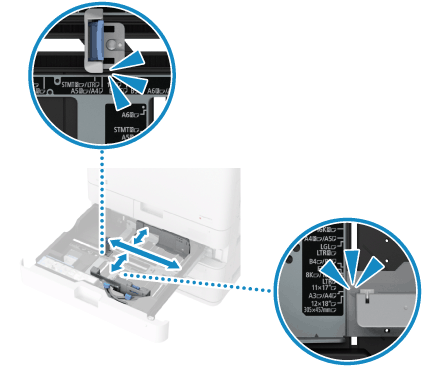
Align the paper guides to the position where you hear a click.
If the paper guides are not aligned correctly, the loaded paper size will not be displayed correctly on the control panel screen. In addition, it may result in paper jams, smudged printouts, and dirty areas inside the machine.
If the paper guides are not aligned correctly, the loaded paper size will not be displayed correctly on the control panel screen. In addition, it may result in paper jams, smudged printouts, and dirty areas inside the machine.
The paper size indicator may indicate a paper size that cannot be loaded in the machine. For the size of paper that can be loaded in the machine, see the following:
If there is not a paper size indicator for the paper to be loaded, load it using the custom size method. Loading Non-standard Size Paper
4
Tighten the fixing screw.
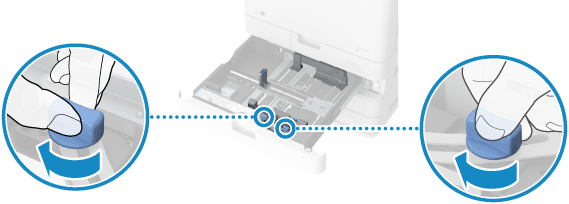
Do not tighten the fixing screw while holding down the paper guides. This can result in a paper jam.
This step is not required for paper drawer 1. Proceed to Step 3.
Fan the paper and align the edges.
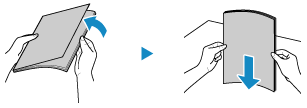
Fan the paper thoroughly in both directions.
After you fan the paper, align the edges on a flat surface.
4
Load the paper with the print side face up.
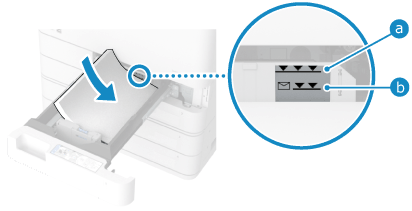

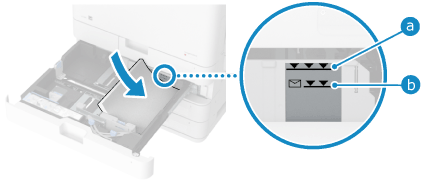
Load the paper with the edge of the paper against the right side of the paper drawer.
Make sure the loaded paper does not exceed the load limit line ( for other than envelopes and
  for envelopes). If it exceeds the load limit line, there may be misfeeds or a paper jam.
 for other than envelopes and
  for envelopes). If it exceeds the load limit line, there may be misfeeds or a paper jam.
5
Push the paper drawer gently into the machine.
6
Set the paper size and type, as needed. Setting the Paper Size and Type for the Paper Drawer
The paper size is detected automatically. Paper Sizes That Can Be Detected Automatically
* If the detected paper size does not match the loaded paper, the paper may not be loaded correctly. Reload the paper.
* If paper of a size that is not detected automatically is loaded, or a different size is detected even after reloading the paper, change the paper size setting.
By default, the paper type is set to Plain 1 or Plain 2. When paper of a different type is loaded, change the paper type setting.
Loading Method for Improving Print Precision (Paper Drawer 2)
1
Pull the paper drawer toward you until it stops.

2
Align the paper guides with the size of the paper to be loaded.
1
Loosen the fixing screw.

2
While holding the lock release lever, move the paper guide.

When loading envelopes, install the Envelope Feeder Attachment before moving the paper guides. Installing the Envelope Feeder Attachment and Orientation of Envelopes (Paper Drawer 2)
3
Align the projections on the paper guides with the size indicator of the paper to be loaded.

Align the paper guides to the position where you hear a click.
If the paper guides are not aligned correctly, the loaded paper size will not be displayed correctly on the control panel screen. In addition, it may result in paper jams, smudged printouts, and dirty areas inside the machine.
If the paper guides are not aligned correctly, the loaded paper size will not be displayed correctly on the control panel screen. In addition, it may result in paper jams, smudged printouts, and dirty areas inside the machine.
The paper size indicator may indicate a paper size that cannot be loaded in the machine. For the size of paper that can be loaded in the machine, see the following:
If there is not a paper size indicator for the paper to be loaded, load it using the custom size method. Loading Non-standard Size Paper
3
Fan the paper and align the edges.

Fan the paper thoroughly in both directions.
After you fan the paper, align the edges on a flat surface.
4
Load the paper with the print side face up.

Load the paper with the edge of the paper against the right side of the paper drawer.
Make sure the loaded paper does not exceed the load limit line ( for other than envelopes and
  for envelopes). If it exceeds the load limit line, there may be misfeeds or a paper jam.
 for other than envelopes and
  for envelopes). If it exceeds the load limit line, there may be misfeeds or a paper jam.
5
Align the paper guides with the width of the paper.
1
While holding the lock release lever, move the paper guides.
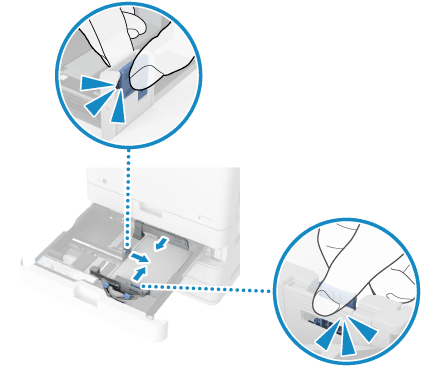
Paper guides that are aligned but too loose or too tight can cause misfeeds or a paper jam.
2
Tighten the fixing screw.
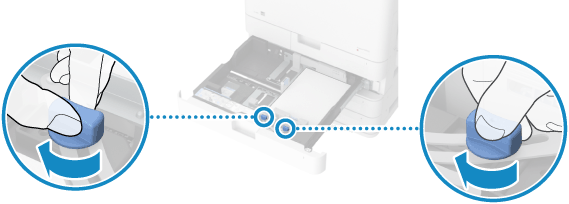
Do not tighten the fixing screw while holding down the paper guides. This can result in a paper jam.
Push the paper drawer gently into the machine.
7
Set the paper size and type, as needed. Setting the Paper Size and Type for the Paper Drawer
The paper size is detected automatically. Paper Sizes That Can Be Detected Automatically
* If the detected paper size does not match the loaded paper, the paper may not be loaded correctly. Reload the paper.
* If paper of a size that is not detected automatically is loaded, or a different size is detected even after reloading the paper, change the paper size setting.
By default, the paper type is set to Plain 1 or Plain 2. When paper of a different type is loaded, change the paper type setting.
NOTE
If a paper size label is affixed to the paper drawer, replace the paper size label after changing the paper size. Paper Drawer
Loading Tab Paper
To load Tab paper in the paper drawer, the optional Tab Feeding Attachment-F is required. Tab Feeding Attachment-F
Tab paper can only be loaded in paper drawer 2.
Tab paper can only be loaded in paper drawer 2.
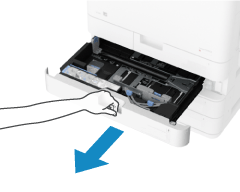
1
Pull paper drawer 2 toward you until it stops.
2
Loosen the fixing screw.

3
Move the paper guide on the left side to the left edge.
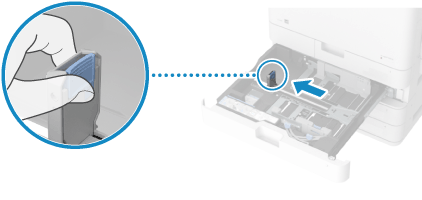
While holding the lock release lever, move the paper guides.
4
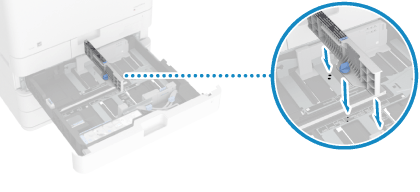
Install Tab Feeding Attachment-F to paper drawer 2.
1
Install Tab Feeding Attachment-F so it is lined up with the A4 or LTR size indicator.
2
Turn the knob to secure Tab Feeding Attachment-F.
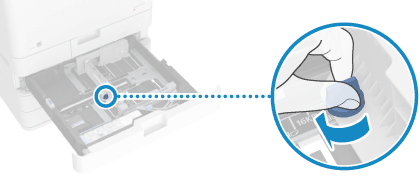
5
Load the Tab paper.
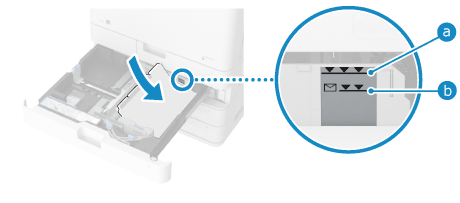
Load the Tab paper in normal order with the front facing up and the tab on the left side.
Make sure the loaded paper does not exceed the load limit line ( for other than envelopes and
  for envelopes). If it exceeds the load limit line, there may be misfeeds or a paper jam.
 for other than envelopes and
  for envelopes). If it exceeds the load limit line, there may be misfeeds or a paper jam.
6
Align the top and bottom paper guides with the length of the paper.
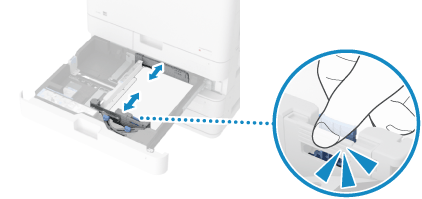
While holding the lock release lever, align the paper guides with the length of the paper.
Paper guides that are aligned and are too loose or too tight can cause misfeeds or a paper jam.
7
Tighten the fixing screw.
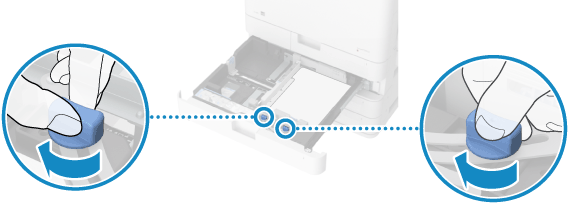
8
Push the paper drawer gently into the machine.
9
Set the paper type. Setting the Paper Size and Type for the Paper Drawer
The paper size is detected automatically.
* If the detected paper size is not A4 or LTR size, the paper may not be loaded correctly. Reload the paper.
By default, the paper type is set to Plain 1 or Plain 2. When Tab paper is loaded, change the paper type setting.
NOTE
If a paper size label is affixed to the paper drawer, replace the paper size label after changing the paper size. Paper Drawer
Loading Non-standard Size Paper
You can load paper correctly by aligning the paper guides on the paper drawer with the paper.
When using paper with a logo, be careful of the orientation of the loaded paper and which side is face up. Orientation for Loading Paper with a Logo
When using paper with a logo, be careful of the orientation of the loaded paper and which side is face up. Orientation for Loading Paper with a Logo
1
Pull the paper drawer toward you until it stops.


2
Loosen the fixing screw.

This step is not required for paper drawer 1. Proceed to Step 3.
Slide the paper guides to the outside.


While holding the lock release lever, move the paper guides.
4
Fan the paper and align the edges.

Fan the paper thoroughly in both directions.
After you fan the paper, align the edges on a flat surface.
5
Load the paper with the print side face up.


Load the paper with the edge of the paper against the right side of the paper drawer.
Make sure the loaded paper does not exceed the load limit line ( for other than envelopes and
  for envelopes). If it exceeds the load limit line, there may be misfeeds or a paper jam.
 for other than envelopes and
  for envelopes). If it exceeds the load limit line, there may be misfeeds or a paper jam.
6
Align the paper guides with the width and length of the paper.
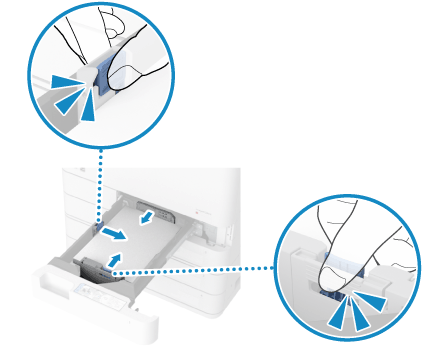


While holding the lock release lever, align the paper guides with the width and length of the paper.
Paper guides that are aligned and are too loose or too tight can cause misfeeds or a paper jam.
7
Tighten the fixing screw.

This step is not required for paper drawer 1. Proceed to Step 8.
Push the paper drawer gently into the machine.
9
Set the paper size and type. Setting the Paper Size and Type for the Paper Drawer
Set the size (length of side) of the loaded paper.
By default, the paper type is set to Plain 1 or Plain 2. When paper of a different type is loaded, change the paper type setting.