Fixing the Paper Size and Type to Use in the Multi-purpose Tray
By default, when paper is loaded in the multi-purpose tray, the screen for setting the paper is displayed on the control panel.
If you always load the same paper in the multi-purpose tray, you can fix the paper size and type. This prevents the paper settings screen from being displayed, saving you the trouble of configuring the settings.
If you always load the same paper in the multi-purpose tray, you can fix the paper size and type. This prevents the paper settings screen from being displayed, saving you the trouble of configuring the settings.
When Using Paper of a Size or Type Different from the Fixed Paper
Cancel the fixed setting in Step 3, and load the paper in the multi-purpose tray. When the screen for setting the paper is displayed on the control panel, set the paper size and type according to the paper to be used. Setting the Paper Size and Type for the Multi-purpose Tray
When There Are Multiple Frequently Used Paper Settings
Instead of fixing the paper size and type, it is recommended to register the paper information (size and type) as Favorite Paper so you can recall this information on the paper settings screen. Registering Frequently Used Paper Settings for the Multi-purpose Tray
Use the control panel to fix the paper size and type. You cannot fix them using Remote UI from a computer.
1
On the control panel, press [ Settings/Registration] in the [Home] screen or other screen. [Home] Screen
 Settings/Registration] in the [Home] screen or other screen. [Home] Screen
The [Settings/Registration] screen is displayed.
2
Press [Preferences]  [Paper Settings]
  [Multi-Purpose Tray Defaults].
 [Paper Settings]
  [Multi-Purpose Tray Defaults].
The [Multi-Purpose Tray Defaults] screen is displayed.
Press [Use Preset]  [Register].
 [Register].
Canceling Fixing of the Paper Size and Type
Press [Always Specify], select the screen to be displayed when paper is loaded in the multi-purpose tray, and press [OK]. The steps thereafter are not required.
When paper is loaded in the multi-purpose tray, the screen for setting the paper is displayed in the control panel.
When paper is loaded in the multi-purpose tray, the screen for setting the paper is displayed in the control panel.
4
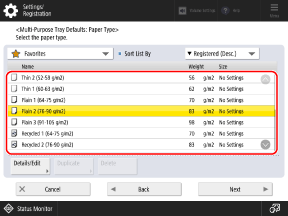
Select the paper type to use.
If the Paper Type to Be Used Is Not Displayed
Select [All] from the pulldown menu at the top left of the screen, and select the paper type from the displayed list.
* If the loaded paper type is not displayed in the list, register the paper type. Registering Frequently Used Paper Types
When Using Envelopes

1
Press [Envelope]  [Next].
 [Next].
2
Select the orientation and size of the envelopes.
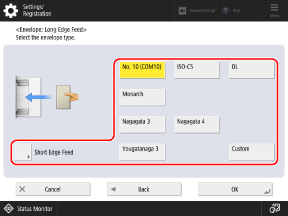
Press [Long Edge Feed] or [Short Edge Feed] according to the orientation of the envelopes, and select the envelope size.
When using custom size envelopes, select [Custom].
3
Press [OK].
The [Multi-Purpose Tray Defaults] screen is displayed again.
Depending on the orientation and size of the envelopes, [Next] may appear. Press [Next], enter the flap length or size (length of side) of the envelopes, and then press [OK].
5
Press [Next].
6
Select the paper size to use.
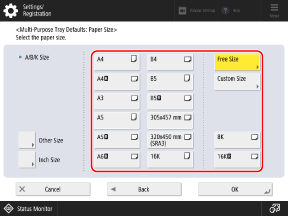
When you use envelopes, you can skip this and the next step. Proceed to Step 8.
When Using Custom Size Paper

1
Press [Custom Size].
If you do not know the size (length) of the paper, or you want to print using the paper size set in the printer driver, press [Free Size]. In this case, you do not need to perform Step 2 (entering the length).
2
Enter the values in [X] and [Y], and press [OK].
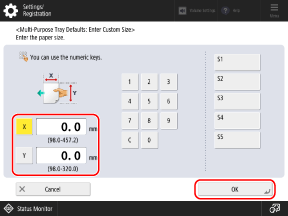
Press [X] and [Y] to select them, and enter the values.
When frequently used non-standard sizes are registered, you can call these up by pressing [S1] to [S5].
When Using Other Size Paper 


1
Press [Other Size].
2
Select the paper size.
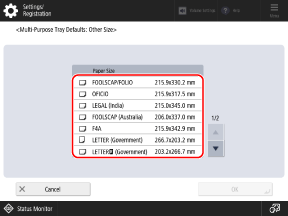
For the sizes of paper that are displayed when [Other Size] is pressed, see the following: Usable Paper
3
Press [OK].
When Using Long Sheet Paper

1
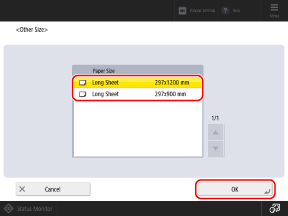
Press [Other Size].
2
Select the size of the loaded Long Sheet paper, and press [OK].
7
Press [OK].
The [Multi-Purpose Tray Defaults] screen is displayed again.
Press [OK].
The paper size and type to use in the multi-purpose tray are fixed.