Setting the Paper Size and Type for the Multi-purpose Tray
When paper is loaded in the multi-purpose tray, the following screen is displayed on the control panel. Set the paper size and type according to the loaded paper.
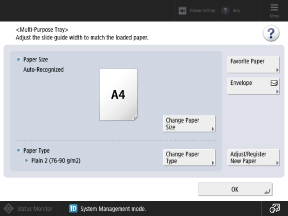
If the paper size and type of the multi-purpose tray are fixed, the above screen is not displayed. Fixing the Paper Size and Type to Use in the Multi-purpose Tray
If the width of the loaded paper is different from the fixed size width, a message indicating that the width does not match is displayed. In this case, cancel the fixed setting and reload the paper in the multi-purpose tray.
If the width of the loaded paper is different from the fixed size width, a message indicating that the width does not match is displayed. In this case, cancel the fixed setting and reload the paper in the multi-purpose tray.
You can also register and set a paper type that has been adjusted according to the characteristics of the loaded paper. Registering a New Paper Type
If you use Coated paper, the paper separation fan operates for a certain period of time when the paper is fed from the multi-purpose tray.
* Depending on the usage environment, the paper separation fan may not operate.
1
Set the paper size.
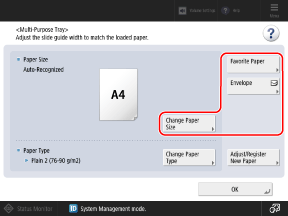
When frequently used paper is registered to the multi-purpose tray, you can recall the paper setting by pressing [Favorite Paper].
When Standard Size Paper Is Loaded

The paper size is detected automatically. Paper Sizes That Can Be Detected Automatically
If the displayed paper size is different from the loaded paper, the paper may not be loaded correctly. Reload the paper.
If paper of a size that is not detected automatically is loaded, or a different paper size is displayed even after reloading the paper, press [Change Paper Size], and select the size of the loaded paper.
When Custom Size Paper Is Loaded

1
Press [Change Paper Size]  [Custom Size].
 [Custom Size].
If you do not know the size (length of side) of the loaded paper, or you want to print using the paper size set in the printer driver, press [Change Paper Size]  [Free Size]
  [OK]. In this case, you do not need to perform Step 2 (entering the side lengths).
 [Free Size]
  [OK]. In this case, you do not need to perform Step 2 (entering the side lengths).
2
Enter the values in [X] and [Y], and press [OK].
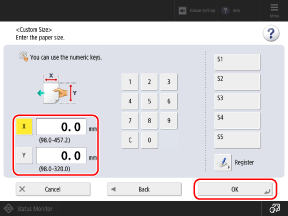
Press [X] and [Y] to select them, and enter the values.
When frequently used non-standard sizes are registered, you can call these up by pressing [S1] to [S5].
When Envelopes Are Loaded

When you set the paper size with the following procedure, the paper type is set automatically for the envelopes.
To set a custom registered paper type, register the size and type as frequently used paper, and use [Favorite Paper] to recall that paper. Registering Frequently Used Paper Settings for the Multi-purpose Tray
To set a custom registered paper type, register the size and type as frequently used paper, and use [Favorite Paper] to recall that paper. Registering Frequently Used Paper Settings for the Multi-purpose Tray
1
Press [Envelope].
2
Select the orientation and size of the loaded envelopes.
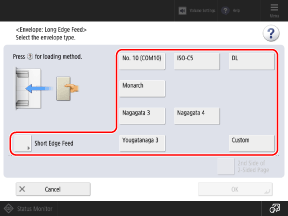
Press [Long Edge Feed] or [Short Edge Feed] according to the orientation of the loaded envelopes, and select the envelope size.
When custom size envelopes are loaded, select [Custom Size].
3
Press [OK].
The paper size and type are set. The steps thereafter are not required.
Depending on the orientation and size of the envelopes, [Next] may appear. Press [Next], enter the flap length of the loaded envelopes or envelope size (length of side), and then press [OK].
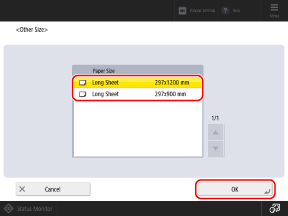
When Long Sheet Paper Is Loaded

1
Press [Change Paper Size]  [Other Size].
 [Other Size].
2
Select the size of the loaded Long Sheet paper, and press [OK].
3
Press [OK].
2
Press [Change Paper Type].
3
Set the paper type.
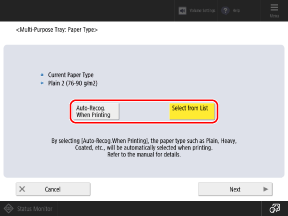
When Performing Auto-Recognition for the Paper Type During Printing

Press [Auto-Recog. When Printing]  [OK].
[OK].
 [OK].
[OK].The machine recognizes the basis weight and finish of the paper loaded in the multi-purpose tray, and automatically sets the most similar paper type from among those already registered in the machine. Paper Types That Can Be Detected Automatically
In the printer driver settings, set [Paper Source] to [Multi-purpose Tray], and set [Paper Type] to [Auto].
* Depending on the printer driver, the corresponding settings may not be available.
* If you set a specific paper type in the printer driver, press [Select from List] and manually configure the paper type setting for the machine. Do not use [Auto-Recog. When Printing].
The machine may print with a different paper type setting than that of the loaded paper.
For using Coated paper, it is recommended that you configure the setting to operate the paper separation fan when using the multi-purpose tray. [Use Paper Separation Fan for Jobs with MP Tray] (C7100 Series Only)
If the machine runs out of paper while printing, set the paper type again. The [Load paper.] Screen Appears Repeatedly and Printing or Copying Stops (C7100 Series Only)
The image quality of the printouts may be degraded. In this case, set the paper type manually. When Setting the Paper Type Manually
If [Auto-Recog. When Printing] is selected, the multi-purpose tray cannot be specified when you print the test page with [Adjust Image Quality].
1
Press [Select from List]  [Next].
 [Next].
2
Select the type of loaded paper.
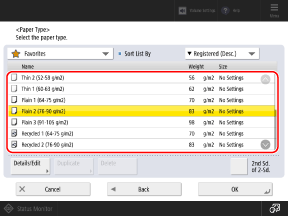
When Printing on the Back Side of Printed Paper
Select [2nd Sd. of 2-Sd.].
If the Loaded Paper Type Is Not Displayed
Select [All] from the pulldown menu at the top left of the screen, and select the paper type from the displayed list.
* If the loaded paper type is not displayed in the list, register the paper type. Registering Frequently Used Paper Types
3
Press [OK].
The initial screen is displayed.
4
Press [OK].
The paper size and type are set.
NOTE
When Priority Is Given to the Printer Driver Settings
When you are printing from the printer driver with the multi-purpose tray specified as the paper source, priority is given to the paper size and type set in the printer driver. [Paper Feed Mode for Printer Driver Jobs with MP Tray]