Checking the Finished Result Before Copying
Before making a large number of copies, you can check the finished result of a copy sample to reduce printing mistakes and save time and paper.
Making a Copy Sample
When making multiple copies of an original placed in the feeder, you can make a copy sample of the original to check the finished result before copying. You can also make a copy sample for specific pages of the original.
You can make a copy sample when any of the following settings are configured:
[Collate (Page Order)]
[Offset]
[Rotate 90 Degrees]
[Staple + Collate]
[Booklet]
[Add Cover]
[Insert Sheets]
[Transparency Cover Sheets]
* For the basic copy operations, see the following:
1
Place the original in the feeder. Placing Originals
On the copy screen, enter the number of copies, and press [Copy Sample]. Copy Screen
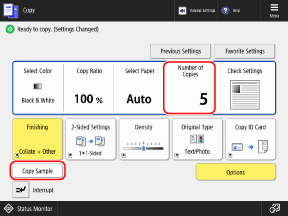
The [Copy Sample] screen is displayed.
3
Specify the pages to be included in the copy sample.
When Making a Copy Sample for All Pages
Select [All Pages], and press [OK].
* The machine counts the copy sample as one of the copies.
When Making a Copy Sample for Specified Pages

* When you make a copy sample for specified pages, the machine does not perform the processing for functions such as finishing and booklet.
1
Select [Specified Pages].
2
Specify the pages to be included in the copy sample.
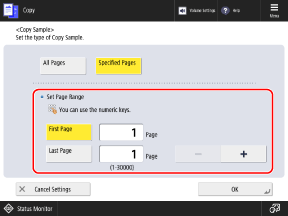
Enter the page numbers of the first page and last page, based on the number of pages in the finished copy.
Press [First Page] and [Last Page] to select them, and enter the values.
Example: If the original has 10 pages and you copy with the [2 on 1] setting,
the finished copy has 5 pages.
In this case, to make a copy sample for pages 7 to 10 of the original, enter "4" for the first page and "5" for the last page.
the finished copy has 5 pages.
In this case, to make a copy sample for pages 7 to 10 of the original, enter "4" for the first page and "5" for the last page.
3
Press [OK].
4
Press [ Start].
 Start].
The machine starts printing the copy sample.
5
Check the copy results.
If there is no problem with the copy results, proceed to Step 6.
When You Want to Change the Copy Settings

1
Press [Change Settings].
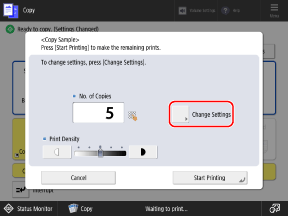
2
Change the copy settings, and press [OK].
3
Press [Copy Sample].
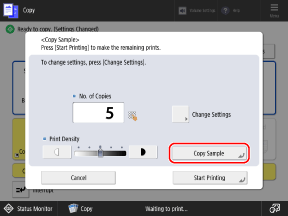
The machine prints the copy sample with the changed settings.
Repeat Step 1 to Step 3 until there are no more problems with the copy results.
Repeat Step 1 to Step 3 until there are no more problems with the copy results.
After you finish checking the results, press [Start Printing].
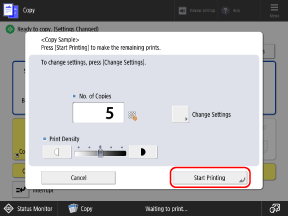
Copying starts.
When you make a copy sample for all pages, one copy is subtracted from the number of copies that you entered in Step 2, and the remaining copies are printed.
When you make a copy sample for specified pages, the number of copies that you entered in Step 2 is printed.
When You Want to Change the Number of Copies
Before you press [Start Printing], re-enter the number of copies using the numeric keys.
Checking Scanned Images Page by Page (Print & Check)
You can copy an original placed on the platen glass one page at a time, and check the finished result in a check print. After you finish checking all pages, you can make multiple copies of the whole original.
* The check print is output as a 1-sided copy, even when you are making 2-sided copies.
* For the basic copy operations, see the following:
1
Place the first original on the platen glass. Placing Originals
2
On the copy screen, press [Options]  [Print & Check]. Copy Screen
 [Print & Check]. Copy Screen
[W/Settings] is displayed at the bottom of the setting button.
3
Press [Close].
The copy screen is displayed again.
4
Press [ Start].
 Start].
The check print is output.
5
Check the check print.
If there is no problem with the check print, proceed to Step 6.
When You Want to Scan the Original Again

1
Place the original on the platen glass again.
2
Select the [Re-Scan] checkbox.
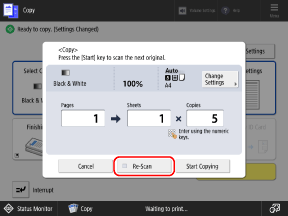
3
Press [ Start].
 Start].
The check print is output.
Repeat Step 1 to Step 3 until there are no more problems with the check print.
Repeat Step 1 to Step 3 until there are no more problems with the check print.
When You Want to Change the Copy Settings

1
Press [Change Settings].
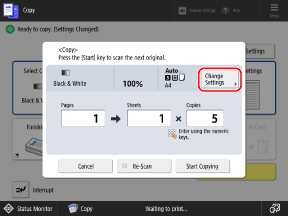
2
Change the copy settings, and press [OK].
3
Select the [Re-Scan] checkbox.
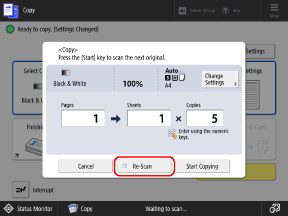
4
Press [ Start].
 Start].
The check print is output with the changed settings.
Repeat Step 1 to Step 4 until there are no more problems with the check print.
Repeat Step 1 to Step 4 until there are no more problems with the check print.
Place the next original on the platen glass, and press [ Start].
 Start].
The check print for the next original is output.
Check the check print.
8
After you finish checking all originals, press [Start Copying].
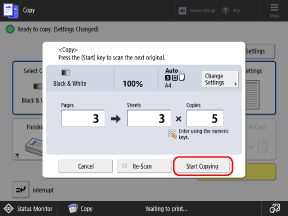
Copying starts.
When You Want to Change the Number of Copies
Before you press [Start Copying], re-enter the number of copies using the numeric keys.