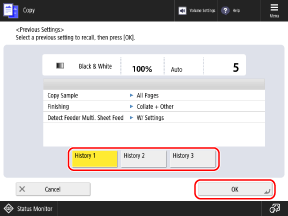
You can press [Previous Settings] to call up the settings used for copying in the past.
When you call up the setting history, the specified copy settings are overwritten.
Copy Operations
This section describes the basic copy operations when copying documents, photos, and other printed materials ("originals").
* You can also interrupt other copy or print operations that are being processed or waiting to be processed, and perform copying. Copying Immediately (Interrupt)
* When making a large number of copies, you can make a copy sample to check the finished result, or you can copy the original one page at a time to check the appearance before copying all of the pages together. Checking the Finished Result Before Copying
* When making a large number of copies, you can make a copy sample to check the finished result, or you can copy the original one page at a time to check the appearance before copying all of the pages together. Checking the Finished Result Before Copying
1
Place the original. Placing Originals
By default, the settings are automatically configured to collate the copies when you place originals in the feeder. [Auto Collate]
If the screen for selecting the thickness of the original appears, select the thickness of the placed original.
2
On the control panel, press [Copy] in the [Home] screen. [Home] Screen
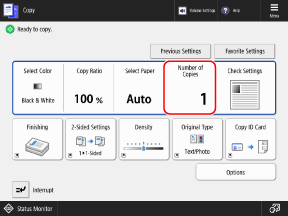
The copy screen is displayed.
3
Enter the number of copies using the numeric keys.

4
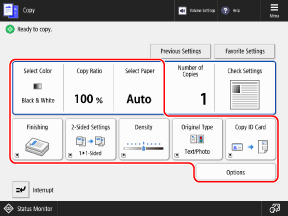
Configure the copy settings.

When "Favorite Settings" are registered, you can call them up by pressing [Favorite Settings]. Registering and Recalling Favorite Settings
When Recalling Previous Settings (Setting History)

On the [Previous Settings] screen, select the history you want to recall, and press [OK].

You can change the called up settings before copying.
Each login user can select from their own setting history.
Guest users or users who are not logged in can select from the setting history common to unauthorized users.
Guest users or users who are not logged in can select from the setting history common to unauthorized users.
The settings when copying with Merge Job Blocks are not saved in the history. Combining Originals Scanned with Different Settings When Copying (Merge Job Blocks)
5
Press [ Start].
 Start].
Copying starts.
To cancel copying, press [Cancel]  [Yes]. Canceling Copy Operations
 [Yes]. Canceling Copy Operations
You can use [ Status Monitor] to view the copy status and log. Checking the Copy Status and Log
 Status Monitor] to view the copy status and log. Checking the Copy Status and Log
If the [Original Size] Screen Appears

Select the size of the placed original or a size close to that of the original.
* Normally, the machine automatically recognizes the original size when copying. However, since the machine cannot identify the size of some types of originals, manually select the size when placing the following:
Highly transparent originals
Originals with an extremely dark background color
Small-size originals
When [Press the [Start] key to scan the next original.] Is Displayed

The screen for scanning additional originals is displayed in the following cases:
When an original is placed on the platen glass and scanning is performed using copy settings for multiple-page originals, such as 2-sided copying or N on 1 copying
When scanning is performed using Job Build
1
To continue scanning originals, place the next original, and press [ Start].
 Start].
The next original is scanned, and the same screen is displayed.
Repeat this process until scanning of all originals is completed.
Repeat this process until scanning of all originals is completed.
When placing originals in the feeder to scan, remove the scanned original (original ejected to the original output tray) before placing the next original.
When Changing the Copy Settings for Each Original
On the screen with the displayed message, press [Change Settings]. You can change the following settings:
[Select Color]
[Copy Ratio]
[2-Sided Original]
[Density]
[Original Type]
For example, when scanning a 2-sided original after scanning a 1-sided original, press [Change Settings], and set [2-Sided Original].
2
Press [Start Copying].
The scanned originals are printed.
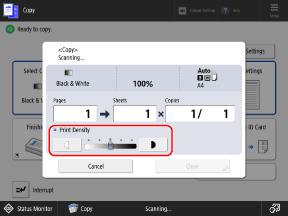
When You Want to Change the Density Settings While Copying

You can move the slider to the left or right to change the density setting.

To decrease the density, adjust it to [ ], and to increase the density, adjust it to [
 ].
].
 ], and to increase the density, adjust it to [
 ].
].You cannot change the density if the Secure Watermark settings are configured.
IMPORTANT
Configuring the Paper Type Settings Correctly
To prevent poor image quality, a dirty fixing assembly, and paper jams, make sure to configure the correct paper type to be used.
When Part of the Image on the Edge of the Original Is Missing After Being Copied
When you copy an original with an image extending to the edges without margins, part of the image at the edge of the original may be missing in the copy.
* For the margin size of the image, see the basic specifications. Basic Specifications
If you set the copy ratio to [Fit to Page] when copying, you can fit the image on the page. Enlarge and Reduce Settings
If the Color of the Original Is Not Detected Correctly When Copying with [Auto (Color/B&W)]
Set the color to [Full Color] or [Black & White] when copying. Selecting Color Copying or Black & White Copying
NOTE
When Multiple Originals Are Fed during Scanning and Operations Are Canceled (Detect Multiple Sheet Feed)
A message appears on the screen. Remove the jammed original while following the instructions in the message. Paper and Staple Jams
When the jammed original is removed, the screen for resuming operations is displayed.
If multi sheet feeding was detected incorrectly, press [Do Not Detect Multi. Sheet Feed] to resume scanning.
When the jammed original is removed, the screen for resuming operations is displayed.
If multi sheet feeding was detected incorrectly, press [Do Not Detect Multi. Sheet Feed] to resume scanning.
To prevent detection of multi sheet feeding, configure either of the following settings:
On the copy screen, press [Options]  [Detect Feeder Multi Sheet Fd.] each time you scan, to cancel detection of multi sheet feeding.
 [Detect Feeder Multi Sheet Fd.] each time you scan, to cancel detection of multi sheet feeding.
Change the default settings to prevent detection of multi sheet feeding. [Set Detection of Feeder Multi. Sheet Feed as Default]
* Depending on the model, the optional document feeder double feeding detection kit may be required in order to use the multiple sheet feed detection function. 


Useful Copy Functions
You can copy using convenient functions, such as extracting and copying only part of an original, or combining originals scanned with different settings when copying. You can also embed a watermark such as "CONFIDENTIAL" to increase the security of copied documents. Useful Copy Functions
Reserving Copying
While other copy or print operations are being processed or waiting to be processed, you can reserve a copy job by performing the same operations as normal copying and pressing [ Start] to scan the original.
The reserved copying starts automatically when the other copy or print operations are completed.
 Start] to scan the original.
 The reserved copying starts automatically when the other copy or print operations are completed.
When the printing or waiting screen is displayed, press [Close] before you perform reserved copying.
You can reserve up to 50 copy jobs including the job being copied (excluding interrupt jobs).