Superimposing Images of Logos and Frames When Copying (For C7100 Series and C5100 Series)
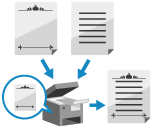
You can register images such as logos and frames (decorative borders) as "form images" to the machine in advance, and superimpose these form images onto the original when copying.
This function is convenient when you want to add your company logo to meeting documents or unify the design of a business proposal by adding a frame.
This function is convenient when you want to add your company logo to meeting documents or unify the design of a business proposal by adding a frame.
Registering Form Images
You can scan an original to be used as a form image, and register it to the machine.
You can register up to 100 form images.
You can register up to 100 form images.
* The number of form images that can be registered varies depending of the amount of storage space available.
Required Preparations
Prepare the original with the printed form image.
1
On the control panel, press [ Settings/Registration] in the [Home] screen or other screen. [Home] Screen
 Settings/Registration] in the [Home] screen or other screen. [Home] Screen
The [Settings/Registration] screen is displayed.
2
Press [Function Settings]  [Common]
  [Print Settings]
  [Register Form].
 [Common]
  [Print Settings]
  [Register Form].
The [Register Form] screen is displayed.
3
Press [Register].
The [Original Size] screen is displayed.
4
Select the size of the original to be used as the form image, and press [Next].
5
Enter the form name and configure the scan settings, as needed.
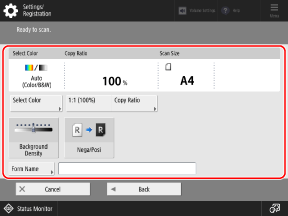
When entering the name of the form image, press [Form Name], enter the form name, and press [OK].
* If a form name is not entered, the registered date and time of the form image becomes the form name.
For details on the scan settings, see the following:
6
Place the form image original on the platen glass. Placing Originals
When you scan the form image original, place it on the platen glass. You cannot register an original placed in the feeder.
7
Press [ Start].
 Start].
The machine starts scanning the original.
When scanning is completed, the form image is registered to the machine and displayed in the list of form images on the [Register Form] screen.
When scanning is completed, the form image is registered to the machine and displayed in the list of form images on the [Register Form] screen.
8
Press [OK]  [Close].
 [Close].
NOTE
Changing the Name of a Registered Form Image
On the [Register Form] screen, select the form image, and press [Details]  [Rename Form].
 [Rename Form].
Superimposing Form Images When Copying
You can superimpose form images onto the original when copying.
* For the basic copy operations, see the following:
1
On the copy screen, press [Options]  [Superimpose Image]. Copy Screen
 [Superimpose Image]. Copy Screen
The [Superimpose Image] screen is displayed.
2
Press [Set] for the side on which to superimpose the form image.
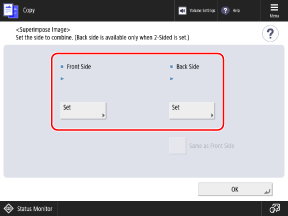
When making 1-sided copies, set the front side.
When making 2-sided copies, set the front side and back side separately.
* To configure the back side using the same settings as the front side, first set the front side, and then select [Same as Front Side].
3
Select the form image to be superimposed, and press [Next].
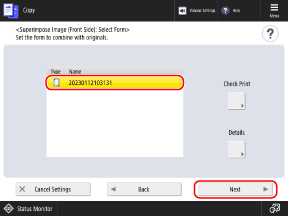
You can select a form image and press [Check Print] to print only the form image and check the content.
You can select a form image and press [Details] to check the details of the form image, such as the registration date and time and the size.
4
Select how to superimpose the image, and press [OK].
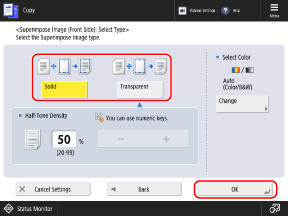
[Solid]
Superimposes the form image without any changes.
[Transparent]
Decreases the density of the form image so that the original is visible through the form image even if it overlaps the original.
In [Half-Tone Density], you can specify the density of the form image.
In [Half-Tone Density], you can specify the density of the form image.
5
Press [OK]  [Close].
 [Close].
The copy screen is displayed again.
NOTE
If you adjust the position of the original to be copied or mirror the original, the settings are applied to both the form image and the original.