Checking, Printing, and Forwarding Faxes Stored with Memory Lock
When a received fax is stored in the Memory RX Inbox, the Processing/Data indicator on the control panel lights up green.
You can check the content of faxes stored in the Memory RX Inbox on the control panel or Remote UI before printing them. You can also forward faxes to specified destinations.
You can check the content of faxes stored in the Memory RX Inbox on the control panel or Remote UI before printing them. You can also forward faxes to specified destinations.
This section describes how to check, print, and forward faxes using the control panel.
To check, print, or forward a fax using Remote UI from a computer, perform the operations from [Access Received/Stored Files] on the Portal page. Managing the Machine from a Computer (Remote UI)
To check, print, or forward a fax using Remote UI from a computer, perform the operations from [Access Received/Stored Files] on the Portal page. Managing the Machine from a Computer (Remote UI)
Required Preparations
Configure the settings to store received faxes in the Memory RX Inbox. Setting Memory Lock
1
On the control panel, press [Fax/I-Fax Inbox] in the [Home] screen. [Home] Screen
The screen for selecting the store location of the received fax is displayed.
2
Press [Memory RX Inbox]  [Memory RX Inbox].
 [Memory RX Inbox].
If the PIN input screen appears, enter the PIN set for the Memory RX Inbox, and press [OK].
3
Check, print, or forward the fax.

To delete fax data, select a fax and press [Delete]  [Yes].
 [Yes].
* You cannot select and delete multiple faxes at the same time.
When Checking the Fax Information and Content
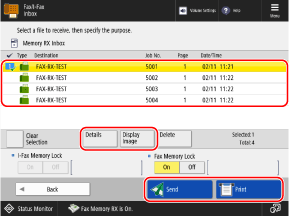
Select a received fax and press [Details] to check details such as the size of the fax.
Select a fax and press [Display Image] to display a preview screen and check the content of the fax.
You can also delete pages on the preview screen or print from the preview screen.
You can also delete pages on the preview screen or print from the preview screen.
When Printing a Fax
Select the fax to be printed, and press [Print]  [Start Printing].
 [Start Printing].
* The data of the printed fax is automatically deleted from the Memory RX Inbox.
* You cannot select and print multiple faxes at the same time.
When Forwarding a Fax

1
Select the fax to be forwarded, and press [Send].
You can select and forward up to 32 faxes at a time.
To select all displayed faxes, press [Select All (Max 32 Files)] while no faxes are selected.
2
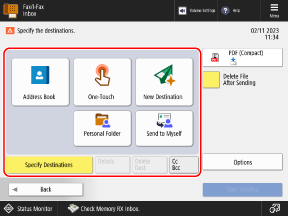
Specify the forwarding destination. Specifying Destinations

To specify a folder for a login user (Personal Folder) as the destination, press [Personal Folder].
To specify the e-mail address of a login user as the destination, press [Send to Myself].
To specify an e-mail address as a Cc or Bcc destination, press [Cc Bcc].
When you forward a fax stored with Memory Lock, you cannot specify a destination using the address book on a mobile device or the TX log of the machine.
3
Configure the forwarding settings, as needed.
You can configure the same settings as when sending files from the Mail Box, such as the file format and file name. [Mail Box] TX Settings Screen
4
Press [Start Sending].
The fax is forwarded to the specified destination.
NOTE
Number of Faxes That Can Be Stored
The storage area of the Memory RX Inbox is shared with the Mail Box. For the number of faxes that can be stored, see the capacity of the Mail Box. Mail Box
Registering a Shortcut to the Store Location
By registering the store location for received faxes as a button on the [Home] screen, you can call up the location from the [Home] screen with a single press of a button. Adding Buttons to the [Home] Screen (Personal and Shared Buttons)