Changing the Print Settings for Received Faxes
By default, received faxes and I-Faxes are printed with the image on only one side of the paper. You can change the settings to print on both sides of the paper, and add the reception date and time, page number, and other information when printing.
This section describes how to configure the settings using Remote UI from a computer.
On the [Home] screen or other screen of the control panel, select [ Settings/Registration]
  [Function Settings], and configure the settings. [Common Settings]
On the [Home] screen or other screen of the control panel, select [
 Settings/Registration]
  [Function Settings], and configure the settings. [Common Settings]
1
Log in to Remote UI. Starting Remote UI
2
On the Portal page of Remote UI, click [Settings/Registration]. Remote UI Portal Page
3
Click [Receive/Forward]  [Common Settings].
 [Common Settings].
The [Common Settings] screen is displayed.
4
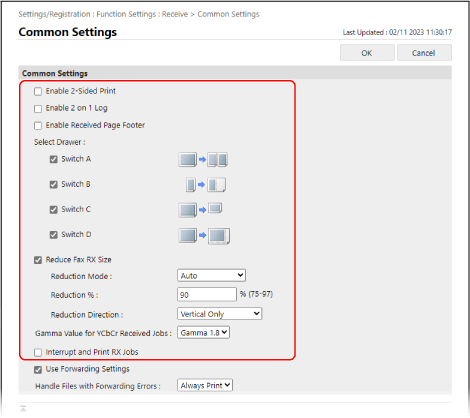
Configure the print settings.

Printing Faxes on Both Sides of the Page, at Reduced Size, or at Original Size

Configure the items described below.
Setting example: When reducing A3 faxes to print on A4 paper Exclude paper sources loaded with paper other than A4 and A4R from automatic selection when printing faxes. Using the Appropriate Paper Source for Each Function In [Select Drawer], clear the [Switch A] checkbox. |
[Enable 2-Sided Print]
Select this checkbox to print received faxes on both sides of the paper.
[Enable 2 on 1 Log]
Select this checkbox to reduce the size of a two-page fax and arrange both pages on the same side of a sheet of paper when printing.

[Select Drawer]
Set the rules for printing on another size of paper when paper of the same size as the received fax is not loaded.
The printing method is determined based on these settings and the size of the loaded paper. Clear the checkbox for any printing methods that you do not want to use.
The printing method is determined based on these settings and the size of the loaded paper. Clear the checkbox for any printing methods that you do not want to use.
[Switch A]:
If a smaller size of paper is loaded, the received fax is divided and printed.
If a smaller size of paper is loaded, the received fax is divided and printed.
[Switch B] and [Switch D]:
If a larger size of paper is loaded, the received fax is printed at the same size as the original, with blank margins.
For [Switch B] and [Switch D], the printed paper and margin layout are different.
If a larger size of paper is loaded, the received fax is printed at the same size as the original, with blank margins.
For [Switch B] and [Switch D], the printed paper and margin layout are different.
[Switch B]

[Switch D]

[Switch C]:
If a smaller size of paper is loaded, the received fax is reduced and printed.
If a smaller size of paper is loaded, the received fax is reduced and printed.
* Depending on the size of the loaded paper, the received fax may not be printed even if a suitable print method is enabled.
* The received fax is printed on paper in a paper source that is set for automatic selection. Exclude any paper sources that you do not want to use from automatic selection. Using the Appropriate Paper Source for Each Function
[Reduce Fax RX Size]
Select this checkbox to reduce and print the received fax so that it fits on the paper. You can also set the reduction ratio and whether to maintain the aspect ratio.
If you clear the checkbox, received faxes that do not fit on the paper are divided and printed on separate pages.
If you clear the checkbox, received faxes that do not fit on the paper are divided and printed on separate pages.
In [Reduction Mode], select whether the reduction ratio is adjusted automatically or fixed. If you select automatic adjustment, the size is reduced by a reduction ratio ranging from the specified value to 100%.
To maintain the aspect ratio, set [Reduction Direction] to [Vertical & Horizontal].
When Adding Information Such As the Reception Date and Time and Page Number When Printing
Select the [Enable Received Page Footer] checkbox. Information such as the reception date and time and the page number is printed at the bottom of the page.
When Printing I-Faxes That Are Faithful to the Original (For C7100 Series and C5100 Series)
Set [YCbCr RX Gamma Value]. By setting the gamma value to match that of the sending side, you can reproduce images that are faithful to the original.
When Giving Priority to Printing Faxes
Select the [Interrupt and Print RX Jobs] checkbox. The machine interrupts other jobs to print faxes or I-Faxes when they are received.
5
Click [OK].
The settings are applied.
6
Log out from Remote UI.