Correcting Uneven Density

If the print result has uneven density, correct it so the density becomes uniform.
You cannot perform correction while printing or scanning or when there is insufficient toner.
You cannot perform correction while printing or scanning or when there is insufficient toner.
There are two methods for correcting uneven density: correct it automatically by scanning a printed test page with the machine, or correct it by manually entering density values. Measure the density values with a densitometer or perform a visual check.
IMPORTANT
Toner is used during correction.
Performing frequent correction may affect the lifetime of the toner.
If the symptoms do not improve even after performing correction, the remaining amount of toner may be low. It is recommended to check the remaining amount of toner, and replace any toner containers, as needed.
Correcting Automatically by Scanning
Scan the printed test page with the machine, have the density values determined and corrected.
The two available methods for scanning and automatically correcting images are Quick Adjust and Full Adjust.
The two available methods for scanning and automatically correcting images are Quick Adjust and Full Adjust.
Performing Simple Correction (Quick Adjust)
Use the control panel to perform Quick Adjust. You cannot perform Quick Adjust using Remote UI from a computer.
1
On the control panel, press [ Settings/Registration] in the [Home] screen or other screen. [Home] Screen
 Settings/Registration] in the [Home] screen or other screen. [Home] Screen
The [Settings/Registration] screen is displayed.
2
Press [Adjustment/Maintenance]  [Adjust Image Quality]
  [Correct Shading].
 [Adjust Image Quality]
  [Correct Shading].
The [Correct Shading] screen is displayed.
3
Press [Scanner Correction].
4
Press [Quick Adjust].
The [Select Paper] screen is displayed. You can check the usable paper sizes and currently selected paper type.
5
Select the paper source with the loaded usable paper, and press [OK].
6
Press [Start Printing].
A test page is printed.
7
Scan the test page and perform correction.
Using the Feeder to Scan

1
Follow the instructions on the screen to load the test page in the feeder.
2
Press [Start Scanning].
The test page is scanned, and adjustment is performed.
When calibration is complete, [Adjustment is complete.] is displayed.
When calibration is complete, [Adjustment is complete.] is displayed.
Using the Platen Glass to Scan

1
Press [Scan Using Platen Glass].
2
Open the feeder.
3
Follow the instructions on the screen to place the test page on the platen glass.
4
Gently close the feeder.
5
Press [Start Scanning].
The test page is scanned, and adjustment is performed.
When calibration is complete, [Adjustment is complete.] is displayed.
When calibration is complete, [Adjustment is complete.] is displayed.
8
Press [OK]  [Close].
 [Close].
Performing More Accurate Correction (Full Adjust)
Use the control panel to perform Full Adjust. You cannot perform correction using Remote UI from a computer.
1
On the control panel, press [ Settings/Registration] in the [Home] screen or other screen. [Home] Screen
 Settings/Registration] in the [Home] screen or other screen. [Home] Screen
The [Settings/Registration] screen is displayed.
2
Press [Adjustment/Maintenance]  [Adjust Image Quality]
  [Correct Shading].
 [Adjust Image Quality]
  [Correct Shading].
The [Correct Shading] screen is displayed.
3
Press [Scanner Correction].
4
Press [Full Adjust].
The [Select Paper] screen is displayed. You can check the usable paper sizes and currently selected paper type.
5
Select the paper source with the loaded usable paper, and press [OK].
6
Press [Start Printing].
Two sheets of test pages are printed.
7
Open the feeder.
8
Follow the instructions on the screen to place the test page 1 on the platen glass.
9
Gently close the feeder.
10
Press [Start Scanning].
Test page 1 is scanned.
11
Remove test page 1 from the platen glass.
12
Repeat Steps 8 to 11 to scan the test page 2.
The test page is scanned, and correction is performed.
13
Press [Start Printing].
A test page is printed.
14
Open the feeder.
15
Follow the instructions on the screen to place the test page on the platen glass.
16
Gently close the feeder.
17
Press [Start Scanning].
The test page is scanned, and correction is performed.
When correction is complete, [Adjustment is complete.] is displayed.
When correction is complete, [Adjustment is complete.] is displayed.
18
Remove the test page from the platen glass.
19
Press [OK]  [Close].
 [Close].
Correcting by Entering Density Values (Checking with a Densitometer)
Measure the printed test page with a commercial densitometer and enter the measured density values to make corrections so that the density of halftone areas is uniform.
Use the control panel to perform correction. You cannot perform correction using Remote UI from a computer.
1
On the control panel, press [ Settings/Registration] in the [Home] screen or other screen. [Home] Screen
 Settings/Registration] in the [Home] screen or other screen. [Home] Screen
The [Settings/Registration] screen is displayed.
2
Press [Adjustment/Maintenance]  [Adjust Image Quality]
  [Correct Shading].
 [Adjust Image Quality]
  [Correct Shading].
The [Correct Shading] screen is displayed.
3
Press [Densitometer Correction]  [Start Printing].
 [Start Printing].
A test page is printed.
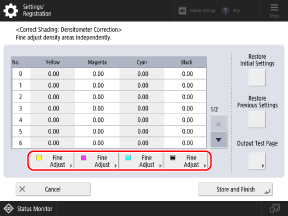
Press [Fine Adjust].

5
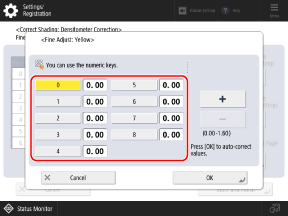
Enter the density values.

Measure color samples 0 to 8 on the test page with a densitometer, and enter the measured density value for each number.
6
Press [OK].
The screen in Step 4 is displayed again.
7
Press [Output Test Page]  [Start Printing].
 [Start Printing].
A test page after correction is printed.
8
Check the test page, and if there are no problems, press [Store and Finish].
The density values are stored.
If the test page after correction has uneven density, perform a visual correction. Correcting by Entering Density Values (Visual Correction)
If the test page after correction has uneven density, perform a visual correction. Correcting by Entering Density Values (Visual Correction)
9
Press [OK]  [Close].
 [Close].
Correcting by Entering Density Values (Visual Correction)
If you do not have a densitometer or the result after correction using a densitometer is not as expected, visually check the printed test page, and determine and correct the density values.
Use the control panel to perform correction. You cannot perform correction using Remote UI from a computer.
1
On the control panel, press [ Settings/Registration] in the [Home] screen or other screen. [Home] Screen
 Settings/Registration] in the [Home] screen or other screen. [Home] Screen
The [Settings/Registration] screen is displayed.
2
Press [Adjustment/Maintenance]  [Adjust Image Quality]
  [Correct Shading].
 [Adjust Image Quality]
  [Correct Shading].
The [Correct Shading] screen is displayed.
3
Press [Visual Correction]  [Output Test Page]
  [Start Printing].
 [Output Test Page]
  [Start Printing].
A test page is printed.
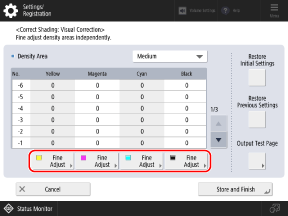
Press [Fine Adjust].

5
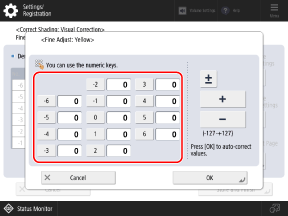
Enter the density values.

Visually check the color samples on the test page to determine the density values (adjustment values), and enter a density value for each number.
* Enter a positive value to increase the density, or a negative value to decrease the density.
* The numbers of the color samples on the test page are from "-6" to "+6."
6
Press [OK].
The screen in Step 4 is displayed again.
7
Press [Output Test Page]  [Start Printing].
 [Start Printing].
A test page after correction is printed.
8
Check the test page, and if there are no problems, press [Store and Finish].
The density values are stored.
9
Press [OK]  [Close].
 [Close].