Printing at a Specified Time (Scheduled Print)
You can print the document (print data) sent from a computer to the machine at a specified time, instead of printing it straight away.
This is convenient, for example, for printing a large volume during the night-time when less people are using the machine.
This is convenient, for example, for printing a large volume during the night-time when less people are using the machine.
You can set Scheduled Print in the print settings of the driver and send the print data to the machine.
Required Preparations
Check that the time settings of the computer and the machine are the same.
* Scheduled Print is executed according to the time setting of the machine.
* If the time settings are different between the computer and the machine, the scheduled time may be recognized as 24 hours or more later. In this case, printing will be canceled.
IMPORTANT
You cannot use the Scheduled Print function when one of the following functions is enabled:
Forced Hold Configuring the Forced Hold Settings
ACCESS MANAGEMENT SYSTEM Using ACCESS MANAGEMENT SYSTEM
When Using Windows
1
Display the [Printing preferences] screen of the printer driver. Printing
2
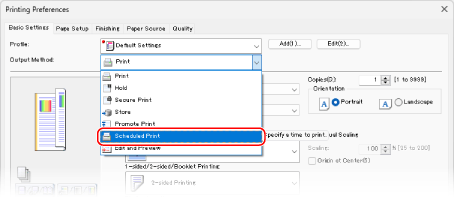
For [Output Method], select [Scheduled Print].

The [Information] screen is displayed.
3
Click [Yes].
The [Scheduled Print Details] screen is displayed.
4
Enter the time to print and click [OK].
The [Printing Preferences] screen is displayed again.
Enter the time in 24-hour format.
5
Configure the other print settings, as needed.
You can adjust the image quality and configure 2-sided printing and other settings to suit your document and purpose. For details, click [Help] on the [Printing Preferences] screen to display help.
6
Click [OK], and click [Print] or [OK].
Printing is scheduled.
NOTE
Checking and Canceling Scheduled Print
By pressing [Scheduled Print] on the print screen of the control panel, you can check or delete the Scheduled Print data. Print Screen
* The Scheduled Print data is deleted when it is printed. It is not displayed in [Jobs Printed] either.
When Using macOS
1
Display the printing dialog box, and select the printer driver of the machine. Printing
2
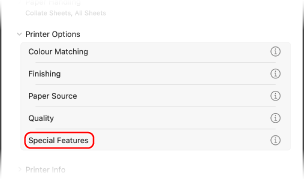
Click [Printer Options]  [Special Features].
 [Special Features].
3
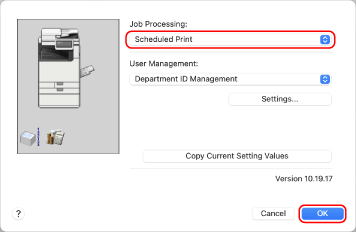
In [Job Processing], select [Scheduled Print], and click [OK].

The printing dialog box is displayed again.
4
Configure the other print settings, as needed.
You can adjust the image quality and configure 2-sided printing and other settings to suit your document and purpose. For more information, click [ ] in the printing dialog box to display help.
5
Click [Print].
The [Scheduled Print Settings] screen is displayed.
6
Enter the time to print and click [OK].
Printing is scheduled.
Enter the time in 24-hour format.
NOTE
Checking and Canceling Scheduled Print
By pressing [Scheduled Print] on the print screen of the control panel, you can check or delete the Scheduled Print data. Print Screen
* The Scheduled Print data is deleted when it is printed. It is not displayed in [Jobs Printed] either.