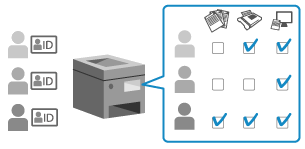
Using ACCESS MANAGEMENT SYSTEM

You can use ACCESS MANAGEMENT SYSTEM for more precise control of functions available to each privilege level (role) and to create new roles. This enables you to configure different roles for each user for strict user management. For example, you can prohibit user A from copying while allowing user B to use all functions.
For details about the required environment and how to create and edit roles, see the ACCESS MANAGEMENT SYSTEM manual at the online manual site.
Enabling ACCESS MANAGEMENT SYSTEM
You must enable ACCESS MANAGEMENT SYSTEM to use this function.
This section describes how to configure the settings using Remote UI from a computer.
On the control panel, select [ Settings/Registration] in the [Home] screen or other screen, and then select [Management Settings] to configure the settings. [Use ACCESS MANAGEMENT SYSTEM]
Administrator privileges are required. The machine must be restarted to apply the settings.
On the control panel, select [
 Settings/Registration] in the [Home] screen or other screen, and then select [Management Settings] to configure the settings. [Use ACCESS MANAGEMENT SYSTEM]
Administrator privileges are required. The machine must be restarted to apply the settings.
1
Log in to Remote UI as an administrator. Starting Remote UI
2
On the Portal page of Remote UI, click [Settings/Registration]. Remote UI Portal Page
3
Click [License/Other]  [ACCESS MANAGEMENT SYSTEM Settings].
 [ACCESS MANAGEMENT SYSTEM Settings].
The [ACCESS MANAGEMENT SYSTEM Settings] screen is displayed.
4
Select the [Use ACCESS MANAGEMENT SYSTEM] checkbox, and click [OK].
5
Restart the machine. Restarting the Machine
The settings are applied.
NOTE
When ACCESS MANAGEMENT SYSTEM Is Enabled
User authentication is enabled.
* If you will not use user authentication after user authentication is enabled, disable ACCESS MANAGEMENT SYSTEM before disabling user authentication.
The following settings are disabled:
Setting an Address Book PIN Restricting Address Book Registration and Editing by Setting a PIN
Restricting the destinations to which faxes and scanned data can be sent Sending Only to Registered Destinations
* You can use ACCESS MANAGEMENT SYSTEM to restrict similar settings for each role.
* These settings are not enabled automatically when ACCESS MANAGEMENT SYSTEM is changed from enabled to disabled. You must reconfigure the settings manually.
The print data temporary saved in the memory of the machine as Scheduled Print data will be deleted.