Loading Paper in POD Deck Lite-C (Option)
For the size of paper that can be loaded in POD Deck Lite-C, see the following. Loading paper of a different size (other than the usable size) may result in a malfunction.
Usable Paper
Usable Paper
You can load paper using Side Guide Plate Fixing Bracket-A to control paper feed deviation and achieve higher printing precision. Using Side Guide Plate Fixing Bracket-A to Load Paper in POD Deck Lite-C
* You can use Side Guide Plate Fixing Bracket-A when loading A4R size paper or larger.
* You can use Side Guide Plate Fixing Bracket-A when loading A4R size paper or larger.
When loading envelopes, pay attention to the orientation and which side is face up. Orientation for Loading Envelopes (POD Deck Lite-C) (Option)
When using paper with a logo, be careful of the orientation of the loaded paper and which side is face up. Orientation for Loading Paper with a Logo
When using paper with a logo, be careful of the orientation of the loaded paper and which side is face up. Orientation for Loading Paper with a Logo
Loading Paper in POD Deck Lite-C

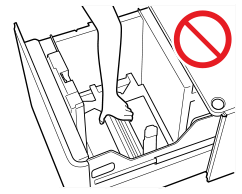
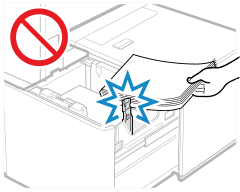
The lifter inside the paper decks rises and descends automatically. When loading paper, be careful not to get your fingers caught, as this may result in personal injury.
IMPORTANT
If paper runs out and printing is stopped when you are printing with the staple setting, do not remove the output sheets that are waiting to be stapled. (Printing and stapling resume after you clear the paper jam.)
If you need to lift up the lifter (for example, if you drop objects inside the paper deck), do not lift up the lifter more than 50 mm (2") or diagonally, as this may result in a malfunction or damage to the machine.
Do not lift up the lifter inside the paper decks while the main power is ON, as this may result in a malfunction or damage to the machine. If you need to lift up the lifter, for example, if you drop objects, turn OFF the main power with the paper decks open. Turning OFF the Machine
Loading printed paper in POD Deck Lite-C may result in a malfunction. When printing on the back side of printed paper (Manual 2-sided Printing), be sure to load the paper in the multi-purpose tray. Loading Paper in the Multi-purpose Tray
A paper separation fan is attached inside of POD Deck Lite-C. Do not insert paper clips or other foreign objects into the blower port.
Paper jams may occur if you load paper into POD Deck Lite-C in a low humidity environment. If paper jams occur, follow the instructions on the control panel screen to remove the jammed paper. In addition, make sure that the loaded paper is not curled.
1
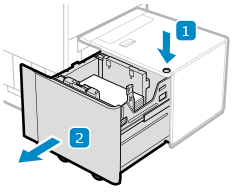
Pull the paper deck toward you until it stops.
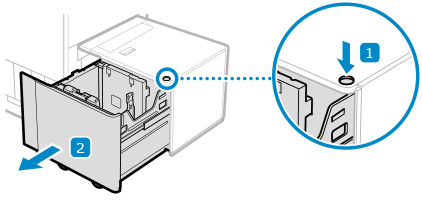
The internal lifter lowers automatically to the paper refill position.
Depending on the use conditions, it may take some time for the paper deck to open after pressing the button.
2
Fan the paper and align the edges.

Fan the four edges of the paper in small batches, and align the edges by tapping the paper on a flat surface a few times.
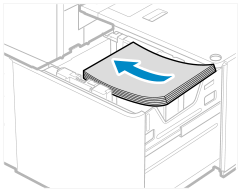
3
Load the paper with the print side face up.
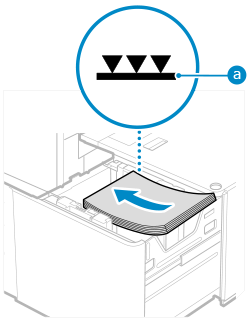
Load the paper with the edge of the paper against the left side of the paper deck.
Make sure the loaded paper does not exceed the load limit line ( ). If it exceeds the load limit line, there may be misfeeds or a paper jam.
). If it exceeds the load limit line, there may be misfeeds or a paper jam.When loading paper, make sure that the height of the paper stack does not exceed 20 mm (3/4"). If the height of the paper stack exceeds 20 mm (3/4"), the edges of the paper stack may become curled or creased, and poor print quality may result.
When Loading Tab Paper
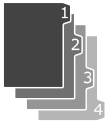
Load it in right tab order with the tabs on the opposite side of the feeding direction.
4
Push the paper deck all the way into the machine until it clicks into place.
The internal lifter rises automatically.
IMPORTANT
In the cases described below, position the side guide plates according to the paper to be used. Changing the Paper Size for POD Deck Lite-C
When loading paper in the paper deck for the first time
When the size of the loaded paper is different from the position of the side guide plates, and the paper is bent or has a gap at the edges
Do not give a strong shock to the rear edge retainer when loading paper into the paper deck, as this may result in a malfunction or damage to the machine.
Never place paper or any other items in the empty part of the paper deck unit next to the paper stack, as this may result in a malfunction or damage to the machine.
Do not load anything other than paper in the area where you load the paper. This can result in a malfunction.
If the first output sheet cannot be output onto the output tray smoothly, we recommend that you place a blank sheet of the same or larger size than the output paper on the output tray in advance.
NOTE
When loading paper into the paper deck, make sure that the paper size setting is the same size of the paper that is being loaded.
Load the paper below the rollers of the rear edge retainer.
If a problem occurs during printing, you may be able to solve it by turning the paper over and reloading it.
Using Side Guide Plate Fixing Bracket-A to Load Paper in POD Deck Lite-C
1
Pull the paper deck toward you until it stops.
The internal lifter lowers automatically to the paper refill position.
Depending on the use conditions, it may take some time for the paper deck to open after pressing the button.
2
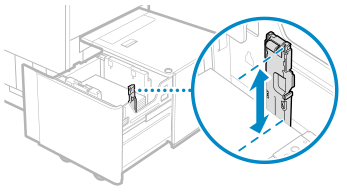
Hold the lever and slide the rear edge retainer until it does not catch on the paper to load.
3
Remove all of the loaded paper.
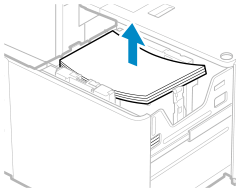
4
After closing the paper deck, open the paper deck again.
The internal lifter rises automatically.
5
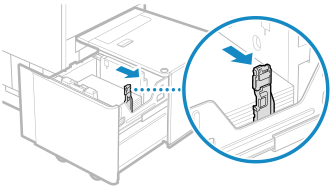
Hold the lever and slide the outer side guide plate and inner side guide plate until it does not catch on the paper to set.
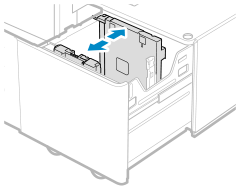
6
Load the paper with the print side face up.
Prepare a paper stack of approximately 20 mm (3/4") in height.
Load the paper stack against the left wall of the paper deck.
7
Hold the lever and slide the outer side guide plate and inner side guide plate to align them with the desired paper size.
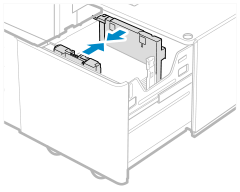
When sliding the side guide plates, make sure that the paper stack stays in contact with the left wall of the paper deck.
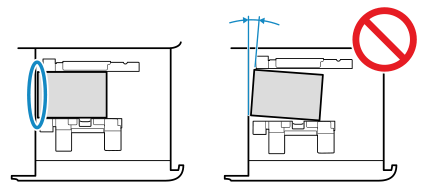
Put your hand on the paper to check whether it lies entirely flat. If the paper does not lie entirely flat, the distance between the side guide plates is too small. Readjust the position of the plate(s).
8
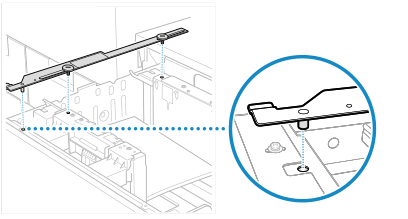
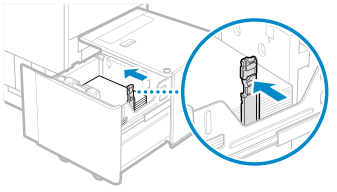
Put Side Guide Plate Fixing Bracket-A on the paper deck by inserting the positioning pin into the matching hole.
9
Position yourself to the left of the paper deck that is pulled out, and tighten the coin screw.
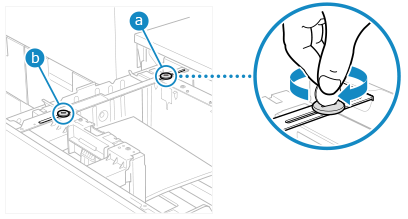
Holding one of the side guide plates to prevent it from moving, tighten the screw on the left side () first, and then that on the right side ( ). If you tighten the coin screw on the right side () first, the side guide plate may become inclined.
) first, and then that on the right side (). If you tighten the coin screw on the right side () first, the side guide plate may become inclined.If the coin screws are tightened obliquely or loosely, the printing precision will be lower.
After tightening the two coin screws, check that the paper stack is in close contact against the left wall of the paper deck.
To Achieve a Still Higher Printing Precision
Check all the following items:
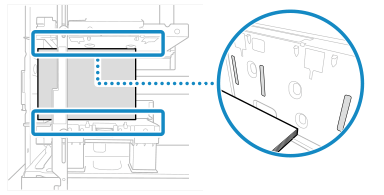
Check that the paper stack is in contact with two or more of the ridges on the left wall of the paper deck.
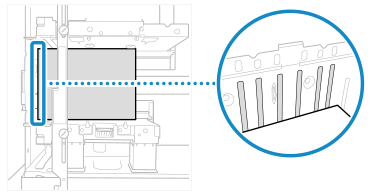
Check that the paper stack is in contact with the one or more of the ridges on the inner side guide plate and one ridge on the outer side guide plate.
Where there is a clearance between the paper stack and a ridge on the outer side guide plate (clearance () in the figure), check that it is in the range of 0.1 mm to 0.5 mm (0.01" to 0.02") (roughly corresponding to the thickness of one to five sheets of plain paper of 80 g/m² (20 lb bond)).
) in the figure), check that it is in the range of 0.1 mm to 0.5 mm (0.01" to 0.02") (roughly corresponding to the thickness of one to five sheets of plain paper of 80 g/m² (20 lb bond)).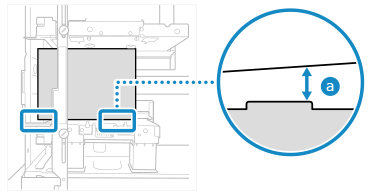
If the clearance () exceeds 0.5 mm (0.02"), close the distance between the side guide plates by loosening the coin screw on the outer side, and then retighten the screw while holding the outer side guide plate to prevent it from moving.
) exceeds 0.5 mm (0.02"), close the distance between the side guide plates by loosening the coin screw on the outer side, and then retighten the screw while holding the outer side guide plate to prevent it from moving.If the clearance () is less than 0.1 mm (0.01"), increase the distance between the side guide plates by loosening the coin screw on the outer side, and then retighten the screw while holding the outer side guide plate to prevent it from moving.
) is less than 0.1 mm (0.01"), increase the distance between the side guide plates by loosening the coin screw on the outer side, and then retighten the screw while holding the outer side guide plate to prevent it from moving.If you have readjusted the distance between the side guide plates, check whether the paper stack is now in contact with two or more of the ridges on the left wall of the paper deck.
10
Load all remaining paper with the print side face up.

When loading paper, make sure that the height of the paper stack does not exceed 20 mm (3/4"). If the height of the paper stack exceeds 20 mm (3/4"), the edges of the paper stack may become curled or creased, and poor print quality may result.
Make sure that the additionally loaded paper stack rests neatly on the previously loaded stack.
11
Hold the lever and slide the rear edge retainer to align it with the size of the paper loaded.

If the rear edge retainer is aligned but too loose or too tight, paper may become jammed, the quality of the image may be degraded, or the inside of the machine may become dirty.
12
Gently push the paper deck all the way into the machine until it clicks into place.
The internal lifter rises automatically.
Changing the Paper Size for POD Deck Lite-C
1
Register the desired paper size. Setting the Paper Size and Type for the Paper Deck and Paper Drawer
The paper size is detected automatically.
* If the detected paper size does not match the loaded paper, the paper may not be loaded correctly. Reload the paper.
2
Pull the paper deck toward you until it stops.
The internal lifter lowers automatically to the paper refill position.
Depending on the use conditions, it may take some time for the paper deck to open after pressing the button.
3
Hold the lever and slide the rear edge retainer until it does not catch on the paper to load.
4
Remove all of the loaded paper.
5
Push the paper deck all the way into the machine until it clicks into place.
The internal lifter rises automatically.
6
Pull the paper deck toward you again until it stops.
The internal lifter lowers automatically to the paper refill position.
7
Hold the lever and slide the outer side guide plate and inner side guide plate until it does not catch on the paper to set.
8
Load the paper of the desired size with the print side face up.
Prepare a paper stack of approximately 20 mm (3/4") in height.
Load the paper stack with the edge of the paper stack against the left side of the paper deck.
When Loading Tab Paper
Load it in right tab order with the tabs on the opposite side of the feeding direction.
9
Hold the lever and slide the outer side guide plate and inner side guide plate to align them with the desired paper size.
When sliding the side guide plates, make sure that the paper stack stays in contact with the left side of the paper deck.
Side guide plates that are aligned but too loose or too tight can cause misfeeds or a paper jam.
10
Hold the lever and slide the rear edge retainer to align it with the size indicator of the loaded paper.
If the rear edge retainer is aligned but too loose or too tight, paper may become jammed, the quality of the image may be degraded, or the inside of the machine may become dirty.
11
Load all remaining paper with the print side face up.
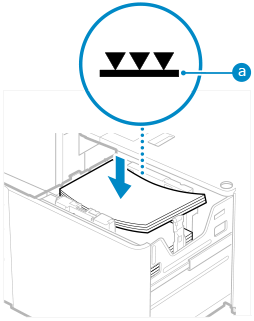
Make sure the loaded paper does not exceed the load limit line (). If it exceeds the load limit line, there may be misfeeds or a paper jam.
). If it exceeds the load limit line, there may be misfeeds or a paper jam.When loading paper, make sure that the height of the paper stack does not exceed 20 mm (3/4"). If the height of the paper stack exceeds 20 mm (3/4"), the edges of the paper stack may become curled or creased, and poor print quality may result.
Make sure that the additionally loaded paper stack rests neatly on the previously loaded stack.
12
Push the paper deck all the way into the machine until it clicks into place.
The internal lifter rises automatically.
13
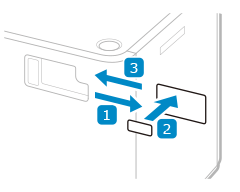
Change the paper size on the media sheet and insert it into the media plate.
1
Pull the media sheet out of the media plate.
2
Stick the paper size label to match the new paper size on the media sheet.
3
Insert the media sheet into the media plate.
IMPORTANT
Do not give a strong shock to the rear edge retainer when loading paper into the paper deck, as this may result in a malfunction or damage to the machine.
Make sure to load paper with the outer side guide plate, inner side guide plate, and rear edge retainer properly aligned with the paper size marks. If they are not aligned properly, paper may become jammed, the quality of the image may be degraded, or the inside of the machine may become dirty.
Never place paper or any other items in the empty part of the paper deck unit next to the paper stack, as this may result in a malfunction or damage to the machine.
Do not load anything other than paper in the area where you load the paper. This can result in a malfunction.
If the first output sheet cannot be output onto the output tray smoothly, we recommend that you place a blank sheet of the same or larger size than the output paper on the output tray in advance.
NOTE
If a problem occurs during printing, you may be able to solve it by turning the paper over and reloading it.