82JS-006
An Error Code (3-Digit Number with #) Is Displayed in the Report or Job Log
Check the following to find out possible causes and solutions for each error code. Select the displayed error code.
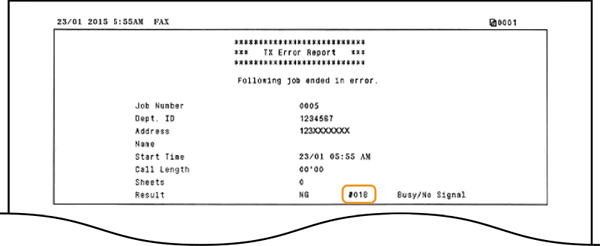
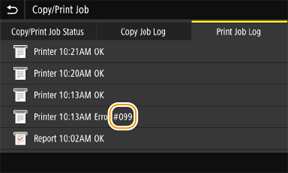
If an error occurs such as when printing is not successful or when you cannot send or receive a fax or scanned original, the corresponding error code is displayed in a report or in the job log screen as a three-digit number.
#001 to #099
#001

The original is jammed in the feeder.
Remove the jammed original. The Original Is Jammed in the Feeder
#003

The amount of data was too large to send or receive faxes.
If sending is not possible, split the original or lower the resolution and then send it.
When sending a fax, select <Resolution> in the <TX/RX Settings> tab, and then select a resolution lower than the specified resolution. Resolutions that can be set,  <200 x 100 dpi (Normal)> (setting at time of purchase) <200 x 200 dpi (Fine)> <200 x 200 dpi (Photo)> <200 x 400 dpi (Superfine)> <400 x 400 dpi (Ultrafine)> |
If receiving is not possible, ask the sender to split the original or lower the resolution and then send it.
#005

A fax could not be sent because the recipient's machine did not respond within 35 seconds.
When the recipient's machine is turned OFF or the line is busy, a fax may not be sent. Ask the recipient to check the machine status.
When sending the fax overseas, insert pauses in the fax number. Cannot Send an International Fax
#012

A fax could not be sent because the recipient's machine has run out of paper.
Ask the recipient to replenish the paper.
#018

A fax could not be sent because there was no answer from the recipient (they were calling on the phone, etc.).
When the recipient's machine is turned OFF or the line is busy, a fax may not be sent. Ask the recipient to check the machine status.
When sending the fax overseas, insert pauses in the fax number. Cannot Send an International Fax
#022

The machine is set so that faxes cannot be sent from a computer.
To send a fax from a computer, set <Allow Fax Driver TX> to <On>. Contact your administrator for details.
<Menu>  <Function Settings> <Function Settings>  <Send> <Send>  <Fax Settings> <Fax Settings>  <Allow Fax Driver TX> <Allow Fax Driver TX>  <On> <On>   |
Could not forward a fax because the specified destination was deleted from the address book.
Register the forwarding destination to the address book again. Registering Destinations to the Machine
If an error occurs and the document that could not be forwarded remains in memory, it can be resent. Deleting/Forwarding Fax Documents Saved in Memory (Memory Reception)
#037

Could not send because the memory is full.
If there are any documents that are waiting to be sent, wait until the machine processes them.
If there are received documents stored in memory, print or delete them.
Printing,  <Menu>  <Function Settings> <Function Settings>  <Receive/Forward> <Receive/Forward>  <Common Settings> <Common Settings>  <Set Fax/I-Fax Inbox> <Set Fax/I-Fax Inbox>  <Fax Memory Lock Settings> <Fax Memory Lock Settings>  Select <Off> in <Use Memory Lock> Select <Off> in <Use Memory Lock>  <Apply> <Apply>   Deleting,  <Status Monitor>  <RX Job> <RX Job>  <RX Job Status> <RX Job Status>  select the document you want to delete select the document you want to delete  <Delete> <Delete>  <Yes> <Yes> |
To send a document with a large number of pages, split the original before sending it.
When sending a fax, lower the resolution used for scanning the original.
When sending a fax, select <Resolution> in the <TX/RX Settings> tab, and then select a resolution lower than the specified resolution. Resolutions that can be set,  <200 x 100 dpi (Normal)> (setting at time of purchase) <200 x 200 dpi (Fine)> <200 x 200 dpi (Photo)> <200 x 400 dpi (Superfine)> <400 x 400 dpi (Ultrafine)> |
Could not send a PC fax because the number of destinations that can be sent to at one time was exceeded.
Deselect [Set the number of destinations that can be specified at once to 2000] in the fax driver.
Open the printer folder  Right-click the fax driver icon for the machine Right-click the fax driver icon for the machine  [Printer properties] or [Properties] [Printer properties] or [Properties]  [Device Settings] tab [Device Settings] tabHow to display the printer folder,  Windows Vista [Start]  [Control Panel] [Control Panel]  [Printer] [Printer]Windows 7/Server 2008 R2 [Start]  [Devices and Printers] [Devices and Printers]Windows 8/Server 2012 Right-click the lower-left corner of the screen  [Control Panel] [Control Panel]  [View devices and printers] [View devices and printers]Windows 8.1/Server 2012 R2 Right-click [Start]  [Control Panel] [Control Panel]  [View devices and printers] [View devices and printers]Windows 10 [  Start] Start]  [Windows System] [Windows System]  [Control Panel] [Control Panel]  [Hardware and Sound] [Hardware and Sound]  [Devices and Printers] [Devices and Printers]Windows Server 2008 [Start]  [Control Panel] [Control Panel]  double-click [Printers] double-click [Printers]Windows Server 2016 Right-click [  Start] Start]  [Control Panel] [Control Panel]  [Hardware] [Hardware]  [Devices and Printers] [Devices and Printers] |
The file size is too large to print.
Either optimize the file to reduce its size, or split the pages and print it again.
Simply try printing again. It might print correctly.
#054

A fax could not be sent because the specified destination fax number exceeded 40 digits.
Specify the destination fax number within 40 digits.
#099

An operation to cancel the job was performed.
This error code is displayed when a job is canceled, but it is not an error. Operate the machine again if necessary.
#401 to #499
#401

Tried to save a scanned original to a USB memory device, but there was insufficient space to save it.
Delete unnecessary data on the USB memory device to free up space, or connect a different USB memory device.
How to remove a USB memory device,  <Status Monitor>  <Rmv. Mem. Media> <Rmv. Mem. Media>  Wait until <The memory media can be safely removed.> is displayed Wait until <The memory media can be safely removed.> is displayed  Remove the USB memory device. Remove the USB memory device.How to insert a USB memory device,  MF746Cdw / MF745Cdw / MF743Cdw / MF741Cdw / MF656Cdw / MF654Cdw / MF653Cdw / MF652Cw / MF644Cdw / MF642Cdw / MF641Cw / MF543dw 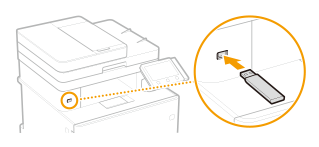 MF455dw / MF453dw / MF452dw / MF451dw / MF449dw / MF448dw / MF445dw 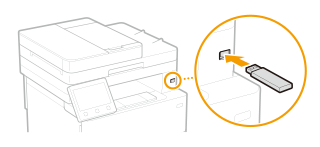 |
#406

Tried to save an original to a USB memory device, but could not because of an error.
Check that the USB memory device has not been removed, and then scan the original again.
How to remove a USB memory device,  <Status Monitor>  <Rmv. Mem. Media> <Rmv. Mem. Media>  Wait until <The memory media can be safely removed.> is displayed Wait until <The memory media can be safely removed.> is displayed  Remove the USB memory device. Remove the USB memory device.How to insert a USB memory device,  MF746Cdw / MF745Cdw / MF743Cdw / MF741Cdw / MF656Cdw / MF654Cdw / MF653Cdw / MF652Cw / MF644Cdw / MF642Cdw / MF641Cw / MF543dw  MF455dw / MF453dw / MF452dw / MF451dw / MF449dw / MF448dw / MF445dw  |
Reduce the number of pages in the original to be scanned at one time.
#408

Loading from a USB memory device failed because the USB memory device was disconnected while loading.
Check that the USB memory device has not been removed, and then load the data again.
How to remove a USB memory device,  <Status Monitor>  <Rmv. Mem. Media> <Rmv. Mem. Media>  Wait until <The memory media can be safely removed.> is displayed Wait until <The memory media can be safely removed.> is displayed  Remove the USB memory device. Remove the USB memory device.How to insert a USB memory device,  MF746Cdw / MF745Cdw / MF743Cdw / MF741Cdw / MF656Cdw / MF654Cdw / MF653Cdw / MF652Cw / MF644Cdw / MF642Cdw / MF641Cw / MF543dw  MF455dw / MF453dw / MF452dw / MF451dw / MF449dw / MF448dw / MF445dw  |
The connected USB memory device is formatted in an unsupported format.
Check that the USB memory device is formatted in a format compatible with the machine.
NOTE
The supported formats of USB memory device are FAT16 and FAT32.
#701 to #799
#701

Authentication failed because the Department ID and PIN were not entered correctly when Department ID Management is enabled.
Enter the right Department ID and PIN. If you do not know the Department ID and PIN, contact your administrator.
Tried to continue with operation without entering a Department ID although non-ID jobs are disabled.
In Administrator Mode in the Remote UI, enable unknown-ID jobs (functions that permit operations without a Department ID and PIN), and then perform the operation again. Contact your administrator for details.
Start the Remote UI and log in to System Manager Mode  [Settings/Registration] [Settings/Registration]  [User Management] [User Management]  [Department ID Management] [Department ID Management]  [Edit] [Edit]  Select [Allow Print Jobs with Unknown IDs]/[Allow Scan Jobs with Unknown IDs]/[Allow Black & White Copy Jobs] Select [Allow Print Jobs with Unknown IDs]/[Allow Scan Jobs with Unknown IDs]/[Allow Black & White Copy Jobs]  [OK] [OK]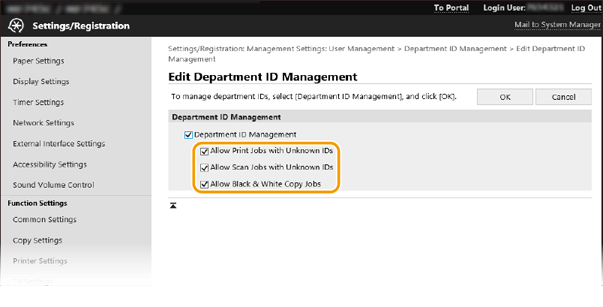 |
#703

Could not send an e-mail/I-Fax or save it a shared folder/FTP server because memory is full.
If there are other documents queued to be sent, wait for those jobs to complete, and then send again.
To send a document with a large number of pages, split the original before sending it.
Delete any documents saved in memory.
Printing,  <Menu>  <Function Settings> <Function Settings>  <Receive/Forward> <Receive/Forward>  <Common Settings> <Common Settings>  <Set Fax/I-Fax Inbox> <Set Fax/I-Fax Inbox>  <Fax Memory Lock Settings> <Fax Memory Lock Settings>  Select <Off> in <Use Memory Lock> Select <Off> in <Use Memory Lock>  <Apply> <Apply>   Deleting,  <Status Monitor>  <RX Job> <RX Job>  <RX Job Status> <RX Job Status>  select the document you want to delete select the document you want to delete  <Delete> <Delete>  <Yes> <Yes> |
Turn off the machine, and then turn on the machine after 10 seconds.
#751

The FTP server is not running or the network is disconnected. (In some instances, connection to the destination is not possible or may be disrupted.)
Check the destination.
Check the network status.
Checking IPv4 settings,  <Status Monitor>  <Network Information> <Network Information>  <IPv4> <IPv4>  Select the setting to view Select the setting to view  Check the settings. Check the settings.Checking IPv6 settings,  <Status Monitor>  <Network Information> <Network Information>  <IPv6> <IPv6>  Select the setting to view Select the setting to view  Check the settings. Check the settings.Checking a wired LAN's MAC address,  <Menu>  <Preferences> <Preferences>  <Network> <Network>  <Ethernet Driver Settings> <Ethernet Driver Settings>Checking a wireless LAN's MAC address and setting information,  MF746Cdw / MF745Cdw / MF743Cdw / MF741Cdw / MF644Cdw / MF642Cdw / MF641Cw / MF543dw / MF449dw / MF448dw / MF445dw <Menu>  <Preferences> <Preferences>  <Network> <Network>  <Wireless LAN Settings> <Wireless LAN Settings>  Check the message Check the message  <OK> <OK>  <Connection Information> <Connection Information>  Select the setting to view. Select the setting to view.MF656Cdw / MF654Cdw / MF653Cdw / MF652Cw / MF455dw / MF453dw / MF452dw / MF451dw <Wireless LAN Settings>  Check the message Check the message  <Yes> <Yes>  <Connection Set.> <Connection Set.>  <Connection Information> <Connection Information>  Check the settings. Check the settings. |
The IP address is not set correctly.
Set the IP address correctly. Setting an IP Address on the Machine Manually
#752

Could not send or receive e-mail or I-Faxes because the SMTP/POP3 server was not set correctly.
Check the SMTP/POP3 server name and change it to the correct setting.
Start the Remote UI and log in to System Manager Mode  [Settings/Registration] [Settings/Registration]  [E-Mail/I-Fax Settings] [E-Mail/I-Fax Settings]  [Edit] [Edit]  Check the [SMTP Server] and [POP Server] settings Check the [SMTP Server] and [POP Server] settings  [OK] [OK]  Turn off the machine, and then turn on the machine after 10 seconds. Turn off the machine, and then turn on the machine after 10 seconds. |
Could not send or receive e-mail or I-Faxes because the domain name setting is incorrect.
Check the domain name and change it to the correct setting.
Start the Remote UI and log in to System Manager Mode  [Settings/Registration] [Settings/Registration]  [Network Settings] [Network Settings]  Select [IPv4 Settings] or [IPv6 Settings] Select [IPv4 Settings] or [IPv6 Settings]  [Edit] [Edit]  Correct the domain name Correct the domain name  [OK] [OK]  Turn off the machine, and then turn on the machine after 10 seconds. Turn off the machine, and then turn on the machine after 10 seconds. |
Could not send or receive e-mail or I-Faxes because the machine is not properly connected to the network.
Check that the machine can connect to the network.
#753

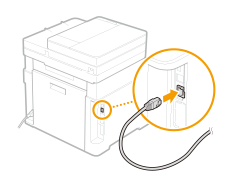
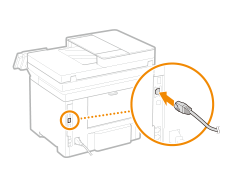
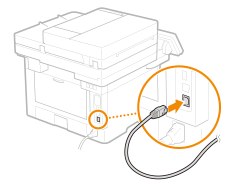
Could not send e-mail or send/receive I-Faxes, or save to a shared folder/FTP server because the LAN cable is disconnected.
Check that the LAN cable is connected properly.
MF746Cdw / MF745Cdw / MF743Cdw / MF741Cdw / MF656Cdw / MF654Cdw / MF653Cdw / MF652Cw / MF644Cdw / MF642Cdw / MF641Cw
MF543dw
MF455dw / MF453dw / MF452dw / MF451dw / MF449dw / MF448dw / MF445dw
#755

Could not send e-mail/I-Faxes or save to a shared folder/FTP server because TCP/IP is not functioning properly.
Check the <TCP/IP Settings> setting and set it correctly.
Checking the TCP/IP setting,  <Menu>  <Output Report> <Output Report>  <Print List> <Print List>  <System Manager Data List> <System Manager Data List>  Check that the size and type of paper displayed on the screen is loaded in the machine, and select <Start> Check that the size and type of paper displayed on the screen is loaded in the machine, and select <Start>   Correcting the TCP/IP setting,  <Menu>  <Preferences> <Preferences>  <Network> <Network>  <TCP/IP Settings> <TCP/IP Settings>  Select items that need to be corrected, and correct them Select items that need to be corrected, and correct them  If necessary, turn off the machine, and then turn on the machine after 10 seconds. If necessary, turn off the machine, and then turn on the machine after 10 seconds. |
An IP address is not set.
Set the IP address correctly. Setting an IP Address on the Machine Manually
Communication is not possible immediately after startup because a standby time for starting communication is set.
Communication is not possible immediately after the machine is turned on. Wait until the time set in <Wait Time for Conn. at Startup> has elapsed and send again.
<Menu>  <Preferences> <Preferences>  <Network> <Network>  <Wait Time for Conn. at Startup> <Wait Time for Conn. at Startup>  Check the standby time until communication with the network starts. Check the standby time until communication with the network starts. |
#766

The certificate has expired.
Renew the certificate. Or, use a certificate that has not expired.
Set <Current Date/Time Settings> correctly.
<Menu>  <Preferences> <Preferences>  <Timer/Energy Settings> <Timer/Energy Settings>  <Current Date/Time Settings> <Current Date/Time Settings>  Enter the date and time Enter the date and time  <Apply> <Apply> |
#801 to #899
#801

A time-out error occurred with the SMTP server when sending an e-mail/I-Fax.
Make sure that the SMTP server is operating properly on the network.
Check that the machine can connect to the network.
The SMTP server returned an error.
Make sure that the SMTP server is configured correctly.
The destination is not set correctly.
Check the destination setting.
Tried to send a scanned document to a shared folder, but could not because of a folder error.
Make sure that both the shared folder and the computer with the shared folder are operating properly.
The folder name or password used for saving to a shared folder is incorrect.
Check the destination settings.
#802

The SMTP/POP3/FTP server name setting is not correct.
Set the SMTP/POP3 server name correctly.
Start the Remote UI and log in to System Manager Mode  [Settings/Registration] [Settings/Registration]  [TX Settings] [TX Settings]  [E-Mail/I-Fax Settings] [E-Mail/I-Fax Settings]  [Edit] [Edit]  Check the [SMTP Server] and [POP Server] settings Check the [SMTP Server] and [POP Server] settings  [OK] [OK]  Turn off the machine, and then turn on the machine after 10 seconds. Turn off the machine, and then turn on the machine after 10 seconds. |
Set a correct FTP server name for the destination.
Start the Remote UI and log in to System Manager Mode  [Address Book] [Address Book]  Select [Coded Dial] or [Favorites] Select [Coded Dial] or [Favorites]  Select the destination to check Select the destination to check  [Edit] [Edit]  Correct the name if necessary Correct the name if necessary  [OK] [OK] |
#804

You do not have access privileges to the shared folder/FTP server.
Assign the sending user (the user name registered in the destination address) write permission to the destination folder. Contact your network administrator for details.
The folder name used for saving to the shared folder/FTP server is not correct.
Check the destination settings.
#806

The user name or password used for saving to the shared folder/FTP server was not correct.
Register the same user name and password in the address book as registered for the shared folder or FTP server.
The e-mail address used for sending an e-mail/I-Fax is not correct.
Specify the right e-mail address and send again. If you use a recipient in the address book, check that the e-mail address is correct. Registering Destinations to the Machine
#808

An error or timeout occurred on the FTP server.
Check the FTP server settings.
#809

Could not overwrite a file with the same name on the FTP server/SMB server.
Delete the file on the FTP server/SMB server, and then send the file again.
#810

The POP3 server returned an error when sending an e-mail or sending/receiving an I-Fax.
Check that the POP3 server address is set correctly.
Check that the mail server or network is operating properly. Contact your network administrator for details.
#813

The login name or password used for the POP3 server is not correct.
Enter the correct login or password for the POP3 server.
#816

The maximum number of printed pages set for the department has been reached.
To reset the printed pages count, click [Clear Count] on the [Department ID Management] page in the Remote UI.
Start the Remote UI and log in to System Manager Mode  [Settings/Registration] [Settings/Registration]  [User Management] [User Management]  [Department ID Management] [Department ID Management]  Click [Clear Count] for [Department ID Page Total] Click [Clear Count] for [Department ID Page Total]  [OK] [OK] |
#818

The received data is in a file format that cannot be printed.
Ask the sender to change the file format and send it again.
#819

Received data that cannot be handled (MIME information is invalid).
Ask the sender to check the settings and send it again.
#820

Received data that cannot be handled (BASE64 or uuencode is invalid).
Ask the sender to check the settings and send it again.
#821

Data that cannot be handled was received (TIFF analysis error occurred).
Ask the sender to check the settings and send it again.
#822

Tried to print a file on a USB memory device, but it is in an unsupported format.
Check supported file formats, and then save the file again.
NOTE
File formats that can be printed from a USB memory device
JPEG (DCF/Exif 2.21 or earlier/JFIF)
TIFF (JPEG/MH/MR/MMR compression)
PDF
#827

Received data that cannot be handled (unsupported MIME information).
Ask the sender to check the settings and send it again.
#829

Data exceeding the maximum receivable size was received.
When receiving faxes, data from page 1000 onward is deleted, and up to page 999 is printed or received in memory. Ask the sender to send again from the 1,000th page onward.
When receiving I-Faxes, receiving is not possible if the size of the e-mail exceeds 24 MB. Ask the sender to reduce the e-mail to 24 MB or less and send it again.
#839

The user name and password used for SMTP authentication are not correct.
Set the correct user name and password.
Start the Remote UI and log in to System Manager Mode  [Settings/Registration] [Settings/Registration]  [TX Settings] [TX Settings]  [E-Mail/I-Fax Settings] [E-Mail/I-Fax Settings]  [Edit] [Edit]  Correct the user name and password if necessary Correct the user name and password if necessary  [OK] [OK]  Turn off the machine, and then turn on the machine after 10 seconds. Turn off the machine, and then turn on the machine after 10 seconds. |
#841

There is no common encryption algorithm with the mail server for sending e-mail/I-Faxes.
Deselect [Use TLS for SMTP]/[Use TLS for POP].
Start the Remote UI and log in to System Manager Mode  [Settings/Registration] [Settings/Registration]  [TX Settings] [TX Settings]  [E-Mail/I-Fax Settings] [E-Mail/I-Fax Settings]  [Edit] [Edit]  Deselect [Use TLS for SMTP] and [Use TLS for POP] Deselect [Use TLS for SMTP] and [Use TLS for POP]  [OK] [OK]  Turn off the machine, and then turn on the machine after 10 seconds. Turn off the machine, and then turn on the machine after 10 seconds. |
Add a common encryption algorithm to your mail server settings.
A TLS-server certificate validation error occurred while communicating with the SMTP server.
Use the Remote UI to verify that the CA certificate signed with the TLS server certificate on the SMTP server is registered on the machine.
Check that the TLS server certificate on the SMTP server is correct.
Check that the TLS server certificate is not a self-signed certificate.
#844

TLS-encrypted communication with the POP3 server failed when sending with POP before SMTP.
Check the TLS-encrypted communication settings of the POP3 server.
Deselect [Use TLS for POP]. If the problem persists, deselect [Use POP Authentication Before Sending] and change the communication setting to a setting other than POP before SMTP.
Start the Remote UI and log in to System Manager Mode  [Settings/Registration] [Settings/Registration]  [TX Settings] [TX Settings]  [E-Mail/I-Fax Settings] [E-Mail/I-Fax Settings]  [Edit] [Edit]  Deselect [Use TLS for POP] (if the problem persists, also deselect [Use POP Authentication Before Sending]) Deselect [Use TLS for POP] (if the problem persists, also deselect [Use POP Authentication Before Sending])  [OK] [OK]  Turn off the machine, and then turn on the machine after 10 seconds. Turn off the machine, and then turn on the machine after 10 seconds. |
A TLS-server certificate validation error occurred while communicating with the POP3 server.
Use the Remote UI to verify that the CA certificate signed with the TLS server certificate on the POP3 server is registered on the machine.
Check that the TLS server certificate on the POP3 server is correct.
Check that the TLS server certificate is not a self-signed certificate.
#846

Could not send an e-mail or I-Fax because POP authentication failed.
Check the settings and try again.
Start the Remote UI and log in to System Manager Mode  [Settings/Registration] [Settings/Registration]  [TX Settings] [TX Settings]  [E-Mail/I-Fax Settings] [E-Mail/I-Fax Settings]  [Edit] [Edit]  Correct the settings if necessary Correct the settings if necessary  [OK] [OK]  Turn off the machine, and then turn on the machine after 10 seconds. Turn off the machine, and then turn on the machine after 10 seconds. |
#852

The power was turned off for some reason during use.
Check that the power plug is firmly inserted into the outlet.
#853

The machine could not print because the amount of data it can process was exceeded.
This error occurs when trying to print a large number of pages of a document. Either reduce the number of pages to be printed at one time, or print when there are no documents waiting to be printed or that are printing. If you still cannot print, check the document data for any issues.
Printing was canceled from the computer.
This error code is displayed if you cancel the operation while the print data is being sent from the computer to the machine, but it is not an error. Print again if necessary.
Secured documents that were left unattended without printing were deleted.
Secured documents are deleted from memory unless they are printed within a certain period of time (30 minutes by settings at time of purchase). Send the secures document again and print it within the time.
To change the period of time a secured document is saved,  <Menu>  <Function Settings> <Function Settings>  <Secure Print> <Secure Print>  <Secure Print Deletion Time> <Secure Print Deletion Time>  Specify how long the machine holds secured documents Specify how long the machine holds secured documents  <Apply> <Apply>  <Apply> <Apply>  Turn off the machine, and then turn on the machine after 10 seconds. Turn off the machine, and then turn on the machine after 10 seconds. |
Tried to print a secured document when secure printing was prohibited.
When <Secure Print> is set to <Off>, secure printing is not available. Set this to <On>, and then perform printing again.
<Menu>  <Function Settings> <Function Settings>  <Secure Print> <Secure Print>  <Use Secure Print> <Use Secure Print>  <On> <On>  <Apply> <Apply>  Turn off the machine, and then turn on the machine after 10 seconds. Turn off the machine, and then turn on the machine after 10 seconds. |
Print without using Secure Print.
Data is corrupted, or tried to print data that is not supported.
Check the data and print again.
Could not print a password-protected PDF file.
Enter the correct password for the PDF file.
<Memory Media Print>  Select the file to print Select the file to print  <Set PDF Details> <Set PDF Details>  <Password to Open Document> <Password to Open Document>  Enter the password Enter the password  <Apply> <Apply>    <Start> <Start> |
#861

Could not print because a printer driver not intended for the machine was used.
Use the printer driver for this machine and print again.
Could not print because the document data is defective.
Check that the document data is not defective.
#863

An error occurred while printing from a computer.
Turn off the machine, and then turn on the machine after 10 seconds. After the restart is complete, try printing again.
#901 to #999
#934

A job was deleted by the automatic deletion function for interrupted jobs.
Correct the error that caused the job to stop, and then perform copying or printing again.
#995

Sending/receiving of a waiting document was stopped.
Send or receive again if necessary.